Section 6.5 Sniffing
As you study this section, answer the following questions:
- What is network sniffing?
- Which tools can be used for network sniffing?
- How can switched networks be exploited through sniffing methods?
- What are some countermeasures to network sniffing?
In this section, you will learn to:
- Sniff network traffic with Wireshark
- Sniff network traffic with TShark
- Capture traffic with TCPDump
- Use SMAC to spoof MAC addresses
- Analyze ARP poisoning with Wireshark
- Analyze DNS spoofing
- Filter and analyze traffic with Wireshark
The key terms for this section include:
Key Terms and Definitions
| Term | Definition |
|---|---|
| Sniffing | The process of collecting information as it crosses a network. |
| Passive sniffing | A type of sniffing where an attacker captures and views data packets distributed through hubs without altering traffic. |
| Active sniffing | A type of sniffing where an attacker captures and views data packets from a switched-based network and alters traffic. |
| Switched network nisffing | The use of switches limits the ability of an attacker to sniff the entire network. Attackers often use methods like MAC spoofing, MAC flooding, ARP poisoning, and port mirroring to sniff portions of the network. |
| Wireshark | One of the most well-known packet analyzers. It is an open-source graphical packet capture utility with installer packages for most operating systems. |
| TCPDump | A command line packet capture utility for Linux. A version of the program called windump is available for Windows. |
| MAC spoofing | A method where the MAC address of a network interface card (NIC) is spoofed as the target's MAC address to gain unauthorized access to the network through the switch. |
| MAC flooding | A method of attack intended to overflow the memory of a network switch forcing the switch into open-fail mode, allowing an attacker to easily intercept the data. |
| ARP poisoning | An exploit where an attacker uses ARP to translate IP addresses into MAC addresses and intercept communication between devices. |
| Port mirroring | A method of monitoring network traffic by creating a duplicate of all network traffic on a port and sending it to another device. |
This section helps you prepare for the following certification exam objectives:
| Exam | Objective |
|---|---|
| CompTIA CySA+ CS0-003 | 1.2 Given a scenario, analyze indicators of potentially malicious activity
1.3 Given a scenario, use appropriate tools or techniques to determine malicious activity
2.2 Given a scenario, analyze output from vulnerability assessment tools
|
| TestOut CyberDefense Pro | 1.1 Monitor networks
4.3 Analyze indicators of compromise
|
6.5.1 Sniffing
Click one of the buttons to take you to that part of the video.
Sniffing 00:00-00:41 Attackers are creative and find many ways to obtain the information they seek. A method called sniffing is often used,
which refers to capturing data packets as they travel over a network. In this video, I'll go over some sniffing types and methods.
Did you ever put a glass against the door to eavesdrop on the conversation in the next room? Did you ever pick up another phone in the house to listen in on a conversation? If so, you're familiar with the idea of sniffing, or what's sometimes call wiretapping.
Attackers want to hear what's happening on your network. They're looking for information that's valuable to them, like passwords, personal information, or financial data.
Vulnerable Protocols 00:41-01:33 Surprisingly, some network traffic isn't very secure, making it easy prey for sniffers. For example, Simple Mail Transfer Protocol, or SMTP, was designed to deliver email messages with the expectation that security measures were implemented at another layer. Post Office Protocol version 3, or POP3, was designed to retrieve email, making the included usernames and passwords easy to intercept. File Transfer Protocol, or FTP, was designed to transmit files in cleartext. Other vulnerable protocols include IMAP, HTTP, and Telnet.
With each of these, the passwords and data are sent in cleartext with the same expectation that encryption and security be added in a different layer. Attackers use sniffing tools like Wireshark and Snort to monitor network traffic and learn more about the contents. These tools can sniff the network passively or actively.
Sniffing Methods 01:33-02:13 With passive sniffing, the attacker only views the data traversing the network. He or she makes no changes to any of the packets and no additional packets are injected. We see this sniffing method in environments where hubs are used. A hub sends all traffic to all ports, making it easy for a sniffer to capture all the data. Luckily, hubs are very seldom used nowadays.
With active sniffing, the attacker not only captures the data packets but also injects new packets into the network. These are often ARP packets. We see this sniffing method in switched networks. The goal is to trick the switch into forwarding all packets, making it possible for the attacker to capture data between switches.
How Sniffers Work 02:13-02:46 By default, a system's network card has a unique media access control address, or MAC address. That MAC address is used when someone needs to send a packet to another system. As the system listens to the data going across the network, it only processes packets that contain its MAC address in the destination field. To sniff packets destined for any system, an attacker switches the network interface card, or NIC, in their system to what's known as promiscuous mode. Now, they can capture all packets traversing the wire and use them as needed.
Switched Network Sniffing 02:46-03:10 In a switched network, attackers can't easily sniff the entire network since switches are designed to keep all traffic destined for a particular network on that network. To get around this, attackers use different methods to sniff out portions of the network. There are four common attack methods to be familiar with: MAC spoofing, MAC flooding, ARP poisoning, and port mirroring. Let's take a look at each.
MAC Spoofing 03:10-03:37 First, let's talk about MAC spoofing. Port security is a common low-level security measure. It allows only specific MAC addresses to access a switch. The goal is to ensure that only authorized devices have access to the network. A MAC address for an NIC is assigned by the manufacturer, and this address is hard-coded directly into the NIC and can't be changed. But it's possible to change the interface driver's MAC address.
MAC Spoofing 03:37-04:15 For example, imagine that you've implemented port security measures to ensure that only computers with the correct MAC address are processed on your network. But unfortunately, an attacker has previously found John's MAC address, which is connected to the same network. The attacker can now use a software tool, such as the SMAC MAC Address Changer, which lets him or her spoof their computer's MAC address to look like John's MAC address. Before John logs on for the day, the attacker can connect directly to the network with minimal effort.
The attacker has basically created a false identification and walked right into your party with someone else's invitation.
MAC Flooding 04:15-05:21 Next, we'll talk about MAC flooding. When a switch is initially turned on, it doesn't know which devices it's going to support.
A switch tracks MAC addresses in a content addressable memory table, or CAM table for short. As a switch receives packets from various MAC addresses, it adds the addresses to its CAM table and associates each one with a physical port. This process allows data to be sent directly to the port where the intended recipient is located instead of sending all data across the entire network, like a hub.
Although one port can have multiple MAC addresses associated with it, the CAM table can only hold so much. A hacker can use a MAC flooding attack to intentionally flood the CAM table with Ethernet frames that each originate from a different MAC address. When the table overflows, the switch reacts by broadcasting all incoming data to all ports, as if the switch transformed into a hub. Since the hacker's MAC address is connected to one of the ports, he or she can capture all traffic as it's broadcast across the network.
ARP Poisoning 05:21-06:54 ARP poisoning, or ARP spoofing, is another type of attack to be aware of. You might recall that the Address Resolution Protocol, or ARP, maps IP addresses to MAC addresses and provides the most efficient path for data transmission. As such, ARP broadcasts are permitted to freely roam the network. An attacker can take advantage of this free flow of traffic by sending spoofed ARP messages onto the
network in an attempt to associate their MAC address with another host's IP address, like the default gateway. The target machine ends up thinking that the attacker's computer is the gateway and sends frames to that system before they're forwarded to the intended destination.
For example, suppose the target machine has an IP address of .2 with a MAC address of B. The attacker knows the target machine's default gateway has an IP address of .1 with a MAC address of A. Currently, all incoming and outgoing traffic is routed through the gateway computer. Even though the attacker jumped into the network with an IP address of .3 and a MAC address of C, he or she sends spoofed information to the victim stating that their IP address is .1 with a MAC address of C. They also send spoofed information to the switch saying that they're actually .2 with a MAC address of C. Now, all traffic headed to and from the target machine is routed through the attacker's system. Since ARP caches are flushed every two to five minutes, the attacker has to continue poisoning the cache repeatedly. It's nearly impossible to detect if they do this each time before the flush.
Port Mirroring 06:54-07:27 The fourth method, port mirroring, is more challenging for attackers but possible depending on the access level gained in the network. The concept behind port mirroring, also known as SPAN port, is simple. Port mirroring creates a duplicate of all network traffic on a port and sends the traffic to another device.
For example, if all traffic from a target machine is directed to the server through a switch, port mirroring can be implemented. Any time data comes through the target machine, the data is duplicated and sent out to the attacker's machine as well.
Summary 07:27-07:48 That's it for this lesson. In this lesson, we discussed active and passive sniffing. We also discussed the four methods of sniffing on switched networks: MAC spoofing, MAC flooding, ARP poisoning, and port mirroring. Being aware of these sniffing methods will help you better protect your network.
6.5.2 Sniffer Facts
This lesson covers the following topics:
- Sniffing
- Switched network sniffing
- Wireshark
- TCPDump
- Additional sniffing tools
Sniffing
Sniffing is the process of collecting information as it crosses a network. The following table shows the two types of sniffing:
| Type | Description |
|---|---|
| Passive sniffing | An attacker using passive sniffing:
|
| Active sniffing | An attacker using active sniffing:
|
Switched Network Sniffing
The use of switches limits the ability of an attacker to sniff the entire network. The following table lists methods attackers often use to sniff portions of the network.
| Method | Description |
|---|---|
| Media access control (MAC) spoofing | The MAC address of a network interface card (NIC) is a unique identification number hard-coded directly into the NIC by the manufacturer. It cannot be altered. When port security is implemented on a switch, only packets with specific MAC addresses are allowed access. This prevents unauthorized access to the network through the switch. Be aware that:
|
| MAC flooding | A network switch contains a content addressable memory (CAM) table. Each incoming MAC address is associated with a physical port in the network when functioning normally. MAC flooding is a method of attack intended to overflow the memory of a network switch forcing the switch into open-fail mode. Key facts are:
|
| Address Resolution Protocol (ARP) poisoning | ARP is used to translate IP addresses into MAC addresses. ARP can be exploited by an attacker using ARP poisoning, also referred to as an ARP spoofing attack. In an ARP poisoning attack, the attacker:
The devices then send all communication between the two to the attacker's computer. A successful ARP poisoning attack allows the hacker to:
|
| Port mirroring | Port mirroring is a method of monitoring network traffic by creating a duplicate of all network traffic on a port and sending it to another device. Port mirroring can be used by an attacker, or it can be used by a security analyst to monitor traffic to find attacks. |
Wireshark
Wireshark ( wireshark.org ) is one of the most well-known packet analyzers. It is an open-source graphical packet capture utility with installer packages for most operating systems, such as Windows, Mac, and Linux. Having chosen the interfaces to listen on, the output is displayed in a three-pane view, with the top pane showing each frame, the bottom-left pane showing the fields from the currently selected frame, and the bottom-right pane showing the raw data from the frame in hex and ASCII. Wireshark is capable of parsing (interpreting) the headers and payloads of hundreds of network protocols.
Another useful option is to use the Follow TCP Stream context command to reconstruct the packet contents for a TCP session.
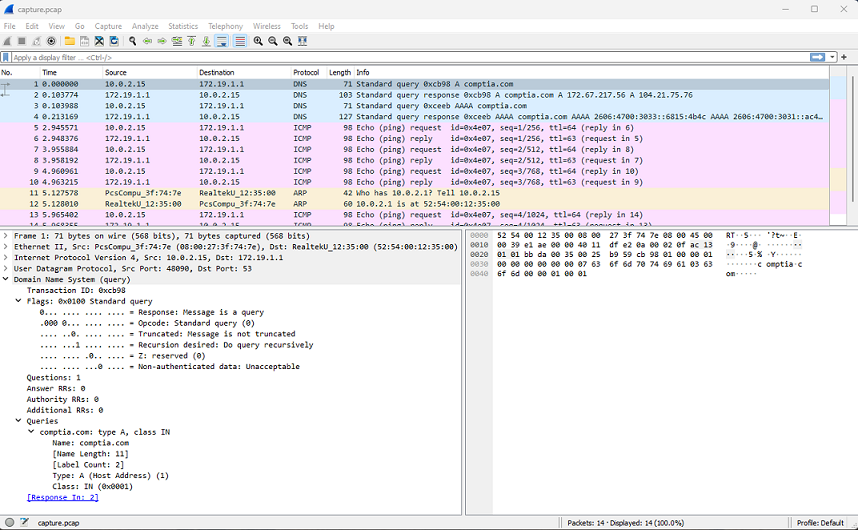
The Wireshark protocol analyzer in action shows the details of a DNS query. (Screenshot: Wireshark wireshark.org .)
The program also has a command line version called tshark ( wireshark.org/docs/man-pages/tshark.html ).
You can apply a capture filter or filter the output using the same expression syntax as tcpdump (though the expression can also be built via the GUI tools). You can save the output to a .pcap file or load a file for analysis. Wireshark supports very powerful display filters ( wiki.wireshark.org/DisplayFilters ) that can be applied to a live capture or a capture file. You can also adjust the coloring rules ( wiki.wireshark.org/ColoringRules ), which control the row shading and font color for each frame.
Wireshark includes search and filtering capabilities that make it a valuable resource. The following table lists the filters you are most likely to use:
| Operator | Description |
|---|---|
| == | Equal (example: ip.addr == 192.168.1.3) |
| eq | Equal (example: tcp.port eq 161) |
| contains | Contains a specific value (example: http contains “http://www.stuff.com”) |
| ne | Not equal (example: ip.src ne 192.168.1.3) |
| != | Not equal (example: ip.addr != 192.168.1.3) |
| && | And (example ip.addr==192.168.1.3&&tcp.port;=23) |
| or | Or (example ip.addr==192.168.1.3 or ip.addr ==192.168.1.4) |
TCPDump
tcpdump is a command line packet capture utility for Linux, though a version of the program called windump is available for Windows ( winpcap.org/windump ). The basic syntax of the command is tcpdump -i eth , where eth represents the interface to listen on. The utility can display captured packets to the console and write capture data to pcap format files using the -w switch, for example, tcpdump -i eth0 -w capture.pcap. The capture .pcap file can then be used in various analysis software such as Wireshark, NetworkMiner ( netresec.com ), NetWitness Investigator ( netwitness.com ), and many others. The tcpdump tool is an excellent utility and well suited to scripting scenarios and hosts with no graphical user interface.
The PCAP file format has some limitations, which has led to the development of PCAP Next Generation (PCAPNG). Wireshark now uses PCAPNG by default, and tcpdump can also process files in the new format ( cloudshark.io/articles/5-reasons-to-move-to-pcapng ).
Here is a sample of a tcpdump output:
tcpdump: verbose output suppressed, use -v or -vv for full protocol decode
listening on eth1 link-type EN10MB (Ethernet), capture size 262144 bytes
10:14:29.232642 IP 10.1.0.102.1647 > 10.1.0.1.80: Flags [P.], seq 1:456, ack 1, win 1024, length 455: HTTP: GET /iisstart.png HTTP/1.1
10:14:29.244646 IP 10.1.0.1.80 > 10.1.0.102.1647: Flags [P.], seq 1:144, ack 456, win 1026, length 143: HTTP: HTTP/1.1 304 Not Modified
10:14:29.256307 IP 10.1.0.102.1647 > 10.1.0.1.80: Flags [.], ack 144, win 1023, length 0
10:14:31.042164 ARP, Reply 10.1.0.2 is-at 00:15:5d:01:ca:4a, length 28
10:14:31.042208 ARP, Reply 10.1.0.1 is-at 00:15:5d:01:ca:4a, length 28
10:14:31.052270 ARP, Reply 10.1.0.101 is-at 00:15:5d:01:ca:4a, length 28
10:14:33.127695 ARP, Request who-has 10.1.0.246 (00:15:5d:01:ca:6f) tell 10.1.0.1, length 28
10:14:33.127762 ARP, Reply 10.1.0.246 is-at 00:15:5d:01:ca:6f, length 28
The following table utilizes the information from the third line to explain the different types of information provided:
| Content | Description |
|---|---|
| 10:14:29.232642 | Timestamp : By default, tcpdump uses the host's kernel time and adjusts to GMT/UTC in the format hh:mm:ss.us (us=microseconds). This depends on the host being synchronized to the correct time and having the correct time zone applied. You can use tcpdump's options to modify timestamp settings. |
| IP | Network Protocol : The network protocol will typically be IP/ IPv6 or ARP. You may also see IPSec (AH or ESP) and routing/VPN protocols, such as GRE or OSPF. |
| 10.1.0.102.1647 | Source IP and Port : The port is the value following the period. |
| 10.1.0.1.80: | Destination IP and Port : The port is the value following the period. |
| Flags [P.], seq 1:456, ack 1, win 1024, length 455: | TCP Flags and Sequence Info : The level of detail is adjusted using the -v, -vv, and -vvv flags. You can use the -e option to print link-level information. |
| HTTP: GET /iisstart.png HTTP/1.1 | Summary Application Protocol Data (HTTP) : The level of detail is adjusted using the -v, -vv, and -vvv flags. You can use the -e option to print link-level information. |
The operation of the basic command can be modified by switches. Some of the most important of these are the following:
| Switch | Description |
|---|---|
| -i | Put an interface into listening mode. |
| -n | Show addresses in numeric format (does not resolve hostnames). |
| -nn | Show address and ports in numeric format. |
| -e | Include the data link (Ethernet) header. |
| -v,-vv,-vvv | Increase the verbosity of output to show more IP header fields, such as TTL. |
| -a | Request that ASCII strings are included in the output. |
| -X | Capture the packet payload in hex and ASCII. Use -XX to also include the data link header. |
| -s Bytes | By default, tcpdump captures the first 96 bytes of the data payload. To capture the full payload, set the snap length to zero with -s 0. |
| -w File | Write the output to a file. Packet capture files are normally identified with a .pcap extension. |
| -r File | Display the contents of a packet capture file. |
There are numerous filter options, which can be combined using logical and (&&), or (||), not (!), and groups (parentheses). Some basic filter keywords include the following:
| Switch | Description |
|---|---|
| host | Capture source and destination traffic from the specified IP or hostname. |
| src / dst | Capture only source or destination traffic from the specified IP. |
| net | Capture traffic from the specified subnet (use CIDR notation). |
| pcap | Request that captured content is saved to a specified file. |
| port | Filter to the specified port (or range of ports, such as 21-1024). You can also use src port or dst port. |
| proto | Filter to a protocol, such as ip, ip6, arp, tcp, udp, or icmp. |
Refer to tcpdump.org for full help and usage examples.
Additional Sniffing Tools
The following tools can also be used with sniffing:
| Tool | Description |
|---|---|
| Cain and Abel | A collection of tools including ARP poisoning. Cain and Abel redirect packets from a target by forging ARP replies. |
| Ufasoft Snif | A network sniffer used to capture, decrypt, and analyze packets as they travel across the network. |
| WinARPAttacker | A tool that can scan, detect, and even attack computers on a LAN. |
| Ettercap | A sniffing tool with multiple functions and can be used for ARP poisoning, passive sniffing, packet grabbing, and protocol decoding. |
| Etherflood | A tool that can flood a switched network with random MAC addresses. |
| SMAC | A spoofing tool that allows an attacker to spoof a MAC address to any value. |
| WinDump | The Windows version of TCPDump. |
6.5.3 Sniff Network Traffic with Wireshark
Click one of the buttons to take you to that part of the video.
Sniffing Network Traffic with Wireshark 00:00-00:43 Wireshark is a network packet analyzer that tries to capture network packets and display the data they carry in as much detail as possible.
Network professionals use Wireshark to troubleshoot network problems, examine security problems, verify network devices, debug network issues, and more. Wireshark can be installed on Windows, Linux, and other operating systems. It's not a firewall or intrusion detection system, and it doesn't keep bad things from happening. But it does a great job of monitoring and measuring activity on a network.
We're going to take a very brief look at Wireshark. There are entire courses on Wireshark, and as you progress professionally, you'll want to learn more about the program.
Wireshark Interface 00:43-02:27 Let's start with Wireshark's user interface. Throughout this course, we'll use Wireshark on Linux and Windows. I'm on Kali Linux. We're going to use Wireshark from there. Like most programs, Wireshark has a menu at the top. The File menu is similar to other programs, as you can see when we click on it. The same is true for the other menu items across the top.
The main toolbar gives you quick access to the most common Wireshark tasks. The two most common items here are the shark fin, or Start, which starts capturing packets, and this square, which turns red when Wireshark is capturing.
Below that, there's the Filter toolbar. We'll come back to this in a few minutes.
Down here, there's the Packet List pane. This is where all the captured packets are displayed. It only takes a few minutes to see hundreds or thousands of packets, depending on your network traffic. Each line here is a packet that Wireshark has captured, and it's separated in columns up here. You can separate packets by source or destination IP addresses or categorize them in other ways. Whichever one is selected up here will display more detailed information down in the Packet Detail pane.
The Packet Detail pane shows all the details about the selected packet. I can come down here, expand the different areas, and see more details. For those of you who love the OSI model, you'll be very happy to hear that this is listed in the OSI order.
Farther down, we have the Packet Bytes pane. This is a hexadecimal dump of the selected packets. Sometimes, you can see readable information over here, in ASCII. If the bytes aren't readable, this information is replaced with periods.
And finally, at the bottom, we have the status bar.
A lot of the Wireshark interface can be customized, but this is what it looks like with the default settings.
Display Filters 02:27-04:46 Okay. Let's go back to display filters. When you do some sniffing with Wireshark, you're going to be overwhelmed with all of the packets it will capture. We can filter the ones that aren't needed. I already ran a scan earlier, and my traffic is here.
One way to filter is to use the Expression Builder. For example, let's say I want to filter dhcp. If I look, bootp and dhcp are actually the same thing. If I expand this out, I get lots of things to choose from. I'm going to just leave it as-is.
Now let's go over to the Relation box. We have things such as is present. The double equal sign (==) means equal to. The exclamation and equal (!=) means not equal to. The next several should be self-explanatory, but I want to pick the equal to and then, for the value, type in '10.10.10.1', which is my DHCP server. Now, I'll click OK and see what happens. I'm filtering only my DHCP traffic.
Now, I want to see if there are any clear text usernames and passwords here. I can do that several ways. I can create a filter by typing in 'http contains admin'. As I type, notice the salmon color. As soon as it's a valid filter, it turns green.
Let's come down here and choose this packet. I'm picking it because it has an external public IP address. I'm going to right-click and select Follow TCP Stream. Now it displays the entire stream related to this conversation. Some of it is readable; some is not. I'm looking for the word "Admin." Let's see if we can just do a find for that. I'll click on Find Next until I see something worth looking at. Here, it looks like I found something. It's the word log with the username Admin listed. This is followed by pwd and the password the person typed in. So, with Wireshark, we were able to see a clear text password. We could also filter other things, like FTP, to find clear text passwords.
I'll come up and clear this filter.
Another way we can filter is to come down here. If I find something that I think is interesting, I can right-click and apply a filter.
We could spend an hour looking at filters, but let's keep moving on here.
Follow the Conversation 04:46-05:37 So, we kind of did this already. We know we can look at packets. But what if we wanted to look at the entire conversation between two devices? I can come down here, right-click on one of these, and select Follow TCP Stream. Now, I get this window that pops up with the entire stream. This particular stream isn't very useful, but you get the idea.
So, how many different conversations have been going on here? I can figure that out by coming up to Statistics and selecting Conversations. When I do, my conversations are combined. All the packets are organized neatly. I can choose a few different ways to see my data and then sort by the total size of the bytes, largest to smallest. I have some tabs up here, such as IP versions 4 and 6. I can select TCP to display my TCP conversation. Okay. I'll close this and then clear my filter.
Get Files out of Wireshark 05:37-06:31 So far, when we look at our packets from Wireshark, we see a bunch of gobbledygook. The good news is that Wireshark has a way to export objects. In our case, we want a file. To do this, we can come up here, to File, go down to Export Objects, and select a category. I can pick HTTP, and I'll get a list of things that downloaded from the web, or we can get objects from our local Windows network by selecting SMB. That's the one I'm going to choose. I only have one file. It's one that I transferred across the network earlier. It's a jpg image file. I'll click on Save and pick a place to save it. I'll pick Desktop, click Save, and close this window.
Now I'll minimize Wireshark, go over to my folders, go to Desktop, and here's the picture that I captured in Wireshark.
Summary 06:31-06:51 That's it for this demo. In this demo, we took a look at Wireshark. We started by going over the Wireshark interface. Then we talked about using filters. We illustrated how to follow conversations in Wireshark. Finally, we ended by exporting an object.
6.5.4 Sniff Network Traffic with TShark
Click one of the buttons to take you to that part of the video.
Sniff Network Traffic with TShark 00:00-00:27 Tshark is an application used to capture network packets. Such traffic can be captured on a wired network or wireless network. Capturing packets with Tshark is very similar to TCPdump. With Tshark, we can analyze the traffic via the terminal without a GUI. In this demo, we'll be using Kali Linux. Many Linux distribution may not have Tshark pre-installed, so you'll have to check.
Set up Tshark 00:27-01:26 First, you'll have to find out which network interfaces are available to Tshark. When we do a ‘tshark -D' command, we can see there's an eth0, which is the wired LAN, and wlan0, which is the wireless LAN. We're going to use the WLAN first to sniff wireless traffic. To do so, we must set up our wireless adapter in monitor mode. Using ‘sudo ifconfig wlan0 down' brings the interface down to allow for a config change. Using ‘sudo iwconfig wlan0 mode monitor' changes the mode to monitor mode. Next, we need to pick a channel to monitor. Keep in mind you may have to switch the channel number if you don't capture any valuable traffic. To change the channel, type ‘sudo iwconfig wlan0 channel 6'. Finally, ‘sudo ifconfig wlan0 up' will bring the interface back up. As you can see, when I run an ‘ip a' command, the wireless interface shows itself in monitor mode.
Sniff Wireless Network 01:26-02:04 Let's go ahead and run a Tshark command to grab some network traffic that's around us on Wi-Fi. The command we're going to run is ‘sudo tshark -I -i wlan0 -w /home/jack/capture_wlan.pcap'. We're only going to let this run for a second and then cancel out of it. Now that we have some data, let's check it out with ‘tshark -r capture_wlan.pcap'. You can see a probe request from a nearby device. Data such as this could help an attacker obtain a MAC address without even connecting to a wireless network.
Sniff LAN 02:04-02:41 Since you may be curious to see some wired LAN traffic as well, let's run a command to capture that. I'll type ‘sudo tshark -i eth0 -w /home/jack/capture_lan.pcap'. Just like the first one, were only going to run this for a few seconds and cancel out of it. Typing ‘tshark -r capture_lan.pcap' will allow us to review this traffic in the terminal. This give you a good idea how packets can be captured to show network traffic. Both files from the wireless and wired capture can be analyzed in Wireshark if that method is preferred.
Summary 02:41-02:57 It's as simple as that. In this demo, we showed you how to change your Wi-Fi interface to monitor mode, sniff both wireless and wired devices, and review data retrieved from the captures.
6.5.5 Capture Traffic with TCPDump
Click one of the buttons to take you to that part of the video.
Capture Traffic with TCPDump 00:00-00:30 In this demo, we're going to look at TCPDump. TCPDump is a free open source command line utility that captures network traffic on Linux systems. TCPDump works a lot like the popular packet capturing program Wireshark, but many network administrators prefer TCPDump because it works in the terminal. TCPDump prints out all the traffic it captures in your terminal. You can filter the packets using various expressions and save the captured packets for later analysis.
Install TCPDump 00:30-01:08 I have a Linux system running here, and I want to open the terminal. I can do this by going up to Search your computer, typing in 'terminal', and hitting Enter. Once the terminal appears, I want to install TCPDump. I have to do this as a superuser or sudo. So, to install, I'm going to type 'sudo apt-get install TCPDump' and press Enter. It asks for my password, and I'll type it in here. You can see here that TCPDump is already installed with the newest version. If it wasn't installed, it'll install it. If an older version's installed, it'll just update to the newest version. I'm going to type "clear" to clear the screen.
Display the TCPDump Manual 01:08-01:39 Before we talk about how to use TCPDump, the first thing you'll want to be aware of is the command to display the manual, 'man tcpdump'. You can read through this manual and see all the different expressions that can be used. Toward the bottom, you can also see examples of the different ways to use TCPDump. If this manual is hard to read, you can find the exact information from the official TCPDump website at www.tcpdump.org. We don't have time to go through every single example, but we'll cover a few here.
Capture Traffic 01:39-02:53 Let's jump right in and start to capture traffic. To do this, I need to know what my network adaptor is called. I can quickly type in 'ifconfig', which displays my IP address, but also shows me the name of my network adaptor. I can see that it's called eth0. That's what I will need to know. For the first command, we're going to tell TCPDump to capture traffic on our network interface. The Interface is identified by -i and then the network adaptor. It also requires superuser privileges to run. So, let's type in 'sudo tcpdump -i eth0' and press Enter. Once we press Enter, TCPDump starts to capture network traffic going through my network interface card, but there isn't much going on yet. Let's open a web browser to create some traffic. As you can see, TCPDump starts to capture that traffic. To stop the capture, I can press Ctrl + C. You can see that in just a few seconds we were able to capture 292 packets. 549 were received by filter, and 257 were dropped by the kernel. And you can see that we've captured some web traffic, mostly http and https, from when we opened our web browser.
Capture Traffic on the Network 02:53-04:16 Ok, so far, we have looked at capturing network traffic that has traveled through my network adaptor on this system. But what if we wanted to capture traffic from another computer or our entire network? We know our network switches don't forward traffic to all ports, only to the destination ports based on the physical address, or MAC address. So I've turned port mirroring on for my switch. We're not going to learn how to do that in this demo, but I wanted you to be aware of what I've done in the background.
So, we have port mirroring enabled on the switch port where my Windows 10 workstation is plugged in. Now all the traffic from that network interface card is going to get captured here with TCPDump. If you're a student or studying for a certification exam and practicing these skills at your workplace or school, make sure you're not violating any of the organization's policies. You are, after all, capturing potentially confidential network traffic. I'll clear the screen again.
All right. I'm going to start capturing some traffic again here. But a few things are different. I'm also capturing from my Windows 10 workstation, and I'm going to just focus on just FTP traffic, which runs on port 21. To do this, I'm just going to type in 'sudo tcpdump port 21' and press Enter. Now I'm capturing only FTP traffic. Not much is going to happen until my Windows 10 machine uses FTP, so let's jump over to my Windows 10 system and create some FTP traffic.
Capture Specific Types of Network Traffic 04:16-05:21 I'm on my Windows 10 system, and I'm going to open a web browser and go to a common FTP site on the internet, which is 'ftp.hp.com'. This is where your can get files such as printer drivers. I'll click around here just to generate traffic. That's good enough. I'll close this window. Now let's go back to our Linux system and see what's going on with TCPDump.
I'm back on this Linux system. You can see a lot's happened. But when you look, everything is isolated to just FTP traffic. I can see the time stamp, hours, minutes, seconds, and milliseconds. I can see the name of the Windows 10 PC that I was on and the address of the FTP we were at.
If this site required me to enter some sort of credentials, those would have been captured and displayed in clear text, since FTP traffic isn't secure.
Once again, there's a lot of uses for TCPDump along with lots of expressions that can be used to narrow your results. It's not as popular as some other packet capturing utilities and software, but it's still very useful to network admins.
Summary 05:21-05:42 That's it for this demo. In this demo, we learned how to install and update TCPDump. We looked at the manual, where you can find a list of expressions that can be used. We practiced capturing some traffic on our Linux system and used port mirroring to capture traffic from a Windows system on our network.
6.5.6 Use SMAC to Spoof MAC Addresses
Click one of the buttons to take you to that part of the video.
Use SMAC to Spoof MAC 00:00-00:37 There may be times you want to change the MAC address on a network interface or device. Changing the assigned address allows a device to appear to be a different device on the network.
MAC spoofing is a technique for changing the factory-assigned Media Access Control address of a network interface on a networked device. We know that the MAC address is hard-coded on a network interface controller, and typically, you can't change it. However, there are tools that can make an operating system believe that the NIC has a different MAC. In this demo, we're going to use a tool to do just that.
Get SMAC Running 00:37-01:07 We're going to spoof addresses with the help of a program called SMAC. I've already downloaded SMAC onto this Windows 10 system. It installs like most other Window programs. You do have to run the program as an administrator, since it has to have access to the system's registry. That's probably the only special instruction you need to get it going. So, to open, I'll right-click and select Run as administrator. I'll say Yes to the User Account Control. I don't have a registered version, so I'll just click Proceed to get stared.
Use SMAC 01:07-02:13 All right. The program is running. This main window shows me the active network interfaces. Over to the right, I can see the IP and the associated MAC address for each NIC. I only have one NIC in this system. It's selected by default. Down here, I can enter a spoofed MAC address. I can do this manually, or I can come over here and select Random.
Another thing I can do is go over to MAC List. When I do that, I get a list of MAC addresses that are in a list. Why is that handy? Well, let's say you're only allowed to connect to a network based on a certain MAC address, and you suddenly have a different system that you want to use to connect. You can get the MAC from the old system and spoof it on the new system.
Here's an example of misusing MAC spoofing: one of the subject matter experts for this course worked for a school system. Students often violated the acceptable use agreement for the school's network. As a solution, our expert banned their MAC addresses from obtaining IP addresses. The very tech-savvy students figured this out and spoofed their MAC addresses to get around this barrier and get an IP from the DHCP server.
Change the MAC 02:13-03:03 Anyway, over here, I can pick a manufacturer to use for the spoofed MAC. Why would I do that? Well, as you've learned in other courses, the first half of a MAC address is assigned by the manufacturer. So, if I'm spoofing on a network with all Dell computers, an address with a 3COM MAC address might stick out a bit. It's just another option to consider.
Okay. I'm just going to pick Random from over here and use that MAC address. Now, I'll go up here and pick Update MAC. When I do, I get a dialog box that says it can only change the MAC to this address because this is an evaluation copy of the program. If it was a full version, I wouldn't see this. I'll select No for now.
At this point, you would typically disable the NIC, change the MAC address, and then enable the NIC. When you're done, you can remove the spoofed MAC by clicking the Remove MAC button.
Verify the New MAC 03:03-03:18 When that's done, you can check your settings by clicking IPConfig. When you do, you essentially get the same information you would get from doing an IPConfig from the command prompt. Here, you can see the IP address, and also the physical, or MAC, address for this device.
Summary 03:18-03:39 That's it for this demo. In this demo, we discussed what MAC spoofing is, and we talked about a few of its uses. Then we used SMAC to change our MAC address on a Windows 10 system. Finally, we looked at IPConfig to verify the MAC address and the rest of the IP address configuration.
6.5.7 Poison ARP
Click one of the buttons to take you to that part of the video.
Poison ARP 00:00-00:35 On-path attacks are very popular because they're so productive. When a hacker puts themselves between a victim and the machine they're connecting to, they can capture traffic, delete traffic, inject their own traffic, spoof DNS, and capture passwords. Imagine the damage that can happen if someone captures important documents and leaks their contents or steals the information. In this demo, we're going to illustrate how to capture a password with a man-in-the middle attack so that, as a security analyst, you can take countermeasures to protect your organization.
Scan Subnet with NMAP 00:35-01:30 So, let's get started. First, I'm going to scan my subnet to see what hosts are connect and identify my router. Inside this terminal on my Kali Linux machine, I can type in "nmap 10.10.10.0/24' and press Enter. This is going to scan my 10.10.10.0 subnet. It finished pretty quickly.
Now let's scroll up and see what we found. Up there, I found my router, router.CorpNet.xyz with an IP address of 10.10.10.1. We need to remember this information for later.
Here, I have another device on the CorpNet domain with an IP of 10.10.10.169.
I'll scroll down a bit. This device, here, is the one I'm most interested in, PC-12 with an IP ending in 195. This is the machine that's going to be my victim machine and the one that I'm going to try to capture passwords from. Let' go ahead and close this terminal.
Finding our Hosts 01:30-02:26 Now I want to open Ettercap. Ettercap comes in both a GUI and a command line interface. It's pre-installed as part of Kali Linux, so we don't have to install or download anything. To open Ettercap, I go up here, to Applications, go down to Sniffing & Spoofing, and then, over to the right, find Ettercap. The Ettercap GUI will appear. And from there, I'll come up to the Sniff tab and select Unified Sniffing. That will launch a dialog box, where I'm prompted to select my Network interface. I only have two options. Depending on your system, you may have multiple interfaces such as a WLAN interface or multiple LAN interfaces. I'm going to leave it with eth0 and click OK.
Now let's scan our subnet for hosts. As you'll recall from our NMAP scan, I had three hosts. I'll come up to the Hosts tab, come down to Scan for hosts, and select it. Ettercap starts scanning the subnet for hosts. Down here, you can see that it scanned 255 hosts and found three.
Selecting Targets 02:26-03:14 Now I want to list these hosts, so I'll go up to the Host tab. This time, we'll come down to the Hosts list and select it. Here, we can see our three hosts. Remember that this 10.10.10.1 was our router, and our victim machine is the one that ended with 195.
Let's go back up here, to the router, and select it. Down here, I want to select Add to Target 1. Now I'll come back up and select the host ending in 195. And then we'll go back down. This time, we'll select Add to Target 2.
So, what am I doing here? This is where I'm going to insert myself between the router and the victim. To do that, I'm going to go up to the Mitm tab, come down a bit, and select ARP poisoning. In this new dialog box, I want to check the box that says "Sniff remote connections" and click OK.
Start Sniffing 03:14-03:33 All right. Now, I'll come up to Start and select Start sniffing. I should have stopped sniffing earlier, but it'll still work fine. Now Ettercap is sniffing our traffic between our victim and the router. We just need to wait for our victim to try to log into a website. Let's jump over to our Windows machine, the one with the IP that ended with 195.
Capturing Credentials 03:33-04:18 All right. I'm over on the Windows machine now, and I've brought up this website. It's a Moodle site, a popular learning management platform used by many educational organizations. I've hidden the web address, but it's an HTTP site, not HTTPS. Just to confirm that we're on the correct machine, I'll quickly open a command prompt and do an ipconfig to verify the IP address. It's the correct machine. It looks good. I'll close this window.
Let's go ahead and log in with some credentials. I'll just type in the word 'teacher', and I'll use 'letmein' for the password. I'll click Log in. It tells me that I have an invalid login, and it wants me to try logging in again. That's totally okay for what we're demonstrating. Let's jump back over to our Kali Linux machine and see what's happening with Ettercap.
Viewing our Results 04:18-04:53 Okay. I'm back on Kali, and here's Ettercap. Down here, at the bottom, you can see that when I attempted to log in, Ettercap captured the username "teacher" and the password "letmein". Of course, this isn't the correct username and password, but Ettercap would capture whatever was entered, and we assume that the user would eventually enter their correct credentials.
The important thing to remember here is that this method does not work with HTTPS. But most users have a habit of using the same credentials for multiple sites. So, once you get the credentials to one site, you'll likely have credentials for multiple sites.
Summary 04:53-05:09 That's it for this demo. In this demo, we used Ettercap to create a on-path attack with ARP poisoning to capture login credentials through a website.
6.5.8 Poison DNS
Click one of the buttons to take you to that part of the video.
Poison DNS 00:00-00:37 DNS Spoofing, sometimes referred to as DNS cache poisoning, is an attack where a rogue device directs DNS requests on a network. This basically means that an attacker manipulates the DNS to redirect DNS traffic. This type of attack is very difficult to detect, which makes it quite dangerous. In this demo, we're going to redirect DNS to our Kali Linux machine, spoof the DNS, and point to a web page I've set up.
For this demo, we're going to use Kali Linux with Ettercap. Ettercap has a GUI interface. That's what we're going to use. But we need to do a few other things before we get started.
Modify the etter.conf File 00:37-01:35 I'm going to open up a terminal here, on Kali Linux. We need to check the etter.config file. The easiest way to find this file is to just type 'locate etter.conf' and press Enter. The path I'm interested is this one, right up here. I'm going to use the program Leafpad to open the file. We'll type in 'leafpad /etc/ettercap/etter.conf' and press Enter. And Leafpad opens my file.
Now we need to edit these two lines of code, uid and gid. I need to change both of these values to zero.
After that, we need to scroll down a bit, to where it says Linux. Right under there, we want to find the iptables. These two lines will be commented out with the pound sign (#). Just delete the two pound signs from these lines of code. So, now that we've done that, we'll save our file and close this window.
Edit the etter.dns Host File 01:35-02:30 Now that we're done with that, we need to edit our etter.dns file. I'm back in the terminal. Once again, to find this file, I can just type in 'locate etter.dns'. And, just like before, I'll use Leafpad to open it by typing 'leafpad etter.dns'. The file opens up.
I need to add a line to this host file. I'll scroll down until I see these few lines with Microsoft in them. Right above those lines, I want to add this line, here: '* A 10.10.10.197'. By doing this, we're telling all of the DNS traffic on the network to go to this IP address, which is actually my Kali Linux system's IP address. The Microsoft lines are not commented out by default, but I went ahead and put pound signs (#) in front of them. We don't want to redirect their DNS. Before I exit, I want to go up and save the file.
Edit index.html 02:30-03:36 All right. We have some more editing to do here. Now I need to edit my index.html file. Since we're spoofing the DNS and redirecting traffic to our Kali system, I need to give the users something to see, so I'll edit the index page.
To get to that file, I'll come up to Places and come down here, to Computer. From there, I need to find the folder called var and open it. Within var, I'll go over to the www folder, then to the html folder. I've already made some changes in here. One of the things I did was copy my index.html file and rename it. Let's open this old file and see what the contents look like.
Okay, our file is open. And, like I said, by default, this is our index.html file on this Linux system. I didn't want to modify the original in case I need to restore it later, so I made this copy. Now let's close this one and open up the modified copy that I created. Once again, I'll use Leafpad to do that. Here, you can see I made a very simple landing page for our victims. It says, "You have been denied access to this site. Nice try!" I've already saved it, so I'll go ahead and close this file.
Set up Ettercap 03:36-05:29 We're done editing files. Now we can go to Applications > Sniffing & Spoofing > Ettercap. Ettercap opens for us. And the first thing we need to do here is come up to the Sniff tab and select Unified Sniffing. A dialog box opens up. We want to select our network adapter. In our case, that's eth0. Click OK. We actually want to come back up to Sniff and select Stop Sniffing because we're not quite ready yet.
We're going to go over to the Hosts tab and select the Scan for Hosts selection. Ettercap will do its thing and start scanning. You can see, down here, that we found three hosts. Now let's go up to Hosts again. This time, select the Hosts list. And down here, you can see the three hosts. Previously, I ran NMAP and figured out that this top host is my router, and this bottom host is my other machine, the one I want to spoof so that anytime this machine goes to a website, the DNS is going to point them to my Kali Linux machine's IP address. So, while my target IP is selected, I'll come down here and click Add to Target 1.
Now we'll go up to Plugins > Manage the plugins and select the dns_spoof option. Now, if we look down here, in the lower pane, you can see it says, "Activating dns_spoof plugin�"
All right, we're almost done. I need to come up to the MITM tab and select ARP poisoning. When the dialog opens up, we need to check the box for Sniff remote connections and then click OK.
We need to start the Apache web service on the Kali machine to actually make it into a web server. I do that by opening up a terminal and typing in 'service apache2 start'. Nothing really exciting happens, but this command starts the Apache service for us. That wraps up our steps on this Kali system. Now we need to see what happens when our victim tries to surf the web. We'll do that from a Windows machine.
Test on a Windows Machine 05:29-05:59 All right. I'm on a Windows machine now. I'll go to a command prompt to check our IP address. I'll type in 'ipconfig', and we can confirm that the IP ends with 195, so this is the right machine. I'll close this window.
Down here, I'll launch Google Chrome, and I'll type in 'www.testout.com'. When the page launches, it takes me to the index.html page on my Kali Linux system and displays the message we typed. That confirms that our DNS has been spoofed and redirected.
Summary 05:59-06:20 That's it for this demo. In this demo, we configured our Kali Linux machine to redirect DNS requests and send the traffic to our modified index.html page. We discussed how we had to edit the files to make this happen and how to configure Ettercap to perform the DNS spoof.