Section 7.1 Device Security
As you study this section, answer the following questions:
- What Linux command creates a scrollable, real-time table of running processes?
- What is the process of moving the contents of memory to a removable device for analysis called?
- What are two popular sources of guidance for hardening endpoints?
- What are some common staging areas for data exfiltration?
In this section, you will learn to:
- Create a remote access policy
- Encrypt a hard drive
- Compare an MD5 hash
- Examine a forensic drive image
The key terms for this section include:
Key Terms and Definitions
| Term | Definition |
|---|---|
| Memory dump | The process of accessing and moving the contents of memory to a removable device for further analysis. |
| Data exfiltration | Another term for data theft. This is often the primary goal of an attack or malware program. |
| Metadata | The properties of a file. This data provides information such as size, creator, last time accessed, and more of a file. |
| NTFS Alternate Data Streams (ADS) | The NTFS ADS in Windows allows a file to contain more than one stream of data. This means that additional data can be appended to a file without changing the file size or functionality. |
This section helps you prepare for the following certification exam objectives:
| Exam | Objective |
|---|---|
| CompTIA CySA+ CS0-003 | 1.1 Explain the importance of system and network architecture concepts in security operations
1.2 Given a scenario, analyze indicators of potentially malicious activity
1.3 Given a scenario, use appropriate tools or techniques to determine malicious activity
2.5 Explain concepts related to vulnerability response, handling, and management
3.2 Given a scenario, perform incident response activities
3.3 Explain the preparation and post-incident activity phases of the incident management life cycle
|
| TestOut CyberDefense Pro | 1.2 Monitor software and systems
2.2 Detect threats using analytics and intelligence
3.2 Implement system hardening
4.2 Manage devices
5.2 Implement physical security controls
|
7.1.1 Device Security Overview
Click one of the buttons to take you to that part of the video.
Device Security Overview 00:00-00:28 Attacking individual host devices is a common tactic for hackers. By taking over a host device, the hacker can gain access to sensitive data or pivot to other devices in the network. Understanding the signs of a host-based attack and how to secure these devices is crucial to the security of an organization. In this lesson, we'll take a look at how we can monitor and secure our processor, memory, and drives in a host device.
Processor and Memory Security 00:28-04:36 Monitoring the processor and memory usage on a host device can tell us if a possible attack or malware is installed on the system. The first step is to establish a baseline of your system so you know what processes should be running and what the normal CPU and memory usage looks like. If you notice that the resource consumption is higher than usual or there's a process you don't recognize, you can dig deeper using process analysis tools.
On a Windows host device, the most common tool we'll use is the Windows Task Manager. This tool lets you see all the processes running and how much the memory and CPU are used. We can even stop processes from running using the Task Manager.
PowerShell has some tools we can use to monitor and manage running processes. The tasklist command will show all running processes along with the process ID, or PID, and the amount of memory being used, but this won't show the CPU usage.
We can then use the taskkill command to end any running processes.
If working on a Linux machine, the top command, which is short for table of processes, provides a table of each running process. This table continuously refreshes, allowing you to see activity in real time. The htop utility can also be installed and will show the same information but provides mouse support and an easier-to-read format.
The free command in Linux provides a summary of memory usage. By default, free shows the total available memory and the amount of memory being used by temporary file systems, kernel buffers, and the page cache.
Aside from memory and CPU usage, we also need to monitor data drives and file systems for malicious activity and secure them as best as possible.
Data theft is often the main goal of an attack or malware program. Before data is stolen from a system, the attacker will usually stage the data in a specific location before stealing it. These areas could include temp files, a user's profile folder, a log file, or the recycle bin. The data staged to these areas is typically compressed and encrypted, so they're easy to move and hard to detect.
Any interaction with the file system will leave a trail of metadata that can be followed to determine if an attack or malware infection has occurred. File system viewers can help you analyze a file's metadata. These viewers can be used to search a file system for keywords and can focus searches on common staging areas. File carving tools can be used to recover file metadata that's been deleted.
Attackers can use NTFS Alternate Data Streams, or ADSs, to cover their tracks on Windows machines. The ADS feature of Windows allows a file to contain more than one stream of data without it being easily noticed. Because of this, a hacker can hide malware inside the ADS and execute it through Command Prompt.
Another sign of an attack or malware is high disk usage. This can be caused by an attacker installing programs, malware caching files to exfiltrate, log files due to extensive network scans, or any number of reasons.
If you notice that disk usage is abnormally high, disk utilization tools can be used to scan the file system and gather real-time disk usage information. These tools often provide a visual mapping of storage space that includes all folders, files, file sizes, and extensions.
During a ransomware attack, the contents of the hard disk are typically encrypted, and the only way to gain access is to get the decryption key. You can use cryptography analysis tools to determine the algorithm used to encrypt the data and how strong the password is. While you might be able to pull the decryption key from the system memory, this is usually not the case, and victims will usually need to pay the ransom to get the decryption key.
The first step in securing access to a host device is to ensure there's a strong password to access the Operating System. If the hacker is unable to log into the system, they typically won't be able to perform an attack. In an enterprise environment, we must also ensure that the principle of least privilege is applied to user accounts. Some system BIOSs will allow you to set a password to be entered before the hard drive data can be accessed. The best defense, however, is ensuring that users know not to install any programs or insert any USB media into the host device unless they know where it came from and that it's safe.
Understanding how to monitor the resources on a host device is crucial to catching a potential attack early.
Summary 04:36-04:54 In this lesson, we first went over CPU and memory usage and some signs that could indicate a possible attack or malware infection. We then looked at some disk usage signs that could point to an attack. We also went over some ways we can secure access to the disks in the host device, which will help prevent unauthorized access.
7.1.2 Device Security Facts
Host devices are common targets for attacks. If an attacker is able to gain access to a host device, they might be able to gain access to sensitive data or pivot to other network devices. Understanding the signs of a host-based attack and how to secure these devices is crucial for network security.
This lesson covers the following topics:
- Processor security
- Memory security
- Disk and file security
- Secure host devices
Processor Security
Abnormal processor usage and activity can be indicative of a possible attack or malware infection. A baseline of normal CPU usage on the host device should be established so any abnormal usage can be quickly identified and investigated.
The following table describes the more common process analysis tools:
| Tool | Description |
|---|---|
| Task Manager | Task Manager provides an overview of all processes running on a Windows host. It can be used to end unwanted processes. |
| Tasklist/taskkill | Tasklist is similar to Task Manager but is a PowerShell tool that displays all running processes, the process ID (PID), and memory usage. Tasklist does not show the CPU usage however. Taskkill is a PowerShell tool that can be used to end unwanted processes. |
| top | In Linux, the top command creates a scrollable, real-time table of every running process. The table includes process ID, user, CPU percentage used, memory percentage used, execution time, and information about each process. The following keys sort output:
|
Memory Security
The following tools can be used to analyze memory usage:
| Tool | Description |
|---|---|
| free | Most Linux distributions come packaged with the free command, which outputs a summary of memory utilization. It retrieves this information from /proc/meminfo and displays information about physical and swap memory. By default, the output of free shows the following information:
|
| Memory Dump | To further analyze memory content, the contents of the memory can be accessed and moved to a removable drive. This process is known as a memory dump. There are several tools available to help with this process including:
|
Disk and File Security
Data exfiltration (data theft) is oftentimes the main goal of an attack or malware program. The following table describes some common areas to look into that can indicate a potential security threat:
| Potential Threat Indicator | Description |
|---|---|
| Staging areas | Malware and attackers will typically use one location to stage data for exfiltration. These areas are typically compressed and encrypted so they are easy to move and hard to detect. These areas include:
File systems can be scanned for file archive, compression, and encryption types such as RAR or gzip, which are not typical of regular usage patterns. Files stored in system folders or the file system's root are also suspicious. |
| Metadata | Any interaction with the file system will leave a trail metadata that can be followed to determine if an attack or malware infection has occurred. File system viewers are used to help analyze a file’s metadata. The viewer can be used to search the file system for keywords and focus searches on common staging areas. The standard Windows dir command has some advanced functionality for file system analysis. The following dir command switches can help to identify file system anomalies:
|
| NTFS Alternate Data Streams (ADS) | The NTFS ADS in Windows allows a file to contain more than one stream of data. This means that additional data can be appended to a file without changing the file size or functionality. Attackers can easily hide malware inside of a file and execute it through the command prompt by exploiting the NTFS ADS. |
| High disk usage | Applications and processes that consume a lot of drive capacity may be malicious. Malware sometimes caches files locally for exfiltration over the network or USB. Malware may also generate substantial log data if it is performing network scans. Disk utilization tools scan the file system and retrieve statistics, including the following:
|
| Data encryption | If a disk or file system has been encrypted, such as during a ransomware attack, then the examiner potentially needs to obtain a decryption key to access it. As well as disk or volume encryption, encryption might have been applied at the file system level or to individual files. Cryptography analysis tools can be used to determine the type of encryption algorithm used and assess the strength of the encryption key (password complexity). On a live system, it might be possible to recover the decryption key from system memory though this is usually not the case and victims will need to pay the ransom to get the decryption key. |
Secure Host Devices
The following steps can be taken to secure a host device in an enterprise environment:
- Create and enforce a strong password policy for the operating system.
- Implement the principle of least privilege for all user accounts on the network.
- Configure a hard drive password in the computer's BIOS.
- Do not allow users to install applications on the device.
- Do not allow users to use USB drives on the device.
7.1.3 Device Hardening Facts
The process of putting an operating system or application in a secure configuration is called hardening. When hardening a system, it is important to keep in mind its intended use, because hardening a system can also restrict the system's access and capabilities. The need for hardening must be balanced against the access requirements and usability in a particular situation.
This lesson covers the following topics:
- Hardening techniques
- Best practice hardening configurations
Hardening Techniques
For an OS functioning in a given role, a standardized series of steps should be established to define a secure configuration that still allows the OS and applications software to execute that role. Once the desired configuration setting has been established, they should be stored in a configuration file or used to create a template that can be used for future deployments.
The hardened security baseline requirements can then be used or applied automatically, ensuring a consistent and reliable process. A system should only run the protocols and services required for legitimate use and no more. By limiting the services, the attack surface can be effectively minimized with processes and users configured on a system.
The following table describes some hardening techniques for potential attack vectors:
| Attack Vector | Hardening Techniques |
|---|---|
| Network interfaces | Interfaces provide a connection to the network. Some machines may have more than one interface. For example, there may be wired and wireless interfaces or a modem interface. Some machines may come with a management network interface card. If any of these interfaces are not required, they should be explicitly disabled rather than simply left unused. |
| Services | Services provide a library of functions for different types of applications. Some services support local features of the OS and installed applications. Other services support remote connections from clients to server applications. Unused services should be disabled. |
| Application service ports | Application service ports allow client software to connect to applications over a network. These should either be disabled or blocked at a firewall if remote access is not required. Be aware that a server might be configured with a non-standard port. For example, an HTTP server might be configured to use 8080 rather than 80. Conversely, malware may try to send nonstandard data over an open port. An intrusion detection system should detect if network data does not correspond to the expected protocol format. |
| Persistent storage | Persistent storage holds user data generated by applications plus cached credentials. Disk encryption is essential to data security. Self-encrypting drives can be used so that all data at rest is always stored securely. |
| Accounts | Accounts should be checked and reviewed to determine whether the account exists for a legitimate reason and also to establish that the account access permissions are configured in a suitably restrictive manner. Any unused or unneeded accounts should be disabled as a minimum and removed if possible. |
| Maintenance | It is also important to establish a maintenance cycle for each device and keep up to date with new security threats and responses for the particular software products being used. Hardware and software versions must be checked to verify that they are still actively supported and patched by the vendor. End of Life (EoL) or End of Support (EoS) equipment and/or software must be removed. This designation means that the devices no longer receive security updates (patches) and will not be serviced or supported by the vendor if issues or outages occur. |
Best Practice Hardening Configurations
Best practice configurations are available to use as a reference when hardening endpoints. Two very popular sources of guidance include the U.S. Department of Defense (DoD) Security Technical Implementation Guides (STIGs) and the Center for Internet Security's CIS Benchmarks™.
The following tables describes these configurations:
| Hardening Configurations | Description |
|---|---|
| U.S. Department of Defense (DoD) Security Technical Implementation Guides (STIGs) | The DoD SCAP Compliance Checker is available for download for free and can run automated system configuration checks against STIG Benchmarks. DoD STIGs also include GPO objects that contain many best practice security configurations, although GPOs must be carefully inspected and tested prior to use/deployment to avoid unintended consequences such as breaking a system or software functionality. More information can be found at https://public.cyber.mil/stigs/scap/ . |
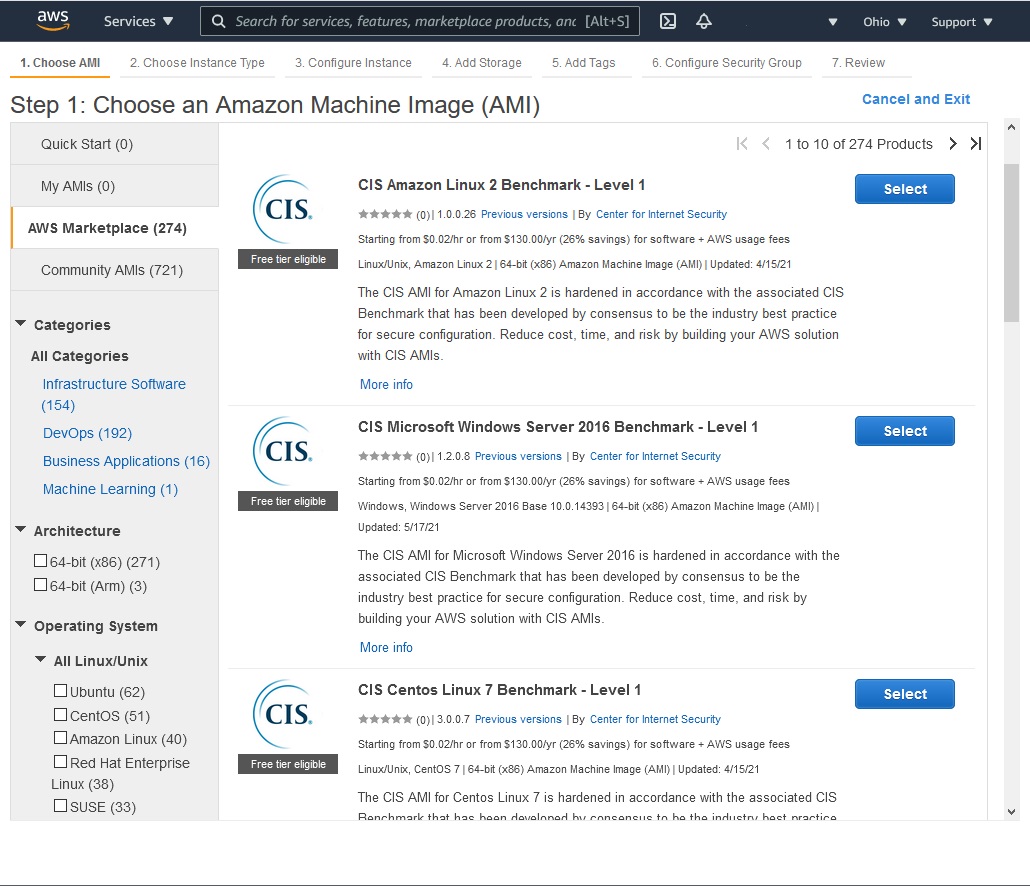
| Center for Internet Security's CIS Benchmarks™ | CIS Benchmark configuration guides can be downloaded for free and include detailed descriptions of all configuration points, although the documents are very lengthy to use in this way. CIS offers a software tool for checking configurations, called CIS CAT, but access to the tool is limited to CIS Members. The guides can be found at https://www.cisecurity.org/cis-benchmarks/ . CIS Benchmarks™ are also available within the professional version of the Tenable Nessus vulnerability scanner, and CIS hardened images are available for deployment within major Cloud platforms, such as AWS or Azure.
|

7.1.5 Verify MD5 Hash Integrity
Click one of the buttons to take you to that part of the video.
Verify MD5 Hash Integrity 00:00-00:35 Many security-minded developers provide a method for verifying the file you download called a hash. Hashes are unique strings of characters that are meant to help prove the integrity of a file. There are different kinds of hashing algorithms, but not all are created equal. Some algorithms are fast and produce a hash that's more likely to be repeated. If a hash isn't unique and can be obtained by hashing a completely different file, it isn't as good for validating data's integrity. This kind of conflict is called a hash collision. Today, we'll look at MD5 hashes.
Calculate MD5 Hash with PowerShell 00:35-01:38 First, we'll look at how to calculate hashes with built-in tools. On Windows, we have PowerShell, which is capable of calculating hashes using the command Get-FileHash. Let's go ahead and calculate the hash of our Kali Linux installer to make sure it isn't corrupted.
I'll open PowerShell and change directories to my Downloads folder. I'll do a 'ls' to verify that my file is there and I can see my Kali download .iso file is in the folder. Now I'll go ahead and type 'Get-FileHash' followed by the file name. I'll then put '-Algorithm MD5' and press Enter.
This will take a few seconds, since the file is so large.
There's the Hash. We should verify it by comparing it to the hash file I've downloaded.
We can see the contents of the hash file by using the command 'Get-Content .\MD5checksum.txt'.
These hashes look like they're the same. You can always verify it letter-by-letter, but we can also compare the hashes using PowerShell. All we have to do is compare the two strings to each other. Let's do that now.
Use PowerShell to Compare Hash Values 01:38-01:54 I'll copy this hash and paste it in here. Now I'll type '-eq'. The -eq in PowerShell is used to compare two items to each other. Now I'll copy and paste this other hash in here and press Enter. The word True pops up, so these hashes are the same.
Summary 01:54-02:10 And that's it for this demo. We looked at using PowerShell to calculate the hash of a file. Additionally, we learned how to compare strings in PowerShell to guarantee that the hashes are identical.
7.1.6 Create a Forensic Drive Image with FTK
Click one of the buttons to take you to that part of the video.
Create a Forensic Drive Image with FTK 00:00-00:26 In this demonstration, we're going to discuss creating a forensic disk image with the Forensic Toolkit. It's better known as the FTK Imager. In our scenario, we need to examine a hard drive from a malicious employee's workstation. Before you try this for real, make sure that your organization considers you qualified to do this and that you have the backing of your legal department.
Use a Write Blocker 00:26-02:24 The first thing we need to do is create an image of the employee's hard drive. Like I said, we're going to use the FTK Imager to do this. Remember, when we're conducting a forensic investigation, we don't want to modify the evidence in any way, shape, or form. If this situation were to be litigated for some reason say, the employee gets fired and then sues the company then the prosecutor could say that when we conducted our forensic investigation, we planted the evidence on the hard drive. That's why it's crucial to make sure that that hard drive isn't changed in any way during the forensics investigation.
We're going to create an image of that hard drive, and we're going to do all of our testing, examining, and investigative work on the imaged copy of the hard drive, not on the actual hard drive. Once we've created that image, we'll use a second tool to analyze the contents of the hard drive to see if we can find anything that's questionable.
The first thing we need to do is get an image of the hard drive. To do this, we have to connect the hard drive to this forensic workstation. That's problematic because as soon as you connect a hard drive to a Windows workstation, Windows immediately starts writing little bits of data to the drive but we don't want to modify the drive in any way.
So we can't just directly connect the drive to a SATA connector on this workstation. Instead, we need to implement a write blocker, also known as a forensic disk controller. Its job is to block writing to the hard drive. It allows us to connect the employee's hard drive to the write blocker, and then we connect the write blocker to our machine, usually with a USB cable. This prevents any write operations coming from the operating system on the forensic computer from going through to the device that we're analyzing. So remember, when you're conducting a forensic investigation on a hard drive and you're going create an image, always use a write blocker to prevent any type of write operation from occurring on that drive. I've already set this system up with a write blocker, and it's ready to go.
Create a Forensic Image 02:24-05:53 Let's go ahead and use the FTK Imager to create an image that we can analyze. By the way, FTK Imager is a free tool. A lot of the forensic software is very, very expensive, but you don't have to spend a lot of money to be able to conduct a good forensic investigation. There are a lot of free, open source, and legitimate tools for forensic investigations.
Within Access Manager, let's click on Add Evidence Item. Then we have to specify what we're going to add. We're adding a physical drive because I've connected it to a write blocker on this particular system. Click Next.
We have to specify which drive we want to create the image from. You'll notice, when I click the dropdown list, it picked all of the hard drives on this system. You need to be very careful that you don't choose the wrong one. For example, if I were to choose Physical Drive 0, that's my local workstation hard disk drive. We'd be creating an image of my local system, not the actual drive that's being used for evidence. Physical Drive 1 is the drive that I've connected to the write blocker. That's what we want to choose. I'll click Finish. We'll come over here, to the Physical Drive 1, and we'll right-click on it. We want to Export Disk Image.
Under Image Destination, we'll click Add. Then we can specify which type of destination image we want to create. Raw (dd) is the default selection because it's probably one of the most widely used imaging format for forensics, so we'll just leave it set the way it is. Click Next.
We need to document the evidence. Remember, whenever you're conducting a forensic investigation, you need to document everything. In fact, you should take a picture of the entire setup that you're using to analyze this hard disk drive. You should take a picture of the drive, take a picture of how it's connected to the write blocker, and take another picture of how the write blocker is connected to the computer. You might even want to take a video of the entire process.
Under Evidence Item Information, you'll want to assign a case number. Let's do '1234' and evidence number '5678'. Then we'll give it a unique description. We'll enter 'HD from Mary Worley.' I'll put 'Dana Fellows' down as the examiner. Click Next.
We have to specify where we want to store the image file on my computer. I have a folder for my forensic images. Let's create a new folder, '1234 Mary Worley'. I'll put in the same thing here for Image Filename, '1234 Mary Worley'. If we want to, we can fragment the image—that is, break the image file into multiple pieces. This is a small hard drive. I'm going to set that to zero, which basically means we'll have one image file for the entire hard disk. Click Finish.
We want to make sure that Verify the images after they are created is checked. It's also a good idea to create a directory listing of all the files and the image after they're created, so check that box too. It can be useful for when you're searching for information. Click Start. At this point, the imaging process has started. It'll take a little bit of time to complete, especially if you're going to be working with a big hard disk drive. I'm going to pause the recording now and come back when it's done.
Okay. As you can see, it's almost done verifying the image. In just a few seconds, the process will be complete.
MD5 Hash and SHA1 Hash 05:53-06:09 Notice that it's created two different hashes, an MD5 Hash and a SHA1 Hash. For both of these, the hashes match. The MD5 Hash matched, and the SHA1 Hash matched as well. That's good. That's exactly what we want to see. I'll go ahead and hit Close.
Verify Image File 06:09-07:01 Before we end this demo, let's verify that the image file has been created. I'll open File Explorer and navigate to the folder where we saved the image. Here are the various pieces of information that were pulled from the hard drive to create it. We have the image file itself. There's a CSV document that contains a listing of all the filenames and directory names. Last on the list, we have a document that provides a nice summary of the image creation process. It gives us the case number, our evidence number, the description, the examiner, all the information we filled out earlier, and the information about the hard drive itself from Mary Worley's computer. At this point, our image file is created. The next step of the process is to use another tool, such as Autopsy, to examine the image.
Summary 07:01-07:26 That's all for this demo. We used FTK imager to capture a forensic image of a hard drive. We discussed the importance of using a write blocker to keep data from getting tampered with and the importance of examining a copy of the disk, not the original disk itself. Then we made a copy the image and verified that it was saved to the folder we created.
7.1.7 Create a Forensic Drive Image with Guymager
Click one of the buttons to take you to that part of the video.
Create a Forensic Drive Image with Guymager 00:00-00:35 There are several ways to capture a disk image as part of a forensic investigation. In this demo, we're going to do this with a program called Guymager. Guymager has a graphical user interface, making it a bit easier to use than a command line tool. We're on the Guymager home page, and you can read more about it there. One thing I want to point out on the website is that Guymager does come on several live CDs and security operating systems. We're going to use Kali Linux for our demo, so let's close the browser and get started.
Write Blocker and Linux Version 00:35-01:11 I want to mention a couple of things before we get started. Normally, you'll want to have a write blocker between the disk you're imaging and the forensic workstation that you're working from. In a virtual environment, such as my test system here, I can't really do that. The write blocker would keep data from being written to the disk we're wanting to image, which is very important.
The other thing I want to point out is that Kali has a live CD version that has a lot of forensic tools that my copy doesn't have. Keep that in mind if you're setting up your own lab and be sure to investigate the right copy of Linux that will work best for you.
Launch Guymager 01:11-02:11 I said that Guymager is a GUI tool, but it does need to be run as a Sudo user. There's a shortcut for it under the Application Launcher, so if I go up here, down to Forensics, and then over to Forensic Imaging Tools, I see Guymager. When it launches, it warns me that it needs to be started with root rights in order to perform acquisitions. That's no fun, and but we can get around it. I'll launch it from the terminal. So let's click No, I don't want to continue here.
I'll go up here and launch a terminal window. After it loads, I'll type 'sudo guymager' and press Enter. It prompts me for a password to continue as an admin, so I'll type that in here. Just a reminder, when you type passwords in Linux, the cursor doesn't move, and you think that you're not really typing. This is normal; it's a security feature. Your keyboard isn't broken. I press Enter, Guymager is launched, and now I can acquire images.
Acquire an Image 02:11-03:57 I'll make this full screen to take advantage of all the space. Right away, I notice I have three disks, or partitions. This first one is my hard drive for my Kali machine. I know that because it's a 20-gig disk, and that's what I used. This second one is what I'm after. I know this is it because it's a 2-gig disk, which I plugged in. To acquire an image, I simply right-click and choose Acquire Image from the menu.
Now we have a few choices for the file format. This one is called Expert Witness Format. When we select it, we have the option to fill out all this additional data that would be needed if this was part of a legal investigation. We're not going to pick that one. We're going to pick the Linux dd raw image. This is the format I'm going to use when it's time to examine the image content. Over here, we can split the file into smaller pieces. I have a smaller drive, so I could uncheck that box, but I'll just leave it as-is.
Now I need to put the images somewhere. I have a temp folder for these images, and I'll navigate to /home/dana/temp and click Choose to select that directory. I need to supply a filename, so I'll just enter 'Image1'. The program puts in the extension, so we don't have to do that. Below here, I'm going to make sure this box is checked so that we have the hash value of the image Calculate MD5. We're also going to verify the image after acquisition. Click Start to get the process going.
We have a very small drive, so this shouldn't take long. In fact, if you look at the progress, you can see we're moving along very nicely. It looks like it's finished, and the indicator light is green. We're done with this part, so let's verify that it acquired the images and saved. I'll minimize Guymager for now.
Verify Image Creation 03:57-04:28 Now let's go up to our Application Launcher and open up File Manager. Remember, we saved the image in a temp directory under /home/dana, and here it is. I'll slide the mouse over and double-click on temp to open it and view the contents. I can see three files. It does look like Guymager broke my file into two, since I checked the box to split files over 2 gigs. The third file is a log file. Let's open up that log and take a look.
Log File 04:28-05:18 My log file has some info about Guymager itself--the version, timestamp, and so on. I'll scroll down here a little ways. Now I see some information about disk size and other data. I want to go down a little farther, to here. This is more relevant information about the acquisition of the disk. I have the device name, /dev/sda, and the size, format, and so on. Down here, I can see the MD5 hash calculation.
Finally, here, we can see when the image was captured, how long it took, and the speed. At the very bottom, we can see the three files that were created when we ran the program. At this point, our disk is captured. The next step is to examine the contents with another forensic software tool designed to do so.
Summary 05:18-05:27 That's it for this demo. In this demo, we used Guymager to capture a drive.
7.1.8 Create a Forensic Drive Image with DC3DD
Click one of the buttons to take you to that part of the video.
Create Forensic Disk Image with DC3DD 00:00-01:32 In this demonstration, we're going to create a forensic drive image. It's very important that you understand you can't use standard file copying utilities to create a forensic drive image. You can't use, say, Windows Explorer or File Explorer. Those utilities copy files that have an entry, a record, in the allocation table of the partition where it resides, so it only copies data that's associated with a file or folder in the file system. When you're conducting a forensic investigation, you need all the data on that hard drive, especially the data that's not associated with a particular file or file in the file system, but is still on the hard disk drive. Basically, we're looking for stuff that's been deleted—stuff that someone may be trying to hide. We need to use a drive imaging utility to do this. There are a variety of utilities that you can use. Some cost a lot of money; some cost practically nothing. We're going to use the latter option in this demonstration today.
In this demo, we'll use dc3dd to obtain a raw image of a hard drive. dc3dd was developed at the Department of Defense's Cyber Crime Center, and it's basically an enhanced version of the open source dd command with added features for computer forensics. One of the main characteristics of dc3dd is that it offers the possibility of hashing on the fly with multiple algorithms (MD5, SHA-1, SHA-256, or SHA-512). You'll want to use a write blocker between your machine and the disk you're obtaining an image from.
Linux Storage Devices 01:32-02:20 Before we start looking at how to create the drive image, you need to understand how Linux storage devices are addressed by the Linux system. It's kind of difficult to understand when you're new to Linux, but all storage devices on Linux systems are addressed using a device file located in the /dev directory. If a process needs to write information to a hard disk drive, it writes it to a specific file in the /dev directory, which then redirects the IO data to the appropriate hardware device, such as a hard disk drive.
What we need to do is figure out what the device name is for the drive that we want to image. There are a variety of command line utilities you can use to do this. One way to find the forensic image is to use fdisk and the sudo fdisk 1 parameter.
Use fdisk to Identify Disks 02:20-03:32 I think we have enough information to get started. We could go to a terminal and start dc3dd, but I'm going to go up to the Application Launcher and start it from there. I'll come down to Forensics and then select Forensic Imaging Tools. I see dc3dd, so let's click on it and launch it.
The only reason I wanted to start it this way is so that you can see we have a nice manual here to learn more about how to use it. I'm not actually going to go over any of this in this information right here, but I will when we type some of the commands in a minute. I'm going to type 'clear' and get a clean screen to work with.
I like to see what disks I have to work with by typing 'sudo fdisk' with the 'l' parameter. Press Enter. Now put in the sudo password. The first disk we'll look at is this one, /dev/sdb. It's a 20-gig disk, and I know that this is the one with my Kali Linux installed on. But this isn't the disk I want to image.
If I go up a little, I see a second disk, /dev/sda. This one is 2 gigs. This is the one I want to image. Make sure you know which disk you're working with when you do this. I'll come down here and type 'clear' to clear the screen.
Using the dc3dd Command to Create a Forensic Drive Image 03:32-05:22 Now we need to type in the command to create the image, tell it where to find the disk, where to store the copy, which hash to use, and name the log file. I'll go ahead and type that in and then come back in a second and explain the command.
Okay, I have the command typed in. The first part is 'sudo dc3dd'. This just tells Linux to run our command as root, or basically like an admin in Windows. The next part, 'if=/dev/sda', is my input file. That's what the letters I-F stand for, input file. After that, we need to specify where our image will go. O-F stands for output file, so we've typed in 'of=/home/dana/temp/imaged2.img'. That's the path where I'll save my image file, and I named it 'image2.img'. Next, we'll use 'hash=sha256' for our hash type. We could use MD5 or one of the others types we listed in the intro of this demo, but this will work fine. The last thing we have is 'log=/home/dana/temp/image2.log'. As you can guess, this is just a log file, which is very important to have along with the disk image. It's going to be located in the same directory as our disk image. We'll look at after we create it.
This all looks really good. I'll press Enter to start the disk imaging. Down here, we can see the copy progress. Keep in mind that this is a very small disk without a lot of data, so it's going quickly. It looks like it's done. Down here, I can see when it completed. Up here is the location of the image file. I'll go up and close out of our terminal. Now let's go look in our temp file, confirm that it copied over, and look at our log file.
Verify Results 05:22-05:50 Next, we'll go up to Application Launcher and over to File Manager. I'll go over to my temp folder and double-click on it to open it. Here are my two files, my image file and my log file. Let's open that log now. It shows us things like the time the image started, the size, where the file was located, our hash value, the output filename, and the time it completed. Our next step would be to use another forensic tool to examine the image itself.
Summary 05:50-06:03 And that's it for this demo. We used the command line utility dc3dd to capture a forensic image from a disk.
7.1.9 Examine a Forensic Drive Image with Autopsy
Click one of the buttons to take you to that part of the video.
Examine a Forensic Drive Image with Autopsy 00:04-00:34 After a computer forensic investigator captures an image of a drive, they need to examine it. Autospy is a popular examination tool. It's digital forensic software that's free, open source, and said to have most of the features that you'd find in commercial digital forensics tools. Some of the features include, hash matching, registry analysis, and web analytics, and the ability to do a keyword search. For our demo, we're going to use Autopsy to analyze a disk that has been previously captured and saved to my hard drive.
Add Data Source 00:34-02:43 Double-click on it to start it. Sometimes it takes a minute or so for it to fully launch. We want to create a new case. Click on that option. We'll give it a case name, '1234 Mary Worley'. Let's specify the directory where we're going to store the information we're about to create. Let's put it in the same directory as our image file. We'll keep all the data together. I'll actually create a folder for it and name it 'Autopsy'. I'll select the folder we just created and then click Next. Enter in a case number, '1234 Mary Worley'. I'll put the examiner's name in here. I'll hit Finish.
This next part is going to take a minute or two while it creates the case and gathers all the files. I'll pause the demo while this is running.
Okay, that took several minutes, and now I'm presented with the Add Data Source page. We have to specify what we want to analyze. We're going to analyze a disk image or VM file. Click Next. We need to specify what image file we want to look at. It's in a folder called Forensic Images under 1234 Mary Worley. There's the image file that we created a minute ago. Hit Open. We need to set our time zone. I'm in Mountain Time, so I'll scroll down until I find that and select it. Click Next.
We have to specify exactly what we want to look for. This tool uses what's called Ingest Modules. An ingest module is basically just a piece of software that looks for a particular type of information in the image file. You can come over here and specify what you want to look for. For example, you could go under Keyword Search and specify what type of information you want that particular module to look for. We want to look for all of this information here, so I'll check all the boxes and click Next. Now let's go ahead and click Finish.
The process of analyzing the image file has started. It can take quite some time to complete, depending on the size of disk and amount of data. In my test environment, I don't have a very large disk or very much data, so it should happen pretty quickly. But I'll go ahead and pause the demo while it runs.
Identify Suspect Content 02:43-05:44 At this point, the image file has been thoroughly examined by the Autopsy tool, and the results are displayed here on the left, organized by the type of data or the view of the data that you want to use. It's very useful. For example, it sorts the data by the file type extension.
Let's click on Images. There are 43 of them. Let's see what we have. If I click this one, WACC classroom.jpg, I can see the image down here, in a preview pane. It looks like a picture of a computer lab or classroom.
See this one up here, with the red X? This is a file that was deleted on the hard drive. Of course, as you probably know, when you delete something, you don't actually delete it at all--you just delete the pointer, or reference to it. The file won't go away until the drive is formatted or overwritten. Even then, files are sometimes recoverable. Down in the preview, this looks like a screen shot of something.
I'll click on Videos. Over in the listing, I have four videos. One's been deleted. When I click on Audio, my list is the same as it was for videos, so Autopsy must recognize that there are audio files as part of the videos. Under Documents, I have some Microsoft Office documents. I could export those out and look at the contents in the supported programs if I wanted to. I have a few PDF documents as well, along with some plain text files. Once again, a few of these have been deleted, as you can see by the red X. I have no executable files to look at, so we'll skip those. Autopsy does give us a list of just the deleted files, all grouped together. That is handy if I was focused just on what Mary may have deleted and might be trying to hide.
I have a few more categories. We have Recycle Bin and something called User Content Suspected. I'll make my way down to the email addresses. Out of concern for confidentiality, I'm not going to open this up because I'm not sure exactly what's on this disk. Just to clarify, when we see things like emails addresses, IP addresses, URLs, and so on, it does not mean email accounts configured on the system, but any email that shows up on the disk in a document, spreadsheet, etc.
Under IP addresses, I see 0.1.2.3. This might be a simple false positive because the format is somewhat like an IP address. Under phone numbers, I have some phony-looking phone numbers. This looks like something from TV, since they have a 555 prefix. I have a bunch of URLs listed. This is handy for seeing where the person has been spending their time on the web.
I have Hashset Hits, but there's nothing there to see. Right under this, I actually have Email Messages, but there aren't any to look at on this disk. I have Credit Cards down here. Once again, I'm not going to click on those and open them because I'm not sure what I might find. And now we're at the bottom of the list.
Additional Features 05:44-06:04 Now, there are entire courses and degree programs on how to use this product and the whole legal process that goes along with it. This demo is a very brief overview of what the software is capable of doing. We didn't even look at things such as geolocation, timeline, report generation, or other features there's a lot more to learn!
Summary 06:04-06:13 That's it for this demonstration. In this demo, we used Autopsy to examine a disk image.
7.1.10 Change File Permissions with icacls
Click one of the buttons to take you to that part of the video.
Intro 00:00-00:46 A user's access to files and folders can be a big part of a company's security policy and a potential place to look for misconfigured users or permissions. Windows provides various methods for viewing and managing file permissions. In this demo, we're going to take a look at one such tool called icacls, which is a command line tool for viewing, managing, and backing up access control lists. To begin with, we'll need to open up the command line. In this case, I'll be using PowerShell. You can simply right-click on the start menu and select 'Windows PowerShell'. Now that we have PowerShell open, we can run icacls and see all the flags and parameters that can be used. As you can see, icacls can do a lot, but we're just going to go over the basics in this demo.
View Permissions with icacls 00:46-01:23 The first thing we're going to look at is simply viewing the current permissions for a folder. I've set up a simple file share folder at C:/FileShare. To view the permissions, I simply type 'icacls', followed by the path to the file or folder I want to view the permissions for. So I'll do that here for my demo folder. Great, now icacls spits out the permissions configured on this folder. I can see I have testuser in the DEMO domain configured. And if we scroll up, we can take a look at what these letters mean. We see that M stands for Modify Access. The other configured users and groups have the F, which we can see stands for Full Access.
Grant Permissions with icacls 01:23-02:04 Now, if we want to edit the permissions for this folder, we can do that with icacls as well. So I have another user that I'd like to give access to this folder. The way to do that with icacls is to again specify the folder or file that I want to edit and then use the '/grant' option and specify the user. In this case, it's 'bobjones', followed by a colon and the right I want to grant. So again, I can scroll up to the list of rights and see which one I need. In this case, I'll just choose Full Access, or 'F'. I press Enter and see that it's finished successfully. Now when I list the permissions again just as before, I see that our bobjones user is now there with Full Access.
Remove Permissions with icacls 02:04-02:29 I see that my testuser still has permission to modify this folder. Let's go ahead and remove that. With icacls I again specify the folder and now use the '/remove' option, followed by the user I want to remove. When I press Enter, I can see that it says successfully processed. And if I again list the permissions for my file share, I see testuser has been removed.
Back up/Save Permissions with icacls 02:29-03:20 So now let's say we have the permissions for our folder the way we want it and would like to back up this configuration. We can also do that with icacls. We again start with the folder that we'd like to work with. So, 'C:/FileShare' and then we use the '/save' option followed by the file we would like to save to. I'll just use 'C:/ACL_Backup.txt' and press Enter; you can see that it was successful. I can take a look at that backup file if I open File Explorer and navigate to where I saved it. So it was just to my C drive, and I can see it here. If I just double-click to open it, I can see that there's some info inside that lines up with the folder I selected, and the next line is the permissions, which are in a specific format that isn't going to be really useful for us. But icacls knows what it means.
Restore Permissions with icacls 03:20-04:35 Backing things up doesn't do us too much good if we can't restore from them. And of course, icacls gives us that ability as well. So, I'll quickly make a change to that folder's permissions by giving the testuser modify access again with the '/grant' option and 'M' for Modify. If I list the permissions again, I can see testuser has modify rights. Now we can restore from our backup and see a change. The restore process is a little different from the other commands we ran; it reads the paths out of the backup file, so we don't need to specify them in the command. So, the command will start the same with icacls, but now we point to just the C: drive, as that's the root of where our path in our backup file is. Then using the '/restore' option, we just need to point it to our backup .txt file. In my case, it's 'C:/ACL_Backup.txt'. When I press enter, I can see a success message, and if you look here you can see it's processed the correct FileShare folder that was in our backup file. If I again list out the permissions for my FileShare, I can see the permissions have been restored to what they were in my backup. So my testuser no longer has modify access.
Summary 04:35-04:56 That's it for this demo. In this demo, we went over the icacls tool built into Windows. We used it to view permissions for a specific folder. We also used it to grant and remove permissions to this folder for specific users. Then we used icacls to restore permissions for this folder.
7.1.11 Encrypt Data
Click one of the buttons to take you to that part of the video.
Data Encryption 00:00-00:15 In this demonstration, we're going to look at how cryptography works. We'll also look at the steps required to perform crypto analysis to recover information without having an encryption key.
CrypTool 00:15-00:55 The tool that we're going to use is called CrypTool, and you can get it here, at cryptool.org.
At the heart of modern cryptography algorithms is the idea that you have a key, either a symmetric or asymmetric key, to encrypt and decrypt information that you want to send privately across, say, the internet.
This tool has a number of different algorithms that we can use in order to encrypt sample documents. They have a sample document here, on the screen for us, that we can use.
To encrypt a document, I come up here, to the Encrypt/Decrypt, and I select modern algorithms. I'm going to select RC4 algorithm. And, in this case, we can specify the length of the key that we want to include.
Short Keys vs. Long Keys 00:55-04:16 I want to show you that shorter keys are very easy to crack, and longer keys take substantial amount of time if they're long enough.
So, here, we're going to select an eight-bit key length and I'm going to specify my key. I'll just say AD and encrypt the document.
Now we have the encrypted document. To decrypt it, if we already knew the key, we could just come to this Encrypt/Decrypt option again. But since we want to discover what the key is, we'll come over, here to Analysis, come down to Symmetric Encryption, and select the RC4 algorithm.
We'll go ahead and click Start, and it's already done. It's found possible key values. And you can see the possible decrypted values up here. And, of course, this looks like something what we would expect, and it says, "Hey, the key was AD." Go ahead and select that, and it goes ahead and decrypts the document for us.
So, that was very, very quick. It didn't take any time at all. Let's go ahead and increase our key length and see what happens. So, we'll come down to RC4 and try, instead, a 16-bit key length. We'll put in some numbers, and we'll encrypt.
And then we'll come over to Analysis and do the same thing, say, 16-bit key length, and start our analysis. And again, almost immediately, it comes back.
Let's go ahead and cancel out of that, and let's increase our key length over here and see some that start taking a little bit of time.
Now, of course, as processors get faster, you can do these things a lot easier. And in this case, it'll take just a couple seconds. But, as we get to a bigger key, it'll take substantially longer.
Comparing an RC4 24-bit, we're up to 10%. On my system, which is actually kind of beefy, it looks like it's going to take about 30 seconds or so to complete. Let's go ahead and wait for that.
Okay. Now that it's done, it shows us the possible decryption values. And, sure enough, the key that it discovered for us does decrypt and shows the original document.
Let's go ahead and just show one more. Let's come up and, instead of a 24-bit key, let's do a 32-bit key and put in some values. These are hex values, of course. And then we'll come over and do our analysis.
In this case, it looks like 32-bit on my machine will take about three hours to complete. Let's go ahead and just see what if we did a 56-bit key or higher.
We'll come back to the original document. I want to show you how this raises exponentially as you go on. So, let's do a 56-bit key, which is a reasonable length.
You wouldn't use that on the internet today, but in the early days, that was used, and it was found to be too weak by brute force analysis, as you might see here.
So, let's go 56-bit. We'll go ahead and start. You can see we're in to a lot of years in order to brute force with a single computer. Now, of course, we could cluster computers or use the cloud to decrypt these.
So many encryption algorithms are no longer considered secure, because you can do brute force analysis over many different computers. With enough computing power, you've got to be careful on the length of your key.
I hope this shows you that the length of the key matters. You always want a longer key if you want your data more secure.
Summary 04:16-04:33 So, in this demonstration, we explored the relationship between key length and the time it takes for a brute force attack to decrypt a document. And there are great free tools to help us with that.
7.1.12 Encrypt a Hard Disk
Click one of the buttons to take you to that part of the video.
Implementing BitLocker 00:00-00:27 To help protect your system's data, Microsoft's BitLocker is often used to encrypt and protect your hard disks. BitLocker can be enabled using various methods, such as from Control Panel, a PowerShell script, Group Policy, Intune, and other third-party applications. In this demonstration, we'll show you how to enable BitLocker on a Windows system using Control Panel and from PowerShell.
BitLocker Prerequisites 00:27-00:49 Before digging into the details, keep in mind that to use BitLocker, the computer on which it's being enabled must either have a Trusted Platform Module, or TPM, installed on the system, or the administrator must configure the Allow BitLocker without a compatible TPM policy. Since Windows 11 requires TMP, we won't have to worry about that second option.
Turn on BitLocker 00:49-03:18 To get started, let's open Control Panel using the Search feature. In Control Panel, let's select BitLocker Drive Encryption. From this window, you see that BitLocker is off. To enable BitLocker, you simply need to click Turn on BitLocker. You're then asked to choose where to save a copy of the recovery key. On a day-to-day basis, a recovery key isn't used. The key will only be needed to access the files and folders if there are problems unlocking the computer.
I'm going to select the option to save this recovery key to a file. Keep in mind that you can't save the key on the same drive which is being encrypted, and as indicated on the screen, it's best to keep the key in a safe place other than your PC. For now, I'll select this option, navigate to my E: drive and save the key in the BitLocker-Keys folder I created earlier.
With that saved, I'll click Next, and I'm given the option to select how much of the drive I want to be encrypted. The options are to encrypt the entire drive or the default, which is only to encrypt the used space. I'll use the default option, so I'll click Next.
The next option is to select the encryption mode to use. If you're working with Windows 10 version 1511 or newer, choose the New encryption mode. Remember that this mode isn't compatible with older versions of Windows, so if you're encrypting an external drive that may be used on an older version of Windows, select Compatible mode instead. I'll click Next to use the New encryption mode.
You're now ready to encrypt the drive. However, before doing so, notice that Microsoft recommends running the BitLocker system check to verify that BitLocker can read the recovery and encryption keys before encrypting the drive. Let's select that option and then click Continue. Notice that it reminds us that a restart is required, so let's go ahead and restart the system now.
Now that my computer has been restarted and I'm signed in, I can monitor the encryption process by coming down here and opening the dialog showing the encryption process. Okay, the disk is now encrypted. I'll now select Manage BitLocker, which opens Control Panel, to the BitLocker feature. From here, the status has changed to BitLocker on, and the drive is now protected.
Enable BitLocker with PowerShell 03:18-04:56 BitLocker can also be enabled from PowerShell. To show how that's done, let's turn BitLocker off and wait for the decrypting process to finish. With BitLocker now off, let's close Control Panel and open PowerShell as an Administrator.
To enable BitLocker on my C: drive, I must first enter Enable-BitLocker. Then, I'll add -MountPoint "C:" to specify which disk I want to encrypt. Next, I can specify an encryption method to use if I don't want to use the default of the new encryption mode. That's done by entering -EncryptionMethod and then the desired mode, such as AES128. However, I'll delete that option since I want to use the new encryption mode.
I want to specify how much of the disk I want to be encrypted, so I'll enter -UsedSpaceOnly. If you want to encrypt the entire drive, you just omit this option from the command. The final option is to specify the desired key protector. Since I want to use TPM, I'll add -TPMprotector.
When I press Enter, BitLocker is enabled, and I'm reminded that I need to restart the system, so let's do that now by running Restart-Computer. Now that I'm logged in, I can open the dialog that lets me see the status of the encryption process. With the encryption complete, I'll select Manage BitLocker, and I see that BitLocker is now enabled.
Summary 04:56-05:09 That's it for this demonstration. In this demonstration, we showed you how to enable BitLocker on a Windows server using Control Panel, as well as from PowerShell.
7.1.13 Wipe Disk Space
Click one of the buttons to take you to that part of the video.
Wipe a Disk 00:00-00:17 In this demonstration, we're going to spend some time talking about how you go about wiping a hard disk drive. Our goal in doing this is to overwrite the hard disk drive with so much junk that any data that was on the hard drive will be very, very difficult to retrieve.
DBAN 00:17-01:01 I've got an old system here that we're about ready to dispose of. We want to destroy all the data that's on the hard disk drive. In order to this, I downloaded this utility that you see here, it's called Darik's Boot and Nuke, or just DBAN for short.
DBAN's a very popular free tool that can be downloaded off of the internet to wipe hard disk drives. It comes as an ISO file. So, I've burned the ISO file to an optical disc and I have booted the system off of the optical disc instead of the hard disk drive.
Note at the top of the screen, there is a big warning that says, "This software irrecoverably destroys data." That's exactly what it's designed to do. So, don't use it on any system whose data you want to keep unless you are planning on reinstalling the operating system.
DBAN Commands 01:01-01:11 Before we start, I want to show you the list of available commands in DBAN. I'll do that by pressing the F3 key. There are several different types of wipes that we can run.
DoD Wipe 01:11-01:31 The first type of wipe is called a DoD wipe, which will wipe the hard disk drive using seven different passes of zeroes, ones, and random characters. There's also a DoD Short wipe that will run three passes of zeroes, ones, and random characters. This type of wipe is really the very bare minimum you should use for wiping a hard disk drive.
Gutmann Wipe 01:31-02:09 There's also a type of wipe called a Gutmann wipe. This is kind of overkill, in my opinion, but if you're really concerned about security, this is a good option. The Gutmann wipe will overwrite your hard disk drive with 35 different passes. That's probably more than is necessary.
Like I said, if you are security conscious and really concerned about the data that's on that drive, Gutmann might be an option. If you choose to use this type of wipe, be aware that it takes days. Sometimes I've seen it even take weeks to run. It takes quite a bit of time to write all that data to your hard disk drive, especially if you have a really big hard disk drive.
Quick Wipe 02:09-02:36 The last type of wipe is called Quick. This type of wipe runs just one pass. Most security experts do not consider one wiping pass to be sufficient. The bare minimum should be at least three, which is the DoD Short type of wipe.
The best option would be to use the DoD type wipe. With the DoD command It will run seven passes. That's what we're going to do here. I'm going to press F1 to return to the main screen.
Perform a Wipe 02:36-05:33 Let's wipe this disk using seven different passes. To do this, we will type 'dod' at the boot prompt and press Enter. The wiping process, or nuking process if you will, has started.
Notice at the top of the screen under options, we can see the type of disk wipe we are running. In this case, we're using the DoD 5220.22-M specification for running the write process. This writes random junk characters in seven different passes.
Over on the right under Statistics, we can see how long this process has been running and how long it's estimated to take to finish. As you can see, in order to run seven wipes off this hard disk drive, it's going to take probably about 4 1/2 hours to complete.
Be aware, I'm doing this on a demonstration system. It's got a really small hard disk in it, like a 40 GB hard drive. Therefore, if you are working with a system that has a 1 TB drive, 2 TB drive, or larger drive, then it's going to take a lot longer to complete the seven passes.
For each pass, it's got to write zeroes, ones, and random characters to every single storage block on that hard disk drive. That takes a long time to complete. We're going to go ahead and just let this process run.
That's how you wipe an entire hard disk drive. Be aware that the process we just looked at does just that. It wipes the entire hard disk drive.
Now, the process we just looked at does not work well in situations where we want to obliterate data on a live system. For example, on this computer, we have a folder on the C: drive called Sensitive. Sensitive documents are kept in this folder. When I'm done with them, I delete them, and then empty the Recycle Bin.
As you know, that does not delete the data from the hard drive, it just deletes the pointer to the file name itself. The file data is still on that hard drive until it's overwritten. That could take a very long time or it may never happen at all. We want to completely obliterate any file that is deleted from the file system. We don't want to touch any file that is still in use in the file system.
For example, I know that there is a file that was deleted from this folder that contains sensitive data and I need to get rid of it. I don't want to get rid of this file, nor do I want to get rid of any other files in the file system. I want to keep using the system. There are a variety of different third-party tools you can use to do this.
These utilities work in much the same manner as the disk wiping tool we just looked at. They overwrite areas of the disk with random characters multiple times in order to obliterate the data. The difference is, these utilities overwrite only the areas where a deleted file resides, not the entire hard disk drive.
There are a variety of different utilities you can use, some of them are automatic in nature. Once you install them on the system and delete a file, they will then automatically go in and overwrite areas of the hard disk drive where those deleted files reside. Others are manual in nature, meaning you have to manually run a command to do that. In fact, there's a command that comes with Windows that will do this very thing.
Use Cipher 05:33-06:53 Let's open up a command prompt with administrator level privileges. The name of the command is cipher. Before we run cipher, we need to change to the root of the hard disk drive. If I do a dir command, we see the sensitive folder right there.
We run cipher at the command prompt. Then, we use the /w option. The /w option is used to wipe areas of the disk where deleted files reside. By default, when I do this, it will write three passes of zeroes, ones, and random characters.
If I wanted to, I could run this command against the entire hard disk drive. In that case it would go through the entire hard disk drive and wipe all areas of the disk where deleted files reside. This would take a little while to complete.
So, what we want to do in this demonstration instead, is to just wipe the Sensitive folder located the root of the C: drive. We type : and then the name of folder that we want to clean, which is Sensitive. Press Enter and the process starts. It tells me, "Please close all other applications while running."
It will take a little while to complete. The cipher command is now going through all files associated with the Sensitive folder that have been deleted. It is overwriting those data areas with random characters, three different times.
Summary 06:53-07:19 That's it for this demonstration. In this demo, we talked about the importance of wiping hard disk drives. We first looked at wiping an entire hard disk drive prior to disposal using the DBAN utility. Then we looked at using the Cipher utility at the command prompt to wipe areas of the disk where deleted files reside without affecting any other files on the hard disk drive.
7.1.14 Recover Deleted Files with Recuva
Click one of the buttons to take you to that part of the video.
Recover Deleted Files with Recova 00:00-00:24 Recova is a free tool used to recover deleted files. Even though you might've thought your files were gone forever, that may not be the case. When files are deleted, it's just marked as free space. Over time, the files marked as free space will be used again, so that's why it's critical to recover files as soon as possible before they're overwritten.
Recover a File 00:24-01:56 Just to show some examples, we're going to look at some files I have in my Documents folder. I have a resume and a training schedule. Both are important documents. However, let's say I left my computer unlocked and someone intentionally deleted my files. This is one reason why it's a good idea to lock your computer when you're away from your desk. When I return, I notice the two missing files in the Documents folder.
Let's walk through how to recover the missing files. We're going to launch a utility called Recova. Keep in mind that you'll need admin privileges to launch this. First, we're going to select our file type. We know what we're looking for, so we're going to select Documents. If you aren't sure of the file type, you can always click All Files. Next, we're going to click on In My Documents because we knew our files were stored there. After that, just click Start. It'll take a second to scan the deleted files marked as free space, so we're going to go ahead and fast forward through this. Right here is a good example of why this is a last resort. Even though we know two files were deleted, only one is recoverable. Let's go ahead and recover this while we can. We're going to click the check box and then select Recover. Normally, when you're recovering a file, you don't write it to the same drive it came from, as this risks damaging the free space you're scanning from. So, we're going to select our E drive. Now that our file is restored, let's go out to that folder and see if the file is usable. We're going to go to File Explorer, E Drive, and then to the Recovery folder. When we open Jacks Training Schedule, we can see the file is still intact.
Wipe Your Drive 01:56-02:25 There are certain use cases where you may need to wipe the free space to make sure the data isn't recoverable. This can either be done by just cleaning the free space or wiping your whole drive. There are utilities out there, such as DBAN, that perform write-overs on all the space on a drive. Keep in mind when this is done it could greatly affect the longevity of the drive. That's why this is normally done when a PC is being decommissioned, donated, or sent elsewhere. You wouldn't want your data falling into the wrong hands.
Summary 02:25-02:44 That's it for this demo. In this demo, we went over how to recover a deleted file. We showed you that it would be a last resort to recover a file, as it isn't guaranteed the file will be usable again. Backups are a preferred method to retrieve your data.