Section 5.1 Reconnaissance
As you study this section, answer the following questions:
- What is reconnaissance?
- What tools do hackers use to gather information?
- What is the difference between passive and active reconnaissance?
- What type of information can be gathered during the reconnaissance phase?
- How can social networking, Google hacking, and search engines be used to gather information?
In this section, you will learn to:
- Define reconnaissance
- Understand the difference between active and passive reconnaissance
- Understand the concept of enumeration
The key terms for this section include:
| Term | Definition |
|---|---|
| Enumeration | To list items one by one. During the enumeration phase of reconnaissance, you extract and record as much information as you can about a network or system. Enumeration is one of the most efficient ways to scout a network and determine the best plan of attack. |
| Passive reconnaissance | Information-gathering techniques that do not draw attention to and cannot be traced back to the hacker. |
| Active reconnaissance | Information-gathering techniques that draw attention to or can be traced back to the attacker. |
This section helps you prepare for the following certification exam objectives:
| Exam | Objective |
|---|---|
| CompTIA CySA+ CS0-003 | 1.1 Explain the importance of system and network architecture concepts in security operations
1.2 Given a scenario, analyze indicators of potentially malicious activity
1.3 Given a scenario, use appropriate tools or techniques to determine malicious activity
2.1 Given a scenario, implement vulnerability scanning methods and concepts
2.2 Given a scenario, analyze output from vulnerability assessment tools
2.4 Given a scenario, recommend controls to mitigate attacks and software vulnerabilities
3.2 Given a scenario, perform incident response activities
|
| TestOut CyberDefense Pro | 1.1 Monitor networks
1.2 Monitor software and systems
3.2 Implement system hardening
3.3 Perform penetration tests
4.1 Manage security incidents
4.2 Manage devices
4.3 Analyze indicators of compromise
|
5.1.1 Reconnaissance Processes
Click one of the buttons to take you to that part of the video.
Reconnaissance Processes 00:00-00:13 In this lesson, we're going to discuss the reconnaissance processes. We'll talk about enumeration as well as active and passive reconnaissance processes.
Reconnaissance 00:13-00:34 Think of a movie where the bad guys "case the joint," or where the law enforcement agency camps out in a van for days at a time to gather information. Although they're on opposite sides of the law, these situations have something in common: reconnaissance. Reconnaissance is a systematic attempt to locate, gather, identify, and record information about a target.
Enumeration 00:34-00:52 To enumerate is to list items one by one. During the enumeration phase of reconnaissance, you'll extract and record as much information as you can about a network or system. Enumeration is one of the most efficient ways to scout a network and determine the best plan of attack.
Passive Reconnaissance 00:52-01:35 When passive reconnaissance is performed, it can't be traced back to the actor. A bad guy could sit and listen to people talking in a bar, follow targets on social media, or browse public websites as a normal user or other websites that contain public information about companies, locations, employees, or other commonly known information. This is the beginning stage of reconnaissance.
Now let's look at a few of the tools that malicious actors use for reconnaissance. You've probably used Google to complete a basic search. But did you know that, by adding a few operators, a bad guy can find some very specific information? This is commonly called Google hacking. Despite its name, Google hacking is legal because it happens on a public site.
Active Reconnaissance 01:35-02:06 Active reconnaissance is the dangerous part for the hacker. In this stage, they leave digital footprints. Some of these footprints are easy to find, and some are much more difficult. The hacker uses well known, open-source tools to crack passwords, exploit vulnerable ports, start a phishing campaign, conduct pretexting, or use other techniques. The more an attacker is forced to expose themselves, the more likely they are to be discovered. The best defense against active reconnaissance is active monitoring.
Summary 02:06-02:30 And that's it for this lesson. In this video, we talked about what reconnaissance is and how it can be active or passive. We discussed that as bad guys discover information about a company, they make lists, and this is called enumeration. By actively monitoring for attacks, you can thwart attacks more quickly and defend your assets.
5.1.2 Reconnaissance Tools Facts
There are several reconnaissance tools that you can use to gather information.
This lesson covers the following topics:
- Internet research tools
- Google hacking
- Network footprinting tools
- Nmap
Internet Research Tools
The following table identifies several internet research tools:
| Tool | Description |
|---|---|
| Google Earth | A satellite imagery tool that provides current and historical images of most locations. Images can date back several decades. |
| Google Maps | A web mapping service that provides a street view of houses, businesses, roadways, and topologies. |
| Webcams | Online streaming digital cameras that can provide video of places, people, and activity in an area. |
| Echosec | A tool that can be used to pull information from social media postings that were made using location services. You can select a location on a map and view all posts that have occurred at that location. These results can be filtered by user, date, or keyword. |
| Maltego | An open-source forensics tool that can be used to pull information from social media postings and find relationships between companies, people, email addresses, and other information. |
| Wayback Machine | A nonprofit catalog of old site snapshots. It can contain information the target thought had been removed from the internet. |
| Recon-ng | Recon-ng has a syntax and use that parallels Metasploit Framework, but Recon-ng is focused on performing web-based reconnaissance. Recon-ng uses workspaces to help organize information, and its functionality can be greatly expanded through the use of numerous add-on modules. Recon-ng can speed up the collection of host and domain information, quickly revealing an organization's external footprint to an attacker, such as IP addresses, subdomains, software versions, and many other attributes. Analysts can also use it to review and monitor an organization's footprint to ensure it complies with policy and other security mandates. 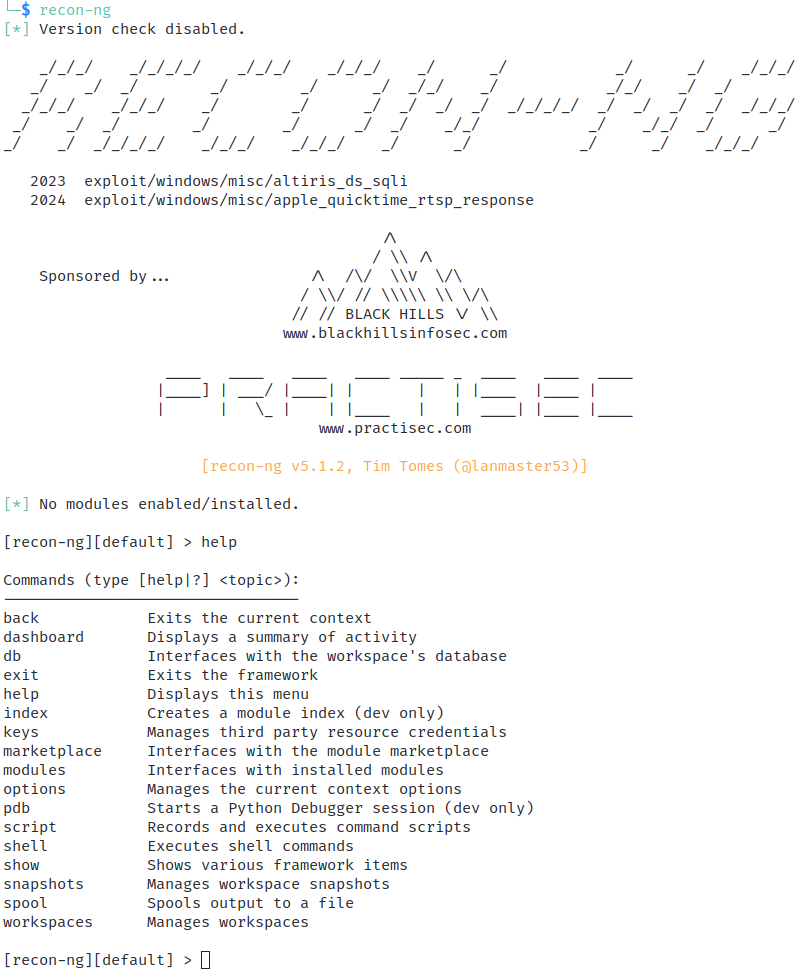 |

Google Hacking
Despite its name, Google hacking is legal; all results are pulled from public websites. By adding a few operators, you can use the Google search engine to provide filtered information about a specific topic, as shown in the following table:
| Search | Information Provided |
|---|---|
| info:website | Provides all information about a website |
| link:website | Lists web pages that contain links to websites |
| related:website | Displays websites similar to the one listed |
| index of /keyword | Displays websites in which directory browsing has been enabled |
| intitle:keyword | Shows results in pages that contain the keyword in the title |
| allinurl:keywords | Shows results in pages that contain all of the listed keywords |
Network Footprinting Tools
Although similar to reconnaissance, footprinting refers specifically to obtaining information about an organization's computer systems. Be aware of the following about footprinting.
- Website and email footprinting can provide details on information flow, operating systems, filenames, and network connections.
- Depending on the level of security within an organization, it is possible to create a network map without entering the physical location of the network.
- Just as a mail carrier can find a mailbox using a mailing address, a hacker can find hosts and other objects on a network using DNS network addressing.
- An IP address can direct you to a network access point such as an email or web server.
The following table lists several network footprinting tools.
| Tool | Description |
|---|---|
| Whois lookup | A web-based utility used to gather information about a target network. It can gather such things as ownership, IP address, domain name, location, server type, and the date the site was created. After accessing the website, enter the domain name (such as www.testout.com) in the search field. Example whois sites include:
|
| nslookup | A utility that queries DNS servers to obtain information about the host network, including DNS records and hostnames. nslookup [hostname] [nameserver] |
| American Registry for Internet Numbers (ARIN) | ARIN (ARIN.net) is a nonprofit, member-based organization that administers IP addresses & ASNs to support the operation and growth of the internet. Once an ARIN account has been created, you can view your internet number resources, request additional resources, initiate transfer requests for resources, reassign IP addresses to your customers, and more. |
Nmap
Nmap Security Scanner ( nmap.org ) is an additional fingerprinting tool that uses diverse methods of host discovery. The tool is open-source cross-platform.
Nmap performs scans against a host to determine which services it is running. Port scanning can be time-consuming on large networks and is non-stealthy. Simple host discovery can be accomplished using Nmap with the -sn switch to skip port scanning.
The following represent some of the main types of scanning that Nmap can perform:
TCP SYN ( -sS)- This is a fast technique, also called half-open scanning, as the scanning host requests a connection without acknowledging it. The target's response to the scan's SYN packet identifies the port state.TCP connect ( -sT)- A half-open scan requires Nmap to have privileged access to the network driver to craft packets. If privileged access is unavailable, Nmap must use the OS to attempt a full TCP connection. This type of scan is less stealthy.TCP flags- You can scan by setting TCP headers in unusual ways. A Null ( -sN) scan sets the header bit to zero, a FIN ( -sF) scan sends an unexpected FIN packet, and an Xmas scan ( -sX) sets the FIN, PSH, and URG flags. This was a means of defeating early types of firewalls and IDS.UDP scans ( -sU)- Scan UDP ports. As these do not use ACKs, Nmap needs to wait for a response or timeout to determine the port state, so that UDP scanning can take a long time. A UDP scan can be combined with a TCP scan.Port range ( -p)- By default, Nmap scans 1,000 commonly used ports. Use the -p argument to specify a port range or use ‑‑exclude‑ports instead.
While some scans are more stealthy than others, a well-configured IDS can detect the vast majority of Nmap scanning techniques.
While Nmap scanning is often associated with malicious activity, Nmap is a useful tool for security analysts to review the configuration of a system in the environment. For example, to look for unauthorized web servers, an analyst can easily probe ports 80 and 443 on a network of hosts using Nmap. Similarly, Nmap's built-in script-scanning functionality can be used by an analyst to check for the presence of known vulnerabilities or misconfigurations.
Nmap Port States
The results of service discovery will be a list of ports scanned on the target IP and the state detected for each port. The following states can be identified with regular TCP scans:
- Open - An application on the host is accepting connections.
- Closed -The port responds to probes (with a reset [RST] packet), but no application is available to accept connections.
- Filtered - Nmap cannot probe the port, usually because a firewall is silently discarding the probes.
Some types of scanning classify port states where the scan is unable to determine a reliable result:
- Unfiltered - Nmap can probe the port but cannot determine whether it is open or closed. This port state is used with an ACK scan, the purpose of which is to test a firewall ruleset.
- Open|Filtered - Reported by some types of scans (notably UDP and IP protocol) when Nmap cannot determine if the port is open or filtered.
- Closed|Filtered - Reported by TCP Idle scans that cannot determine whether the port is closed or filtered.
Nmap Output Options
Nmap output scan results can be saved to a file instead of only displayed to the console. Several options exist, including the following:
- Normal (- oN) - Human-readable output directed to a file for analysis later.
- XML ( -oX) - Output using XML formatting to delimit the information.
- Grepable output ( -oG) - Delimits the output using one line for each host and tab, slash, and comma characters for fields. This format makes it easier to parse the output using the grep command.
Examples of uses of the nmap command are:
nmap -sS hostname/IP address- The -sS (scan Stealth) command line flag is a TCP SYN scan that scans thousands of ports per second.
- The results show the ports found, the state (open or closed), and the service using the port.
- The -sS flag is the default flag.
nmap -p- hostname/IP address- nmap-p- scans the entire range of ports beginning with port 1.
- You can also specify the ports to scan:
- -p 22 scans only port 22.
- -p 22,25,80 scans for ports 22, 25, and port 80.
- -p-200 scans ports 1-100.
nmap ---top-ports- Scans the top ports used based on Fyodor’s latest internet research on open ports on the internet.
- nmap ---top-ports 50 172.26.125.24 scans only the top 50 ports on host 172.26.125.24.
The following video helps explain how to analyze the output from fingerprinting scans using Nmap.
Video
Click one of the buttons to take you to that part of the video.
Analyzing Output from Fingerprinting Scans 00:00-00:39 When it comes to operating system fingerprinting, Nmap is the poster child for that and here is a typical kind of hello world simple use of an Nmap. One thing that you can do here is in this case not necessarily fingerprinting. But what you're doing is you're taking a look using the -SV.
And what it does is it goes through and does a scan of of all of the different ports on this particular system. And you can even discover the operating system using the -oh option.
Example 00:39-03:36 So let me show you that real quick. I ran a scan, a very noisy one over the entire network.And what you're looking at here, let me resize this real quick so you can get a better look at it here. There we go, is I used the -oh option and that fingerprints and I ran it against the entire subnet, took forever and and again, it was very noisy.
But what this did it returns some interesting information. First of all, it went through and checked out all the different ports that were open on each system. So can you guess what kind of system we have here? But what's interesting is that this particular copy of Nmap probably cuz I'm in a virtualized environment couldn't really discover exactly what that TCP fingerprint is and let me explain.
When you send Nmap after a particular resource, and issue it against a particular system using the -oh option. What it does is it goes and talks to the system and Nmap has a very good database usually of what those responses look like. And it's kind of like people's accents.
Let's say there are ten people who speak English. Somebody's from the north of England, somebody's from the south of England, somebody speaks English as a second language from Venezuela. I'm James, I'm from Seattle, so I have a western kind of accent. We all speak the same language, but we have different nuances and inflections.
Well, if you have a good enough database that can tell where those accents come from, then you can say well that person probably came from Venezuela, that person probably came from the north of England. That's what Nmap basically does. And so but when it compares things to a database and it sees an accent or hears an accent that it doesn't quite understand, it will give you the TCP IP fingerprint.
That's what it calls it because it says and all of this information here is basically it saying I don't know exactly what it is, but here's the information. And what you can actually do is you can submit that to the folks who maintain Nmap if they haven't gotten it already.
But this one here has done a pretty good job of actually capturing the operating system for this particular one. This one here says, it's in fact here on 192.168.224.3, it notices not only the open ports, it's got Apache server open on it. But it gives me a very definite, this is running a specific Linux Kernel and it is kernel three, maybe kernel four, and then it's saying by the way that it's also on the same network one hub.
This one here, once again, it found a version of Linux and it found versions of OpenSSH and Apache Open, but it couldn't quite tell what kernel was running there. It did tell me that it was virtualized though through a virtual nick. So you can see there are additional operating systems, couldn't figure this one out quite either.
Summary 03:36-04:09 So it's important to understand that the readout of how this works and also some of the conditions that can make it so that operating system fingerprinting doesn't quite work exactly how you would expect. Sometimes through multiple hops, things will the accent will get lost in translation as it were.
Other times because of virtualization you'll get Nmap will get responses that it can't quite figure out the operating system, but it can get awfully close and sometimes we're on the money.
5.1.3 Perform a Scan with Nmap
Perform a Scan with Nmap 00:00-00:46
Nmap, or Network Mapper, is a free open-source network scanner that discovers hosts and services on a computer network by sending packets and analyzing the responses. Nmap provides a number of features for probing computer networks, including service detection, operating system detection, and host discovery. These features are extended by the use of scripts that provide more advanced service detection. In this demo, we're going to explore nmap and many of its uses. Right off the bat, I'm going to tell you that we're only going to cover a fraction of nmap's features. There are entire courses about nmap; it has hundreds and hundreds of uses.
Getting Started 00:46-01:10
So, with that, let's get started. I'm on this Kali Linux system, and I have a terminal open. I'm going to do an ifconfig because I want to figure out what subnet I'm on. My IP address is up here, and the subnet mask is over here. So, based on the IP address of 10.10.10.197 and the subnet mask, I can pretty much assume that my usable IP range will go from 10.10.10.1 to 254.
The -F Scan 01:10-01:54
The first, most basic command is ‘nmap 10.10.10.0/24'. Now, if I were to run this command just like this, it would scan every IP address on this subnet and a whole bunch of ports on each device. This could take a long time. To speed things up a bit, I'm going to modify our scan and add -F to do a fast scan. Notice that this is a capital F, not lowercase. When I do the scan now, nmap will scan only 100 ports on each device, which will cut down the amount of time to complete the scan. Now I'll press Enter and wait. The scan is finished. It scanned 256 IP addresses and three hosts, and it took a bit over 13 seconds to complete.
The -O Scan 01:54-02:21
The next scan will detect the operating system on the remote system. It doesn't always work, but we'll go ahead and give it a try. The command to do this is 'nmap -O 10.10.10.1'. And after I press Enter, I get some information about the OS. I can see that I have Linux running, and the kernel is 4.4. Now that I have this information, it could help me find out what types of vulnerabilities this system has.
The -sV Scan 02:21-02:52
Okay. Now I want to find the versions of the services running on a system. For that, I can do a version scan. This is done with the command 'nmap -sV 10.10.10.1'. Press Enter. Now, in addition to seeing the service running, I also see the version of the service. I can see that OpenSSH 7.4 is running. Along with this version of DNS, I have Apache, down here. With this information, I can do some research and see if there are any known issues that I should be aware of.
Port Range Scan 02:52-03:13
Now, let's say I'm only interested in a range of ports. I can tell Nmap to just scan a range of ports with the command 'nmap 10.10.10.1 -p80-443'. I press Enter, and you can see that it only returned those ports from that range. I see my port 80, port 179, and port 443.
UDP Scan 03:13-03:32
All the scans so far have been TCP scans. Now, let's do a UDP scan. I do that by typing 'nmap -sU 10.10.10.1'. And when I press Enter, I see some new ports here. I have ports 161, 500, 1900, and 5351.
Save Scan to Text File 03:32-04:15
Sometimes, you might do a scan, but you want to save the information for later. You can have the output go into a text file. To do that, I would type in my command, such as 'nmap -sS 10.10.10.1 -oN scan.txt', and press Enter. So, I told nmap to do a default SYN scan, but to save it to a text file called scan.txt. Now, this is not only displaying my results, but it also wrote the output to a text file.
Let's save the results. If I want to look at these, I'll type in 'cat scan.txt' and press Enter. And here's the output again. There might be a time or two when you want to send Nmap scan results to someone, and this is one way of doing it.
Summary 04:15-04:37
That's it for this demo. In this demo, we discussed some of the ways to use Nmap. We stated that this is just barely a fraction of the types of scans available with Nmap. We did a few examples of scans and then viewed the results. We ended this demo by showing how to write and save scan results to a text file.
5.1.4 Perform a Scan with Nmap Scripts
Scan with Nmap Scripts 00:00-00:24
Nmap, or Network Mapper, can do a lot of things to make a security analyst's job easier. But everyday Nmap's functions are limited. To get the most out of Nmap, you will want to be familiar with the Nmap Scripting Engine. If you're using Kali Linux, this program is installed by default. In this demo, we're going to explore how to use some of the scripts that come with the Nmap Scripting Engine.
Script Location 00:24-00:46
Before we look at a few of these in the terminal, let's see where these scripts are located. I've browsed here already; the path is Computer > usr > share > nmap > scripts. Let's go ahead and open one of these in a text editor to see what it looks like. You might want to write your own scripts if you know how. I'm just going to stick to the ones already written by someone else.
Let's close these windows.
Scanning and Script Explanation 00:46-01:20
Like every demo in this course, we're either scanning systems we own or have permission to scan. Nmap actually has a site that you can scan for practice, scanme.nmap.org. If you read this, here, it basically says you're welcome to do a few scans a day, not hundreds. Okay. I'm fine with that deal. I hope that you use the site for practice and respect their rules.
While we're here, let's take a look at the scripts. You can see a very long list of the scripts and what they do. At last count, there are 594 scripts listed here, but we're only going to use a couple. Okay, I'll close this.
Grab a Banner 01:20-02:09
All right. I have a terminal here, and I want to start out with something simple, the Banner script. Let's type in 'nmap --script banner 10.10.10.1' and press Enter. I'll wait for it complete. It looks like I've got some stuff here. I have some information about port 22 and SSH. I can see the versions of SSH right here.
Now, let's try the same thing, but target the Nmap site. I'll type in 'nmap --script banner scanme.nmap.org', press Enter, and wait. Okay. It looks we have some good stuff here. First, it displays the Nmap scan report with the IP of the site.
Down here, I see port 22 and SSH along with the version. It looks like Ubuntu is the server. And down here, port 9929 is giving me some info I might want to read.
Grab HTTP Headers 02:09-02:53
Now, let's go out and grab a server's HTTP headers. I'll type in 'nmap --script http-headers 10.10.10.1' and press Enter. Here, you can see the http headers for port 80 and, down here, for port 443.
Once again, let's do the same script, but target the scanme.nmap site. We'll type 'nmap --script http-headers scanme.nmap.org' and press Enter. Here, we can see it scanned the site. Down a bit, I can see my header information. They're running an Apache web server on Ubuntu. I don't see port 443 here anywhere, which is odd.
Find FTP Anonymous Logins 02:53-03:27
You might want to avoid having FTP servers with anonymous logins on your network. There's an Nmap script designed to detect these. Let's type in 'nmap - -script ftp-anon - -script-trace -p 21 10.10.10.196' and press Enter. This is a Windows system that has Internet Information Services running on it with FTP enabled. You can see, here, that I do, indeed, see that Anonymous FTP logins are allowed bad idea.
Find Domain Info 03:27-04:11
Now let's see what other fun thing we can do with Nmap scripts. We'll search the whois database and find information about a particular website. To do that, I'll type in 'nmap --script whois-domain tampicoil.com' and press Enter. Now, let's scroll way to the top, and you can see our script, here. There's a bunch of ports open. Keep going down. Here's the domain name, tampicoil.com. Down a little farther, I can see it's registered at GoDaddy. Go down a bit more, and my name servers are listed with HostGator. This tells me that the domain is registered at GoDaddy, but the site itself is hosted at HostGator. And the rest of this is things like terms of use and other information.
Summary 04:11-04:39
Well, that's it for this demo. In this demo, we discussed the scripting engine that comes with Nmap. We looked at the file location for the scripts and visited the Nmap website to review the terms of use for scanning their site. We did a variety of scans on a few different targets using scripts. We did a banner grab, examined some HTTP headers, found an anonymous FTP login, and did a whois lookup.
5.1.6 NMAP Fingerprint Facts
This lesson covers the following topics:
- Nmap fingerprinting concepts
- Analyze output from fingerprinting scans (video)
Nmap Fingerprinting Concepts
-sV
- Protocol —Do not assume that a port is being used for its well-known application protocol. Nmap can scan traffic to verify whether it matches the expected signature (HTTP, DNS, SMTP, and so on).
- Application name and version —The software operating the port, such as Apache web server or Internet Information Services (IIS) web server.
- OS type and version —Use the -o switch to enable OS fingerprinting (or -A to use both OS fingerprinting and version discovery).
- Device type —Not all network devices are PCs. Nmap can identify switches and routers or other types of networked device, such as NAS boxes, printers, and webcams.
- Hostname —Find a device's hostname.

Nmap fingerprinting scan results. (Screenshot Nmap nmap.org .)
In this example, we see Nmap scan output showing an Apache HTTP server configured to use port 8080, which is a common alternative port. Notice that the service and version clearly identify the software that is in use.
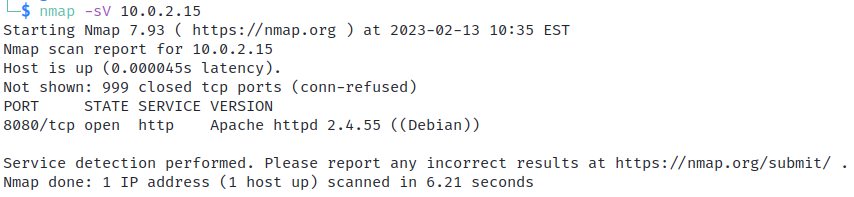
An Nmap scan showing an Apache HTTP server running on port 8080. (Screenshot courtesy of CompTIA.)
In contrast, the following Nmap scan shows that the host is listening on port 8080 like before, but the service is listed as tcpwrapped and the version is blank. This scan result is highly suspicious and, in this case, reveals that a netcat listener is running on the host.
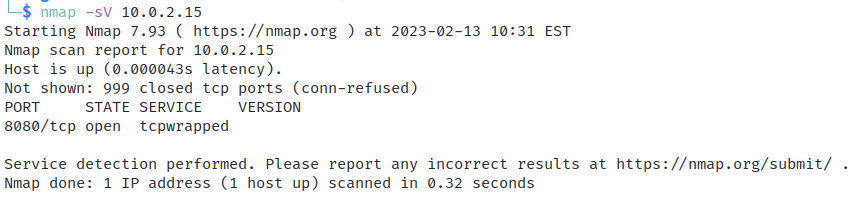
An Nmap scan showing a suspicious service running on port 8080. (Screenshot courtesy of CompTIA.)
Nmap comes with a database of application and version fingerprint signatures, classified using a standard syntax called Common Platform Enumeration (CPE). Unmatched responses can be submitted to a web URL for analysis by the community.
The functionality of the Nmap tool can be extended with Nmap Scripting Engine (NSE) scripts written in the Lua scripting language ( lua.org ). Nmap probes can use a default set of scripts with the -sC or -A switches. The --script argument allows the user to specify scripts by name or category.
Some of the more detailed probing that can be carried out using scripts includes the following:
- OS detection and platform enumeration
- Windows user account discovery
- Identification of a logged-on Windows user
- Basic vulnerability detection performance
- Probing of web servers to gather HTTP data and identify web applications
- Adding geolocation to traceroute probes
Analyze Output from Fingerprinting Scans
This video explores how to understand the output produced by topology and host enumeration tools.
Video
Click one of the buttons to take you to that part of the video. Analyzing Output from Fingerprinting Scans 00:00-00:39 When it comes to operating system fingerprinting, Nmap is the poster child for that and here is a typical kind of hello world simple use of an Nmap. One thing that you can do here is in this case not necessarily fingerprinting. But what you're doing is you're taking a look using the -SV.
And what it does is it goes through and does a scan of of all of the different ports on this particular system. And you can even discover the operating system using the -oh option.
Example 00:39-03:36 So let me show you that real quick. I ran a scan, a very noisy one over the entire network.And what you're looking at here, let me resize this real quick so you can get a better look at it here. There we go, is I used the -oh option and that fingerprints and I ran it against the entire subnet, took forever and and again, it was very noisy.
But what this did it returns some interesting information. First of all, it went through and checked out all the different ports that were open on each system. So can you guess what kind of system we have here? But what's interesting is that this particular copy of Nmap probably cuz I'm in a virtualized environment couldn't really discover exactly what that TCP fingerprint is and let me explain.
When you send Nmap after a particular resource, and issue it against a particular system using the -oh option. What it does is it goes and talks to the system and Nmap has a very good database usually of what those responses look like. And it's kind of like people's accents.
Let's say there are ten people who speak English. Somebody's from the north of England, somebody's from the south of England, somebody speaks English as a second language from Venezuela. I'm James, I'm from Seattle, so I have a western kind of accent. We all speak the same language, but we have different nuances and inflections.
Well, if you have a good enough database that can tell where those accents come from, then you can say well that person probably came from Venezuela, that person probably came from the north of England. That's what Nmap basically does. And so but when it compares things to a database and it sees an accent or hears an accent that it doesn't quite understand, it will give you the TCP IP fingerprint.
That's what it calls it because it says and all of this information here is basically it saying I don't know exactly what it is, but here's the information. And what you can actually do is you can submit that to the folks who maintain Nmap if they haven't gotten it already.
But this one here has done a pretty good job of actually capturing the operating system for this particular one. This one here says, it's in fact here on 192.168.224.3, it notices not only the open ports, it's got Apache server open on it. But it gives me a very definite, this is running a specific Linux Kernel and it is kernel three, maybe kernel four, and then it's saying by the way that it's also on the same network one hub.
This one here, once again, it found a version of Linux and it found versions of OpenSSH and Apache Open, but it couldn't quite tell what kernel was running there. It did tell me that it was virtualized though through a virtual nick. So you can see there are additional operating systems, couldn't figure this one out quite either.
Summary 03:36-04:09 So it's important to understand that the readout of how this works and also some of the conditions that can make it so that operating system fingerprinting doesn't quite work exactly how you would expect. Sometimes through multiple hops, things will the accent will get lost in translation as it were.
Other times because of virtualization you'll get Nmap will get responses that it can't quite figure out the operating system, but it can get awfully close and sometimes we're on the money.
5.1.7 Scan for IoT with Nmap
Click one of the buttons to take you to that part of the video.
Scan for IoT with Nmap 00:00-00:25 Today, most networks have so many devices connected to them, it's really easy to forget how many smart devices you run at the office and at home. It's a good idea to run a scan every once in a while to inventory what is connected, and you need to be aware of what programs those devices are running. There are many tools you can use to do this. In this demo, we're going to use Nmap to scan for IoT devices.
Use Nmap to Find Devices 00:25-01:40 Let's get started. I'm on my Kali Linux machine here, and I've typed in the Nmap command. It looks very complicated, but typically, if you know what you want to scan for, you can do a search on the web to find out what syntax to enter. Let's break this command down.
The first part is obvious: we're using Nmap for this scan.
-n says to skip DNS resolution. This will speed up the scan.
-Pn will treat all hosts as if they're online. We don't want to skip any.
-sSU tells Nmap to do both TCP SYN and UDP scans.
-pT tells us the range of ports to scan. So does capital U.
Then we have -v for verbosity level and -A to detect the OS and version, followed by the IP and subnet mask.
If this scan weren't for demo purposes, I would leave it as-is, start the scan, and perhaps go home for the night and check the results in the morning. But, earlier, I did this scan, and it took hours to complete. So, to speed things up a bit, I'm going to modify it a little. First, I'm going to just scan one device, and I'm going to skip the UDP scan. I'll press Enter and let it start scanning. This is still going to take a little bit of time, so I'll pause the recording and let it run.
Scan Results 01:40-02:55 Okay, my scan is complete. Let's scroll up and take a look at a few things. First, I have TCP ports 80 and 9999 open. Remember, I skipped UDP, so there could be more.
I'll scroll down, and here, you can see that the device is a TP-LINK Smartplug. Here's something interesting: "tcpwrapped." A little research told me that this a normal response for this device. The device doesn't know why I'm trying to communicate with it, so it's refusing to answer because I have an unauthorized IP address.
I know that this device is a smart-plug device. But if I didn't know that, I could look up the first six values of the MAC address, which identify the manufacturer.
The next few lines, here, tell me that we're running Linux, specifically Linux version 2.6.17. This is information that I might find useful; I can use it to see if there are any vulnerabilities with this version. It looks like this device has been running for 33 days. I have lots of other information here, too.
So, with that scan, I was able to find a lot of information about this device. Again, if this weren't just a demo, I would have done a complete scan of the network, including UDP ports. I also would have dumped this scan into a text file for further analysis and documentation.
Summary 02:55-03:24 That's it for this demo. In this demo, we used Nmap to scan our network for Internet of Things devices. We broke down the syntax of our search and explained that a full scan would take hours. We demonstrated a modified scan on one device, and we were able to identify the device and the ports used. We discovered a new term, tcpwrapper, and verified that this was a normal response to a scan for this device.
5.1.8 Conduct Vulnerability Scans
Click one of the buttons to take you to that part of the video.
Conduct Vulnerability Scans 00:00-00:44 Throughout this course, we talk about many scanning methods. Typically, you scan for a specific purpose, often to look for vulnerabilities. Vulnerability scanning attempts to find points that someone could potentially exploit on a computer or network.
A vulnerability scan can detect and sometimes classify system weaknesses in computers, networks, and other equipment. The scan can also predict the effectiveness of countermeasures that you might implement. A scan may be performed by an IT department or someone hired to perform a penetration test. There are several good tools that perform vulnerability scanning. But if you're on a budget, you can use Nmap with a script, the Nmap Scripting Engine, to do a vulnerability scan.
Get the Nmap Script 00:44-01:45 I'm on a Kali Linux system. This system comes with a whole bunch of scripts, but the one we want isn't included. That's not a problem; we can go out to the web and find it. To get the script, we'll go to Github.
I've already located the webpage with the script. This is the one that we want. I'll open that link. Down here, in the description, it says that the script uses some well-known service to provide information about vulnerabilities. That's really not a great description, but I happen to know that it works pretty well.
To get the script, you need to click on this Clone or Download link and copy the address. Now, we'll open the terminal, type in ‘git clone', paste in the rest of the address, and press Enter on the keyboard. I've already done that, so I won't do it again.
When I was doing this, I wasn't paying attention, and it went into the root directory, so I had to go in and move it to the /usr/share/nmap/scripts directory so Nmap knows where to find it by default. If you have some basic Linux skills, it shouldn't be a problem to move to the directory before downloading the script.
Run the Script 01:45-03:20 All right. On my network, I have a Windows 10 system, and I've installed XAMPP on it with some web pages, php, forms, and so on. I want to put it out there facing the public internet. But I'm not sure if it has any vulnerabilities. This is my example. I could also have other systems that I can scan. But for this demo, I'm just going to scan this particular system.
Since I'm familiar with this system, I already know the IP address. To begin, I want to just do a regular service scan with nmap to see what we get. For that, I'll type in ‘nmap -sV 10.10.10.195' and press Enter. It takes a few seconds to get the results. When it's done, you can see that I have a few open ports and services running. As I already mentioned, this system is running a web server, Apache, along with other services, so I'm concerned about it. Now let's run this scan with the script.
To run the script, we'll type ‘nmap - -script nmap-vulners -sV 10.10.10.195' and press Enter. This will take a few seconds.
The scan is done. Now we have some additional information. Right here, we have some information under Apache and port 443. I'm going to hold down the Ctrl key and click on this hyperlink. It'll open Firefox, and I'll go to the page where I can read more about this particular vulnerability. I'll scroll down. Under the description, it tells me exactly what this issue is. It looks like someone could execute some code, so it's probably not something I want to let loose on the web until I do more research and fix any problems.
Other Scripts 03:20-03:37 While we're in Firefox, let's jump back over to the Github tab. I'll go back a page. There are other scripts here that do some additional scans. If you have a test environment (and you should), you can download others and see what type of results you can get. Remember that you can run multiple scripts in one scan.
Summary 03:37-04:03 That's it for this demo. In this demo, we used Nmap and the Nmap Scripting Engine to do a vulnerability scan on a Windows 10 system running XAMPP. First, we went to Github to locate the scripts we needed. Then we did a regular service scan with Nmap. We did another scan using the script, and then we used the web to learn more about one of the vulnerabilities that the script found.
5.1.9 Disable DNS Zone Transfers
Click one of the buttons to take you to that part of the video.
Examining DNS Attacks 00:00-00:15 In this demo, we're going to look at a few ways an attacker may use the DNS system to get information about the computers in an organization, and also to compromise a machine and get access to information.
Reconnaissance Using DNS Servers 00:15-01:43 Let's first look at doing reconnaissance using DNS servers. One way this can be done is with the nslookup command.
You see that I have a PowerShell command prompt window open here, and if you just type 'nslookup', that will put you into this utility. nslookup is used to troubleshoot DNS server settings.
You can see here that the DNS server that I'll be using is this one. It's the default one that I have configured for my machine here. When a computer wants to resolve a name, the first thing it does is look into a special file called a host file.
We'll talk more about that later, but essentially the host file can contain mappings between domain names and specific IP addresses. If it's not in the host file, then an operating system checks its DNS cache.
If the mapping is in there, then it uses the IP address that it finds. If not, it goes out and does the name resolution with the DNS server that's configured.
In this case, nslookup simply allows us to do those queries by passing the cache that might be on a local operating system.
So, if we want to, here, we can simply type in the name that we want to resolve like 'google.com', and it will go out and resolve that. My DNS server here goes out and says, I don't know what IP address that is associated with.
And then it issues the query to the resolver that it's pointing to. And you see here the IP address of www.google.com. Of course, we can try other ones like testout.com and others in you'll see that the resolution occurs appropriately.
For this demo, I've set up a domain that we can use to see how a few vulnerabilities work.
Domain Information 01:43-02:15 One vulnerability that exists with DNS servers is the ability to find out all the domain information associated with a particular name. One way we can do that is using the list command.
We specify the domain that we want using the '-d' flag; and then we can say ajptech.net. This will tell us all of the computers that are associated with the ajptech domain.
If you do that, you see that we have a full list of all the machines.
Now, this is just a test environment. I've just listed a few servers, etc.
Zone Transfer 02:15-04:39 You can imagine in an organization that has hundreds of computers, this provides very nice information to know which IP addresses we should spend time attacking, based on these records.
This is referred to as a zone transfer, and we need to make sure that our DNS servers in our organization don't allow zone transfers to just anyone.
They're useful because you don't want just a single server, and so you want to share those records with other secondary zones, but you need to restrict who is allowed to do those zone transfers.
Let's take a look at that, inside of Windows Server 2019. You see here I have launched the DNS manager on the server.
If you haven't installed that role before, it's super simple to do, and you do so before configuring these different zones. Let's go ahead and look at some of the properties that you might want to set.
The one that's of most interest to us right now is this Zone Transfers tab. This basically specifies who is allowed to gather all those records at once, and you can see here that we have 'To any server'.
We could come in and just say, 'No zone transfers are allowed.' But as I explained a minute ago, that's useful, because if this is the primary zone for that domain name, then you want to have a secondary zone.
You don't want a single point of failure here, and so you want to be able to allow zone transfers.
You can only allow servers in the Name Servers tab, which is nice because usually you set those up specific to a domain, and that would be anything that's listed here, or you can restrict it to a specific IP address.
Let's go ahead and apply those settings. Let's say that we're going to only allow the following servers, and I'll just put in a fake IP address here right now. It won't resolve right now, but that's okay. But it will restrict those zone transfers.
Let's go ahead and switch back over to our PowerShell window, and let's try that same command. You can see now that it says it has refused transferring all that information from the zone--perfect.
Now when people are doing reconnaissance, they won't be able to see everything that we have in that zone.
However, the domain name server continues to work, so I can say server1, and you can see that that name resolution continues to work. So, make sure you secure your zone transfers.
Today, restricting zone transfers is commonplace; in fact, it's the default of many operating systems, and it's the best practice everybody should have. If your DNS server isn't configured that way, you want to make sure that you take care of that. Now let's move on to a couple of other concepts.
Distributor Reflection 04:39-06:42 There are many different DNS attacks, such as distributor reflection, denial of service attacks, cache poisoning, TCP send floods, and others.
Let me just briefly explain one of these to give you a flavor.
A distributor reflection denial of service attack occurs when several DNS queries are sent to a DNS server that has an open resolver, and that DNS server responds to the spoofed address with a large payload.
The key to the attack is that the attacker only has to send a small packet of information to the DNS server, and then the DNS server sends a large response, but that response doesn't go back to the attacker; it sends it to the target that the attacker listed, using a spoofed source IP address.
In short, the attacker uses the DNS to create a denial of service attack against the third party. In this case, you need to make sure that you don't have any open resolvers.
An open resolver is essentially a DNS server that's willing to resolve names for third parties.
Usually you protect this in a couple of different ways--either restricting the DNS requests that come into your DNS server, that is, you don't allow outside requests; or simply not having any forwarding capabilities associated with your DNS server, and making sure that recursion is disabled on your DNS server.
Let me show you that setting quickly here. If you come to your server, you'll see the properties of the server itself. We are in the zone from before. We're going to go over here to the Advanced tab.
You want to make sure that this option is set, so that you disable the recursion. That, of course, disables the forwarders as indicated there. I'll say OK there.
Then I'll come over to the Forwarders tab here. You can see that I'm set up, but it's not using those anymore. The downside of this is we need to use a different DNS server in order to do our name resolution.
This server now can only do name resolution for the domains that are on it, but that's okay. That's best practice. You definitely don't want to be susceptible to those amplification attacks that I just explained.
Let's come back here to our PowerShell prompt and get out of the nslookup command.
Let me show you a couple of other things. I'll go ahead and clear the screen, as well.
Clear out the Cache 06:42-08:21 A minute ago, I explained that when name resolution needs to occur on an operating system, it first checks the set host file, and then it goes to cache, sees what's in cache and uses that if there is something that's associated with that name, and then it goes and does the name resolution using the DNS system.
Let's go ahead and take a look at that cache.
But before we do so, we need to make sure that we have something in cache. I'll simply go ahead and try to ping google.com. You can see that I get a response.
Now, to see what's in cache, you simply say 'ipconfig /displaydns'. You can see that I have several different entries in there.
I have some of those entries because I have a browser running on my system, and it's already resolved some names. Let's go ahead and try to clear that out. To clear out your cache, you type 'ipconfig /flushdns'.
Let's ping google.com, and then let's go ahead and see if we can see just those name resolutions.
You can see here there is only one record now when we display the dns cache.
So, this cache constantly keeps track of what's been resolved previously so it doesn't have to invoke the DNS system for every single request if it already knows that information. It saves time.
Each of these records also has a time to live, as you can see there, and so they're constantly refreshing as the system is being used.
One mistake that some people come across when they're trying to resolve DNS issues is they forget to clear out their cache.
They hit a site that's in cache, they make some changes, and they don't realize that it's actually pulling it out of cache instead of going on. I want to make sure you're aware of how cache works.
The Host File 08:21-11:26 Now what if we could poison the cache or insert a record in there that wasn't legitimate, that came from another source?
This is a little bit harder to architect, but if we could specify a different IP address for the name server, the DNS server, we could pull records from it. It would be saved in the cache or locally, and then subsequent resolutions would pull the IP address out of the cache.
Indeed, that's one attack that individuals use when exploiting the DNS system. We're not going to show that to you today, but I want to show you one other concept before we wrap up this demo, and that has to do with the host file that I mentioned a few minutes ago.
This is the host file I mentioned a minute ago, and you can see that it's located in Windows System32\drivers\etc\hosts. In this file, you can include specific mappings between a domain name and an IP address.
Before there was this DNS system, this file was distributed to all the computers on the internet, and so there's just a huge file of these mappings so that you wouldn't have to remember the specific IP addresses.
Thankfully, the DNS system came along, making our lives a lot easier and being allowed to update, but this is still in place. And as I mentioned, it gets checked before the OS resolver cache, before going out to the DNS system to resolve domain names.
You can see an example of how you can use this. But before I put in an example, let me show you a legitimate site so that you can see how this works. Let's go to cat-bounce.com, just a random site.
You can see that there's something out there. If we want to redirect individuals, instead of them going to this site to a different site, we can go into the host file and add a mapping that we're interested in.
You can see that we put the IP address first, and then the domain name. So, I know that the duckduckgo server is at the following address, and then I can simply put 'www.cat-bounce.com', and I'll save that.
Recent browsers have incorporated a DNS cache inside of the browser itself.
They do this because it gives them a competitive advantage to go ahead and resolve those domain names ahead of time, the minute that they show up on a page and that you might potentially click on.
Lets open an incognito window to bypass the cache.
If we go to www.cat-bounce.com, you see that it forwards on duckduckgo.com. I hope you can see how dangerous this could be. This is considered host file manipulation.
However, an attacker could simply keep that in place and use. An innocent individual wouldn't have any idea that you weren't on the legitimate site.
Consider banking sites or corporate sites, anywhere where sensitive information might be shared. An attacker can get access to this host file, present what looks to be a legitimate website, and then siphon off data as you use it.
It's also good to know that you can use host file to block malicious information, if you are a systems administrator.
This is a common site. It looks a little dated, but the information is pretty good on it. You can come and download a specific host file to block out a bunch of bad or malicious sites.
The IP address you see is a null IP address. In other words, if we added this to our host file and you went there, it simply wouldn't go anywhere.
One thing to note, you'll need to have administrator rights to adjust the host file.
That's it for this demo. In this demo, we've look at a few ways that an attacker can use the DNS system to get out information about computers in the organization and to compromise a machine and eventually grab sensitive information.
Summary 11:26-11:55 We've looked at the nslookup command. We've looked at zone transfers. We've looked at securing the open resolvers. And we've looked at the host file and clearing cache.
It's really important that you protect your DNS servers and make sure that you aren't taken advantage of in that way.
5.1.11 Extract Web Server Information
Click one of the buttons to take you to that part of the video.
Extract Web Server Information 00:00-00:44 Testing web servers and web applications is a multi-step process. There are many things to test, including functionality, usability, compatibility, performance, security, and the interface. In this demo, we're going to focus on security. We want to be sure our site and servers are safe from potential attacks. There are several tools that can help us accomplish this testing objectives. One of them is Zed Attack Proxy (ZAP), a tool created by OWASP, the Open Web Application Security Project.
ZAP is a free security tool and that's maintained by volunteers. It helps you automatically find security vulnerabilities in web applications by both web developers and penetration testers.
Let's go ahead and use ZAP to do a scan.
Use ZAP 00:44-02:03 ZAP comes on Kali Linux. I've already logged in to this machine. We're going to do a high-level overview of the program and hit just a few of the features. To learn the program well, you would want to spend several hours working with it.
To open the program, I'll go to up to Applications > Web Application Analysis and select owasp-zap from the list. It takes a few minutes for it to open.
I'm going to say no, I don't want to persist the ZAP session. If we say yes to persist a session, the session information will be saved in the local database so you can access it later. That's fine, but we aren't going to do that for now.
To get things going, I'm going to enter in a website to scan. I'm going to use a site I set up to be vulnerable for testing. Don't attack a website that you don't have permission to attack. It's against the law. The site I'm attacking is '10.10.10.195/dvwa', and I'll click on Attack. While that's scanning, let's look at a few of the options on the program.
The interface is pretty typical-looking. It has its menu bar, toolbar, tree view, the workspace window, and an information area down here.
On the menu bar, we have a variety of options we can set. As I move across, you can see the different options. If I stop over the Report menu item, you can see we can generate a report of our scan in some different formats such as HTML, XML, and so on.
View Results 02:03-03:21 It looks like my scan is done, so let's click on Sites. Now come over and select the Response tab, up here. Since this site requires a login, what we can see is limited, but this is still a great way to start our testing.
Let's look at the tree view. I've selected the site I just scanned; I can see some header information over in the right pane. I have an Apache web server running. It's using OpenSSL and PHP version 7.3.3. If I come back over to the tree view and start expanding these out, I get information about each file on the web server. I can keep going down until I find information about the type of login and authentication method that's used on the site.
Let's move down to the information area. First, let's click on Active Scan. Here, you can see the scan's progress in real time. Ours is done, so not much is happening here.
Under Alerts, we can see a list of vulnerabilities that we want to be aware of. They're marked by flags, which are listed as high, medium, low, informational, and false positives. I have some mediums and some lows. If I click on this top one, I can see more information in the pane to the right. Down a little bit, it tells me exactly what the issue is in more detail. This one says that it's possible to view the directory listing. So, in other words, all my scripts and code are visible to a potential hacker.
Reports 03:21-04:03 The whole reason to do these types of scans is to gather information for a report for the penetration test or to correct issues if you're working on the server or web application. I mentioned reports earlier, so let's go back up to our menu and select Reports. I'll choose Generate HTML Report. I'll just call it 'test', save it in Documents, and click on Save. The report automatically opens, so let's take a look.
Once our report is open, you can see basically the same information that we did from our Alerts tab in the program. The program created these hyperlinks, so we can jump around and view our information. I can now use this report to send to someone, include it in a penetration test report, or use it for reference while working on the programs.
Next Steps 04:03-04:13 As I mentioned earlier, we only did a high-level overview of the program. There's a lot more you can do with it. As a final reminder, only scan sites and servers that you have permission to scan.
Summary 04:13-04:31 That's it for this demo. In this demo, we used ZAP to scan a web server and application. Then we viewed the results to identify potential vulnerabilities in the program. We ended this demo by creating a report that contains the results.
5.1.13 Detect Promiscuous Mode
Click one of the buttons to take you to that part of the video.
Detect Promiscuous Mode 00:00-00:50 Network sniffing is part of using network monitoring and analyzer tools to diagnose and prevent network-related problems such as traffic bottlenecks. Malicious users use sniffing tools to sniff, intercept, and steal information, or, sometimes, to spoof it. User login credentials, emails, instant messages, and data are all susceptible to sniffing.
Typically, when someone is sniffing a network, their network card is in promiscuous mode. This is a mode for a network interface card that causes all traffic it receives to be sent to the computer, rather than passing only the frames specifically addressed to that system. That's just a quick summary, but all that information is prerequisite to this course, so we're going to move on now. In this demo, we want to figure out how to tell if a network card is running in promiscuous mode.
Detect Sniffing 00:50-01:46 I'm on a Windows 10 system. We're going to use this system to do our sniffing. Let's open this command prompt. I'm going to do a ipconfig to verify this IP address. (This IP ends with .195 I'll need to remember that for later.) I'm done with the command prompt. Now we need to launch Wireshark. Once we start Wireshark, I want to make sure that promiscuous mode is enabled. Let's go to Edit and then down to Preferences. Once our Preferences window appears, we want to go to Capture. This check box, here, is checked by default. When this is checked, it lets the network card on this computer know that it should pass all traffic to the machine, not just the frames addressed to it. So, this is what we want. I'll click OK to exit this window. Now I'm going to click the shark fin to start sniffing traffic. It looks like it's started sniffing, so let's switch over to a Kali Linux system.
Okay.
Use Nmap to Detect Sniffing 01:46-02:38 I'm on this Kali Linux system, and I have a terminal open. There are a variety of tools that can be used to detect sniffing on a network. Some are free, and some aren't. It seems Nmap can do nearly anything, including finding a system that's sniffing the network. To do this, we'll run nmap with a script. I'll start by typing 'nmap -sV - -script=sniffer-detect 10.10.10.195'. Press Enter. I used nmap -sV to display the version, script, and IP address, the IP of the Windows 10 machine we did an ipconfig on at the beginning of the demo. The scan ran, and it took about 13 seconds. Here, it says, "Host script results, sniffer-detect likely in promiscuous mode." It also shows all 1s.
Countermeasure to Sniffing 02:38-02:55 So, Nmap determined that the machine is running in promiscuous mode. That's great. But the downside is that I would have to run this script when I suspect that someone is sniffing my network, which isn't optimal. It's better to prevent sniffing in the first place by encrypting all data, using a switched network, and implementing VLANs.
Summary 02:55-03:15 That's it for this demo. In this demo, we started a Windows 10 system and ran Wireshark. We illustrated how Wireshark will have the network interface card run in promiscuous mode. Then we used a script along with nmap to verify that the Windows 10 machine was running in promiscuous mode.
5.1.14 Perform a SYN Flood
Click one of the buttons to take you to that part of the video.
Perform a SYN Flood 00:00-00:53 You may have already heard about a three-way handshake in network communication, but let's quickly review it again. A three-way handshake starts when a client sends a connection request to a server, saying, "Let's connect." This is called a SYN message. The server acknowledges this request by sending a SYN-ACK message back to the client, saying, "Okay, I'll talk to you." Then the client sends back an ACK message, saying, "Great, we're talking." This is a three-way handshake.
In a SYN flood attack, only part of this process happens. The attacker, or the client, doesn't respond back to the final ACK message. The server sits and waits with a half-open connection that's never completed, denying others communication with the server in the meantime. Another method is to spoof the IP address so the server responds to the spoofed IP address, never getting any response.
I'm going to demonstrate how all this works.
First, we need a victim for demonstration purposes.
Identify the Victim 00:53-01:58 I've already identified the IP address of my victim on my Kali Linux system, and I've run Zenmap against it. I scanned for all open ports from 0 to 65535. Here, you can see that we have all these ports. We're going to attack port 135. I'll minimize Zenmap for now.
To get an idea of what happens during this attack, let's open up the victim machine. It's a Windows 10 machine, and I've installed Wireshark on it. I'm going to go ahead and open Wireshark by clicking on the shark fin. We're doing this to see what happens when this machine is attacked.
I'm also going to come open Task Manager. We need the Performance tab. You can see my CPU is relaxed. We had a spike here, probably when we opened Wireshark. Down here, we really have no Ethernet activity. I actually need to go back over to Wireshark and click the shark fin to start sniffing traffic. I'll just leave for now and go back to Kali Linux.
I'm in Kali Linux, and we're going to use Metasploit for this.
Run the Metasploit Database 01:58-02:33 First, I'll open a terminal here. After it opens, I want to start the database. The Kali Linux Network Services Policy states that no network services, including database services, will run on boot by default, so we need to get the database going in order to get Metasploit up and running with database support. From the terminal, we'll type ‘service postgresql start' and press Enter. This starts the database that we'll need. A lot of times, I'll forget to do this, and you'll get an error letting you know it can't connect to the database.
All right. Now, let's start Metasploit.
Load the SYN Flood Module in Metasploit 02:33-03:20 Type in ‘msfconsole' and press Enter. This sometimes takes a few minutes to get started, so be patient. I'll adjust the terminal window and clear the screen.
Now, with Metasploit up and running, I want to search for SYN flood. I'll type in ‘search synflood' and press Enter. And I get a matching module.
This is easy because there's only one module listed, so that's the one we're going to use. I'll use that module by copying this part, here. We'll type in ‘use', paste in auxiliary/dos/tcp/synflood, and press Enter.
Now you can see that it loaded that module here, in red. We want to see the options for using this, so let's type ‘show options'.
Okay. There are a few things we need to do here.
Configure SYN Flood Options 03:20-04:24 We need to configure the remote host, shown here. I also want to configure the remote port. If you remember from our Zenmap scan, that's going to be port 135. I'm also going to spoof my IP address, down here. Okay. Let's configure these.
I'll start with the remote target. I'll type in ‘set RHOST 10.10.10.195' and press Enter.
Let's set the remote port, ‘set RPORT 135', and press Enter.
Next, let's set the spoofed IP address by typing ‘set SHOST 10.10.10.50'. I just randomly picked that 50, but I do know that this IP isn't used on my network.
Now, let's look at our options again by typing ‘show options'. We have everything in there, and it's just the way we planned, so it looks like we're ready to attack. I'll type ‘clear' to clean up the screen.
To run the exploit and start SYN Flood, we just type in ‘exploit' and press Enter.
Run SYN Flood Exploit 04:24-05:35 It says, "Hey, I'm SYN flooding 10.10.10.195 on port 135." Well, to be sure, let's jump back over to our Windows 10, the victim, and see what's going on.
I'm on the Windows 10 machine. First, let's look at Wireshark. I have a ton of traffic going from 10.50 as to 10.195. Over here, you can see that SYN requests are happening. I'm going to stop sniffing here. Now let's highlight one of these. If I look in the lower pane, I can see one thing, the source's MAC address. It ends in 1c. That can help me determine the attacker's real IP address, since the MAC isn't spoofed. Now let's look at Task Manger.
As you recall, we looked at the CPU and Ethernet usage here. You can see that my CPU is a little higher than what it was previously; but it's not as high as I would have guessed. Also, if you look at the Ethernet, you can see that it's really busy. Remember, that's an attack from just one machine. Imagine if it were coming from 10 machines or hundreds of machines. It wouldn't take much to overwhelm this system.
So, how do you stop SYN floods from happening?
Countermeasures for SYN Floods 05:35-05:53 There are several methods. Admins used to block the port of the incoming SYN requests, but that didn't work very well. Now, admins can use SYN cookies, RST cookies, filtering, and Microblocks to mitigate SYN flood attacks, as well as other methods.
That's it for this demo.
Summary 05:53-06:21 In this demo, we started by reviewing the three-way TCP handshake. We discussed how a SYN flood begins with an incomplete handshake, leaving the server sitting and waiting. We performed a SYN flood using Metasploit. We viewed Wireshark and our performance on the victim machine to analyze the attack's effect. We ended by talking about a few of the countermeasures that help prevent SYN flooding.
5.1.16 Disable IIS Banner Broadcasting
Click one of the buttons to take you to that part of the video.
Disable IIS Banner Broadcasting 00:00-00:25 It seems that software and hardware manufacturers love to use banners to tell the world what software is running on a piece of equipment. Unfortunately, hackers love it too. As a countermeasure, you can disable banner broadcasting. In this demo, we'll disable the HTTP response on a Windows server running Internet Information Services (IIS).
Remove Normal HTTP Response Headers 00:25-01:33 There are a few ways you can obscure or remove response headers. One way to obscure the response headers is to rewrite the message with blank text. In this demo, we'll show you how to remove the headers.
We're on a Windows server with IIS, installed. The first thing we'll do is type 'Server Manager' in the search box. Next, we'll open IIS by going to Tools. Over here, in the left pane, we'll expand the Server name and do the same thing for Sites.
We'll select the Demo site here. When we do, we get several items over here. We want to double-click HTTP Response Headers. We'll highlight each header and delete the ones that we don't want. We'll select the first one. Then come over here and select Remove. We'll get a message that asks if we want to remove the selected header. We'll click Yes. We'll do the same thing for this other one. Say Yes again to confirm, and then we're done.
Depending on the server setup, you may have more than what we have here.
Summary 01:33-01:47 That's it for this demo. We removed the HTTP response headers from the Windows server to prevent information from being shared about our web server.